TL;DR – How to create a custom logic app connector, so you can store your API key securely and use it within your playbooks, when there is no pre-built connector.
I’ve had this discussion with at least three different partners recently, so I am publishing this blog to share with anyone else that may have the same question, since it seems to be a popular one recently.
As you know Logic Apps are used for automation within various Microsoft security services, including Sentinel (playbooks), Defender for Cloud (workflow automation), and others. Most of the time there is an existing connector, but sometimes SOC teams need to connect to custom developed APIs, and that’s where this scenario comes in. In those cases, we still need to store those API keys in a secure manner. That’s especially the case if you are managing playbooks within your customer’s workspaces (MSSP architecture) and you need to ensure any connection information is stored in a secure manner.
Create the custom connector
Note: “Custom connectors are RESTful APIs that can be hosted anywhere, as long as a well-documented Swagger is available and conforms to OpenAPI standards. A custom connector can also be created for a SOAP API using the WSDL that describes the SOAP service.“
To create the custom connector, go to the Azure portal and search for “Logic apps custom connector“.
You will just need to enter the default information, name, region, resource group, etc.
Note: Make sure your new Logic App Custom Connector exists in the same region your playbooks exist, otherwise you won’t be able to find it.
Once that’s done you will need to ‘Edit‘ your connector to specify the import mode, where you can use an OpenAPI definition, or a Postman collection, as shown below. You can also modify the icon for your connector. The host and base URL will be filled in automatically based on your imported info.
Here is where we’ll choose the authentication type, which in my case is an API key.
And then I can select the various Actions and Triggers I will need for my connector, as shown below.
For additional information and options in this section, please reference the Logic Apps documentation.
Using the connector within a playbook
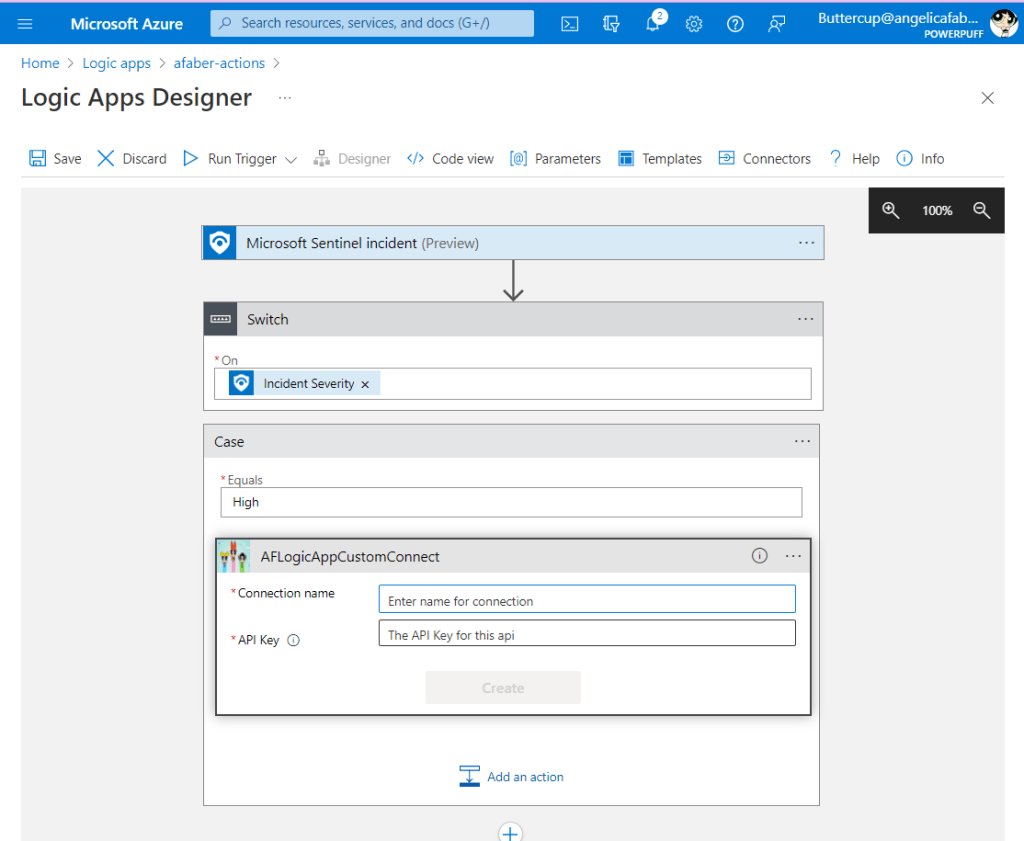
Now that I have a connector and at least one action, I can create a new Logic App where I can connect to my custom API. I’ll find it under the ‘Custom‘ tab when choosing an operation, as shown below.
Once I select the action, I’ll be presented with the menu to enter my new connection name and the API key, as show below.
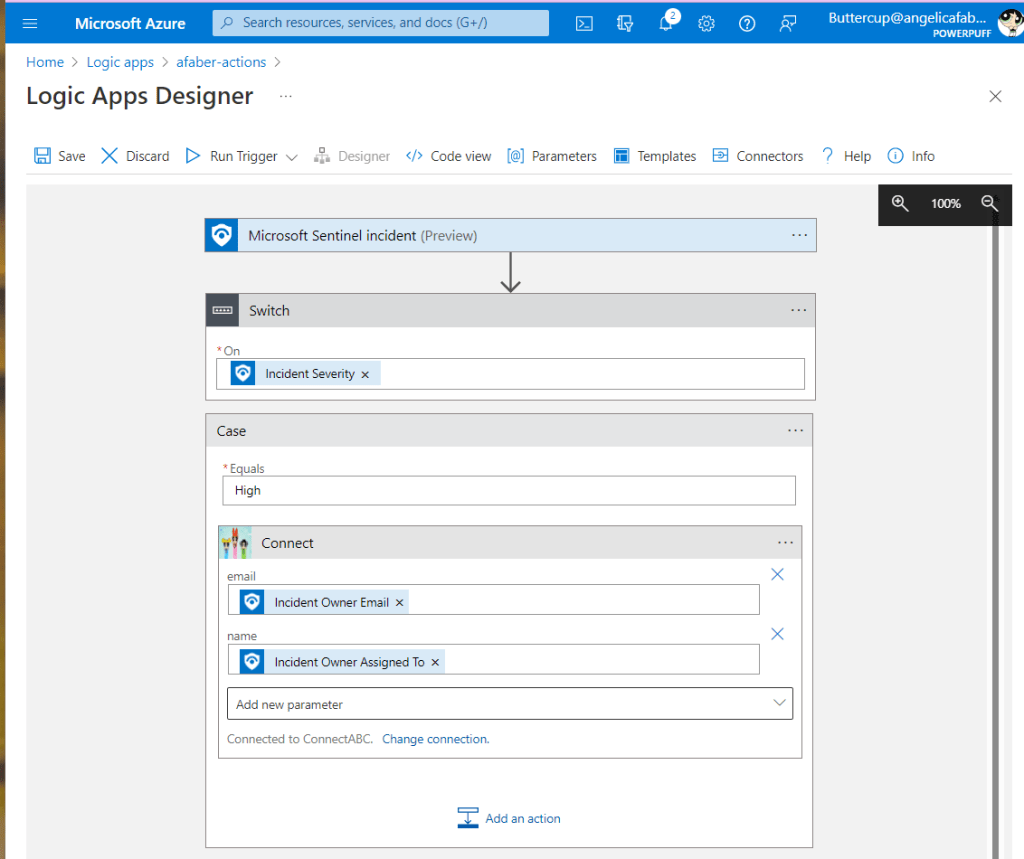
Once I save my creatively named connection, ConnectABC, my API key will be stored securely.
I can also configure any additional parameters that I need for the connection, as shown below.
The connection I created is now stored under the ‘API connections‘ blade within my logic app menu, as shown below.
And it’s not a value that I can see, which is why it’s secure! However, I can update it if I need to do so later on, as shown below:
I am still learning about Logic Apps and the incredible flexibility they offer as part of our SOAR features within the Microsoft security services. I hope you find this information useful and continue to explore with me!
TL;DR – Steps to create access reviews that meet strict compliance requirements by allowing auditors to review any “Don’t know” reviewees prior to the end of a review.
This is a short blog post to document the steps to create an access review that ensures strict compliance requirements around attestation are met. This is a scenario that came up last week while I was delivering one of the Rockstar training sessions and I can’t believe I haven’t documented this yet, so here it is!
The challenge
Many auditors have a requirement to ensure reviewers of access to groups, applications, etc. provide definitive answers. The challenge here is that Access Reviews within Entra Identity Governance provide an option for reviewers to choose “Approve“, “Deny“, or “Don’t know”. So, you can see how “Don’t know” does not meet that definitive answer requirement.
The solution
Fortunately, Access Reviews also provides a feature that allows us to configure multi-stage access reviews, with up to three stages. And within that feature, there is the option to only move to the next stage the “Reviewees marked as “Don’t Know““.
The results
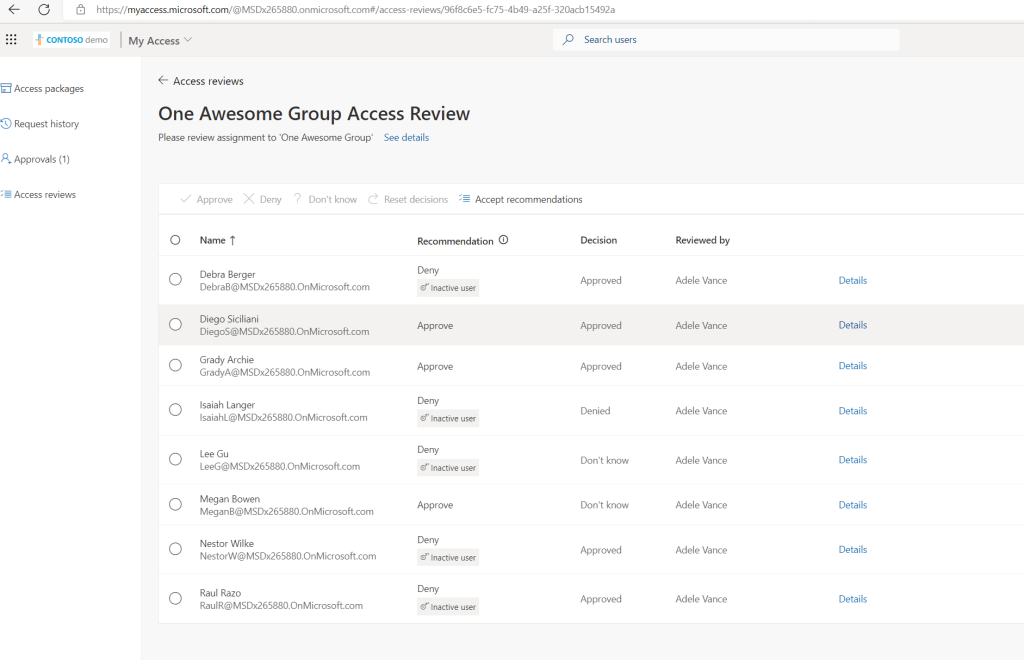
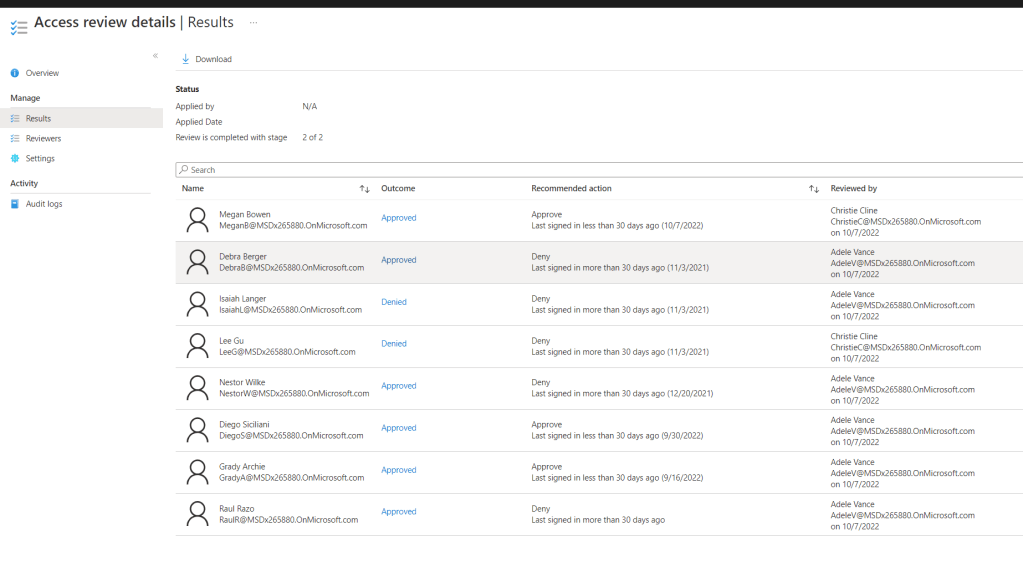
During the first stage, the reviewer gets to review all the members of the group, as shown below. And as you can see, the reviewer, Adele, has approved 5 of them, denied 1, and selected “Don’t know” for 2 of them.
We can also see this from the admin portal as well, as shown below.
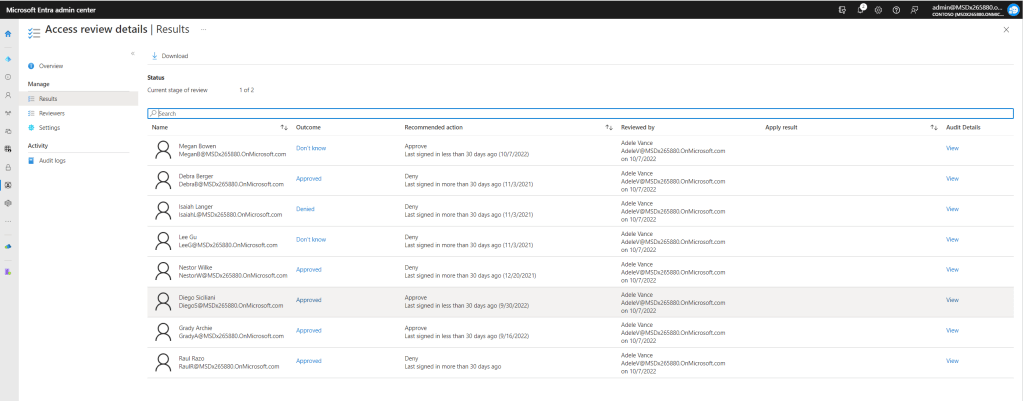
So, when the first stage is completed and the next stage approver gets the list to review, this is what they see.
They can see that in the previous stage Adele selected “Don’t know” for 2 of them, which are the ones this approver gets to review. So, this is where the auditor would step in to make that final decision and therefore prevent any reviewees that were neither approved, nor denied.
At the end of both stages, you end up with all users either being denied or approved, and none of them have “Don’t know” as the outcome.
I hope this post is useful and clarifies the options available to meet this specific requirement to provide definitive answers during access reviews.
TL;DR –Steps to configure a virtual OT sensor to use for a Defender for IoT POC.
I promised one of my partners that I would document the steps I followed to build my Defender for IoT OT sensor demo instance. I had to build a virtual appliance because (A) I don’t have access to any of the physical appliances and (B) even if I did, I don’t think any of the nearby facilities would allow me to just plug in to their network. So, that’s what I am doing in this post!
My setup and documentation
I am using an Azure VM and within that I create a local Hyper-V VM, because the sensor is an appliance, so it can’t just be an Azure VM on its own. The instructions I followed are really a compilation of steps. I started with the official documentation, which was very helpful, but I also combined with some information from this hands-on-lab. The lab uses the older version 10, but still included some screenshots and information that I thought was helpful. And I also had help from my colleague, Nick, who helped me brainstorm a few issues we hit along the way. Thanks!
Hyper-V Pre-Configuration
The instructions to pre-configure the VM are pretty much straight from the hands-on-lab. I am using a 4×8 because that works great with the Azure VM size I chose. And you’ll see this will map to the Ruggedized sensor option later on. Also, please keep in mind that I am not connecting my sensor to any other management console for this POC.
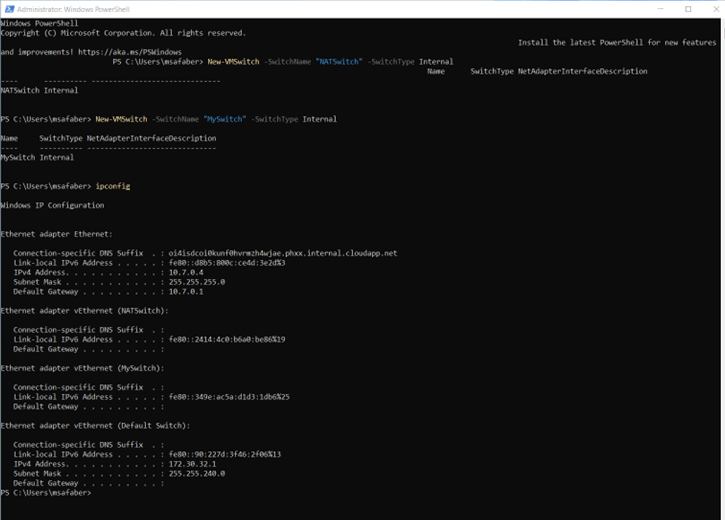
In my case, my Windows 11 host Ethernet adapter is assigned an IP of 10.7.0.4, therefore I used 192.168.0.0/24 as the network scope of the “NATSwitch”. And I created the two switches as shown below:
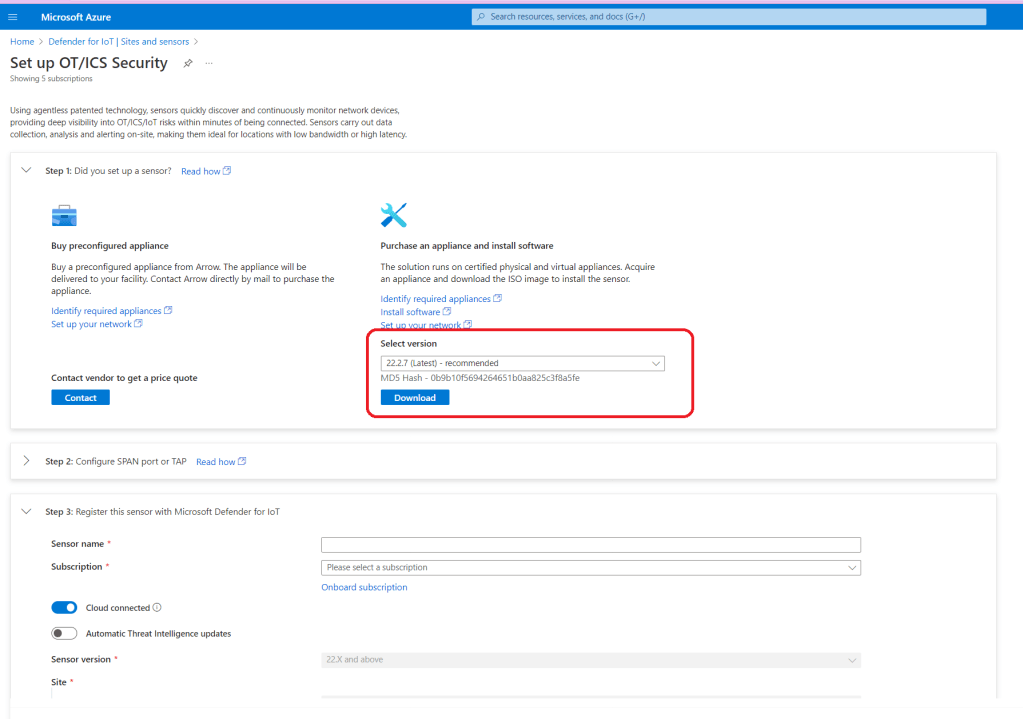
The steps to create the Hyper-V VM are pretty much straight from the documentation. The Hyper-V VM is then created using the image that you download from the portal, as shown below:
And specifically, step 1 of the onboarding process, as shown below.
You will use that image file when you create your Hyper-V VM, by selecting Install an operating system from a bootable CD/DVD-ROM within Installation Options and then selecting Image file (.iso), where you use the specific directory where you copied the file to in the Azure VM.
The settings on your Hyper-V VM should end up looking something like this. Please note, I have an extra switch, but you only need two.
Now you can connect to the VM, so you can complete the next steps.
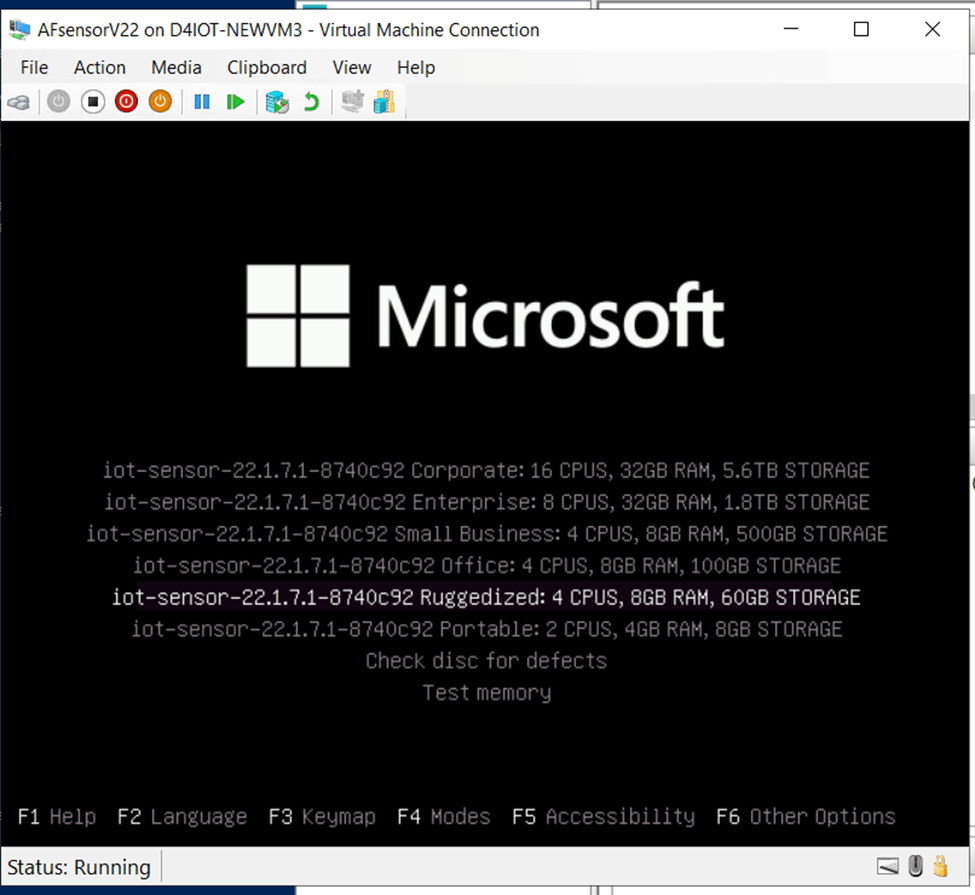
The first screen you will see will give you the option to select a language, after that you will see a selection of installation options. As mentioned earlier, I chose to go with the Ruggedized just based on the size of my POC.
The installation will take a few minutes and then you’ll see the first options to configure your sensor. In my case for the monitor interface, I chose eht1, based on the configuration of my switches.
And I chose eth0 for the management interface.
A few notes on the other options that followed:
I skipped erspan, this just for Cisco devices.
I chose 192.168.0.50 for my sensor IP, based on my network configuration above.
I used the default backup directory.
I used 255.255.255.0 for subnet mask
I used 8.8.8.8 for DNS
I used 192.168.0.1 for gateway IP
No proxy
And after another few minutes you will see the passwords. Take a picture!! You will not see this again.
Final steps
In order to configure your sensor, you will need to download the registration file that will be generated on step 3 from the portal when you click on “Register“.
Back in the Azure VM, I can now open a new browser session and connect to https://192.168.0.50 (my sensor IP). Please note the first time you connect you can configure a certificate to be used for this connection, or you can just use the default one, which is what I am using and why it shows as Not secure in the browser. Also, the first time you connect you will be required to upload that file you downloaded during the registration process (step 3).
And once that is done you will be able to login with the cyberx user and password from the screenshot you took when the installation was complete.
If you need to connect to the sensor to run CLI commands, you can connect using the support user and password from the screenshot you took when the installation was completed. You can run commands, such as the ones shown below.
Also, if you see this error when connecting to the host, don’t be concerned. I have this error showing up every time I restart the VM and so far, everything is working as expected.
adiot0: can not register netvsc VF receive handler (err = -16)
A few optional steps
This is my demo instance, so I really don’t have anything connected to monitor. Therefore, I need to gather my data from PCAP files. In order to do that, I first need to make a small update to be able to play those files.
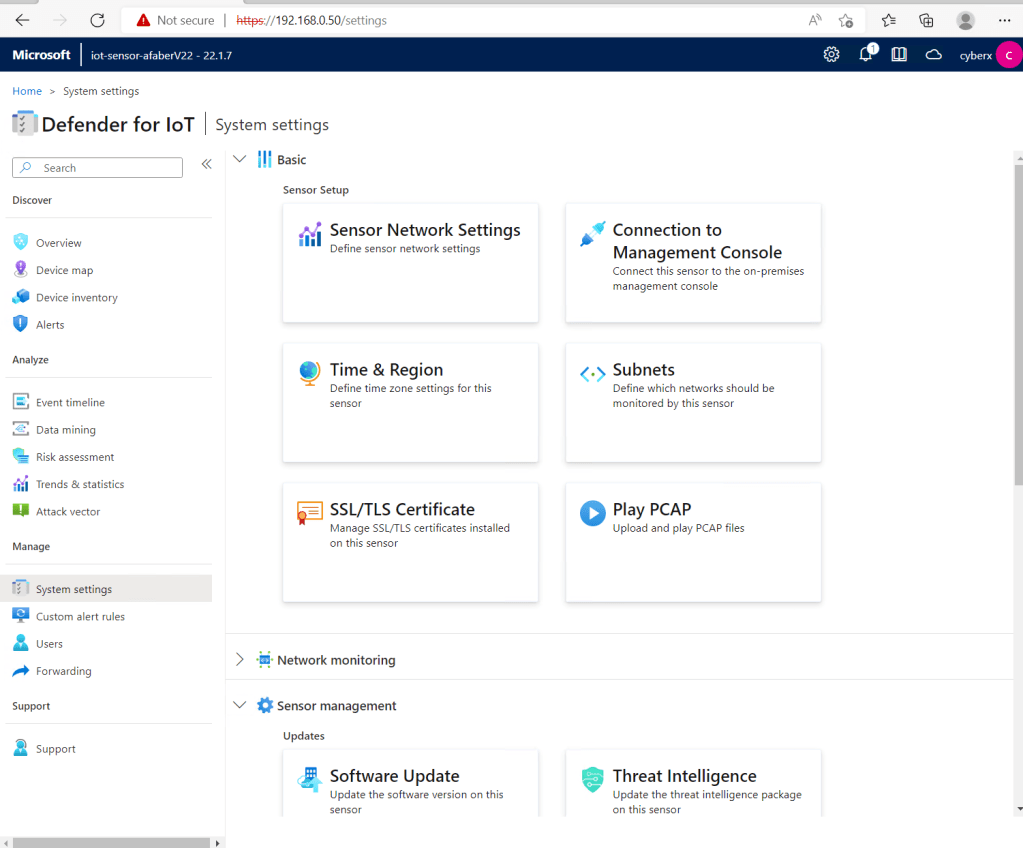
Navigate to System settings, and then select Advanced Configurations:
Select Pcaps from the drop down and then update the settings highlighted below.
This will enable the Play PCAP option shown below.
And now you can begin exploring your findings. You can see the Device map, as shown below.
Alerts
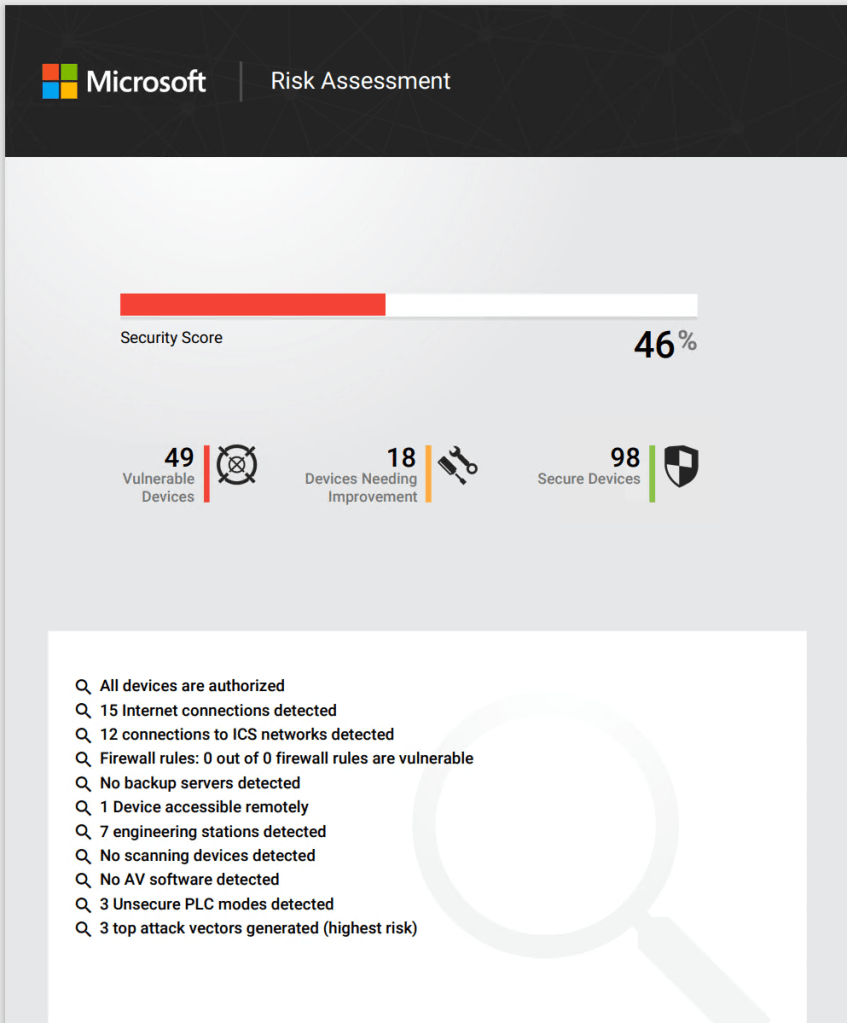
And even generate a detailed Risk Assessment report to provide to your customers.
I hope you take the time to explore this very powerful service. In a future blog post I’ll cover the integration with Microsoft Sentinel and the better together story of how these two services come together to bridge the gap between OT and IT.
TL;DR – MSSP – To trigger playbooks in the customer tenants sometimes you need to assign the managed identities of those playbooks permissions to execute actions within the customer tenant. This post covers the steps to configure the access required to assign those roles and the steps to assign the roles as well.
After I wrote the previous blog post, “Delegate access using Azure Lighthouse for a Sentinel POC”, I received many questions from current and future partners as well. I updated the previous blogs with additional clarification in some areas, but other questions were a bit more complex. In this post I want to address one of those questions, which the existing documentation addresses without specific examples, so it can be a challenge. Hopefully, this post helps other partners trying to configure the same access.
First, the template modifications
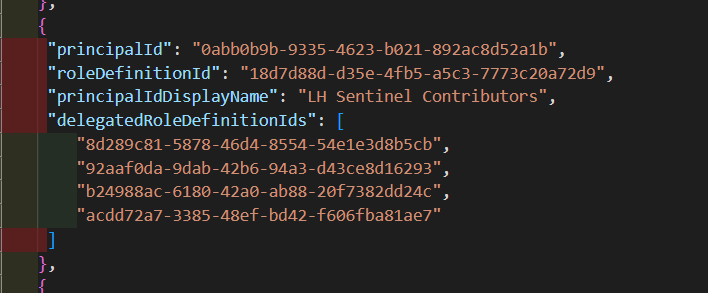
When you configure the initial Azure Lighthouse template to delegate access from the customer workspace to the MSSP, there are some modifications required in order to allow the MSSP users and groups to be able to assign the access. You have to modify the template manually, and you have to specifically add the “User Access Administrator” role (18d7d88d-d35e-4fb5-a5c3-7773c20a72d9) and the “delegatedRoleDefinitionIds” parameter, which is required to specify the roles that the MSSP user or group will be able to assign to the managed identities within the customer workspace.
If you are worried about the very powerful “User Access Administrator” role being assigned to the MSSP, keep in mind that it’s a different version of that role. As the documentation states, it’s “only for the limited purpose of assigning roles to a managed identity in the customer tenant. No other permissions typically granted by this role will apply”.
Once that template is uploaded, your customer’s delegation will look like this:
As you can see above, my “LH Sentinel Contributors” group now “Can assign access to” 4 different roles: “Microsoft Sentinel Reader“, “Log Analytics Contributor“, “Contributor“, and “Reader“.
Why do I need these permissions?
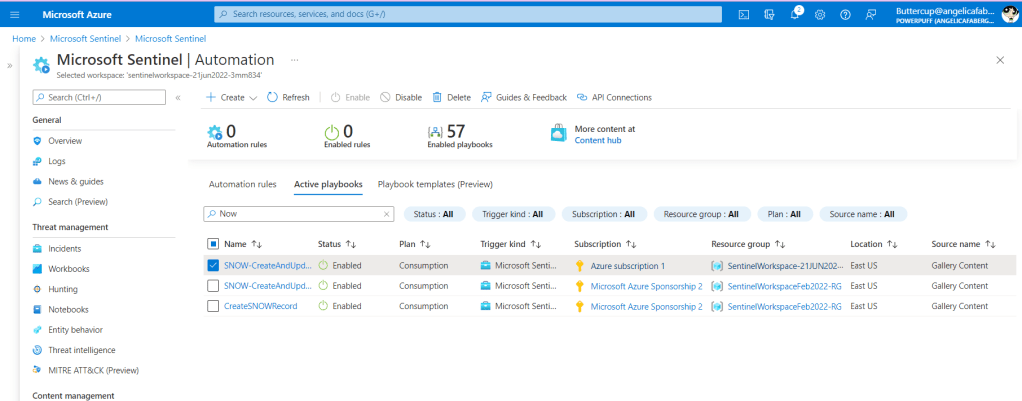
Why would I even need these permissions? In my case, I have a playbook that I need to trigger on my customer’s workspace, the “SNOW-CreateAndUpdateIncident” playbook. And that playbook needs some permissions to be able to execute correctly.
If I was executing it locally on my MSSP tenant, then I would just assign the roles directly by going to the Identity blade within the specific logic app.
But if I try to do this from the Sentinel portal for one of my customer’s workspaces, I get an error like the one below.
So, I need a way to assign these roles in my customer’s workspace to trigger those playbooks locally from my customer’s workspace.
Now, I can assign roles
Per the documentation this role assignment needs to be done using the API, and it needs to be done using a specific version of the API, 2019-04-01-preview or later.
You will need the following values to populate the parameters in the body:
delegatedManagedIdentityResourceId
Note: These are both in the customer’s workspace, which you will have access to, as long as you have Logic App Contributor role included in your Azure Lighthouse template.
principalId
You will use those values to populate the parameters within the body of the API call. The following parameters are required:
“roleDefinitionId” – This is the role definition in the customer’s workspace, so make sure you use the customer subscription id value.
“principalType” – In our case this will be “ServicePrincipal“, since it’s a managed identity.
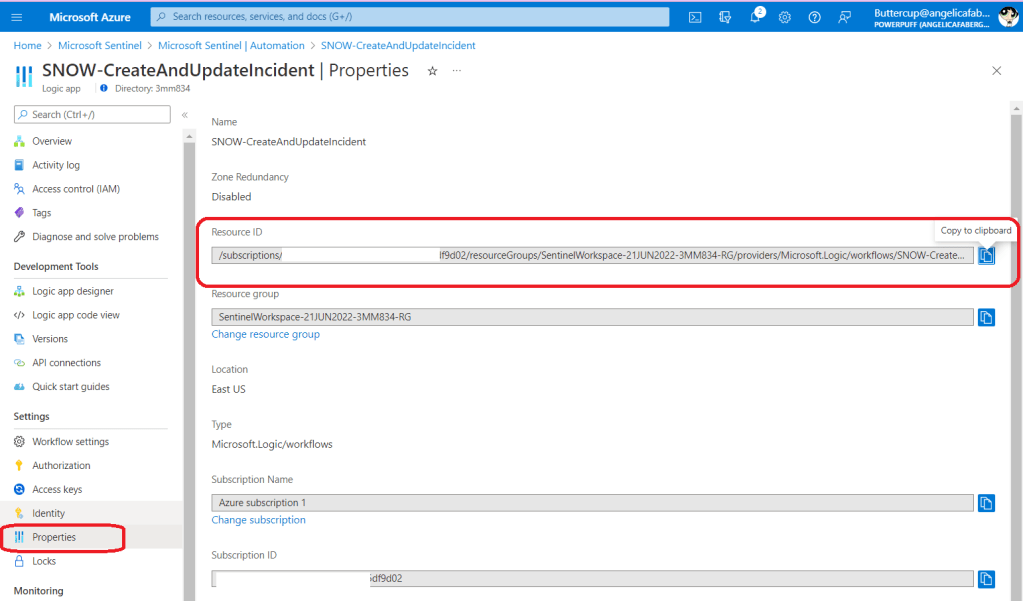
“delegatedManagedIdentityResourceId” – This is the Resource Id of the delegated managed identity resource in the customer’s tenant. This is also the reason we need to use API version 2019-04-01-preview or later. You can just copy and paste from the playbook “Properties” tab, as shown above.
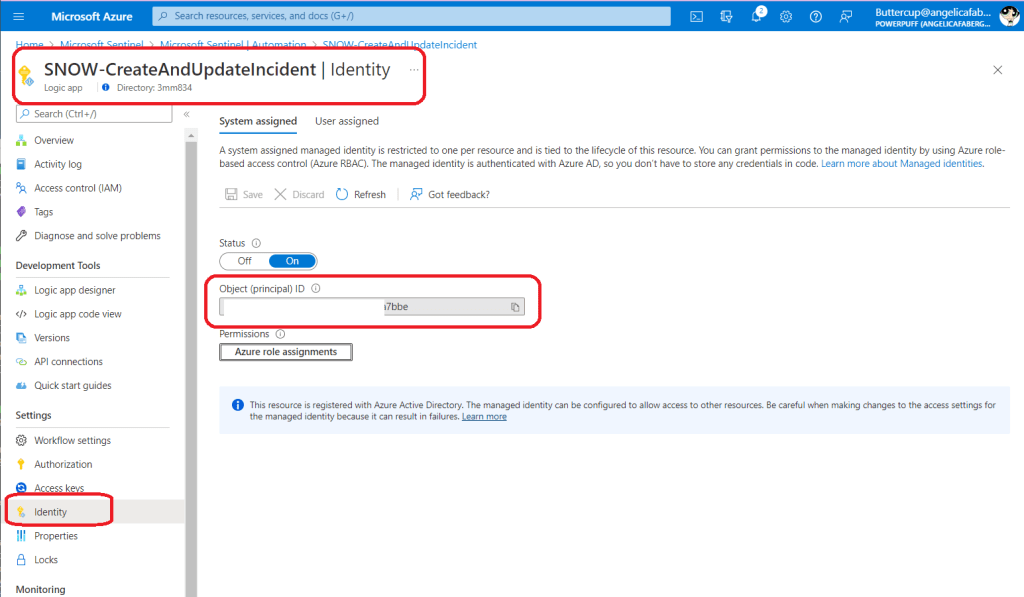
“principalId” – This is the object id of the managed identity in the customer’s workspace, as shown above.
The file will look like this:
Note: 8d289c81-5878-46d4-8554-54e1e3d8b5cb is the value for Microsoft Sentinel Reader, which is the role I am trying to assign to this managed identity.
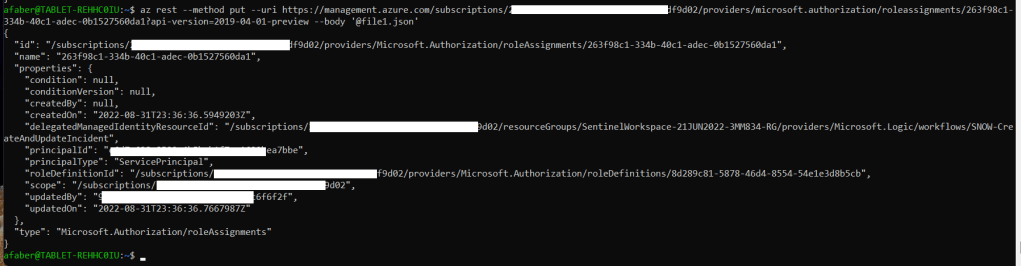
As noted in the API documentation, to assign a role, you will need a “GUID tool to generate a unique identifier that will be used for the role assignment identifier“, which is part of the value used in the command below to call the API. The value you see below in the API call, 263f98c1-334b-40c1-adec-0b1527560da1, is the value I generated with a GUID tool. You can use any, I used this one.
And once you run the command, you’ll see output similar to the one shown below, which means the role was successfully assigned.
And that’s it! Now the managed identity associated with the Sentinel playbook (logic app) in the customer’s workspace has the required permissions to be able to execute within the customer’s workspace.
TL;DR –Steps to delegate access to users on a different tenant for a Sentinel POC using Azure Lighthouse.
I include this live demo in every webinar I deliver about Microsoft Sentinel, but today a partner asked me for documented step-by-step instructions, which I wasn’t able to find, so I am creating this post.
Most MSSPs need to create a POC to test Microsoft Sentinel, where they configure one workspace as the MSSP and a few other workspaces as customers. To be clear, the documentation is great about the correct way this in a real scenario, where partners need access to their customers’ workspaces, but for a POC, a partner doesn’t need to publish a managed service offer, they just need do this using an ARM template.
From the MSSP tenant
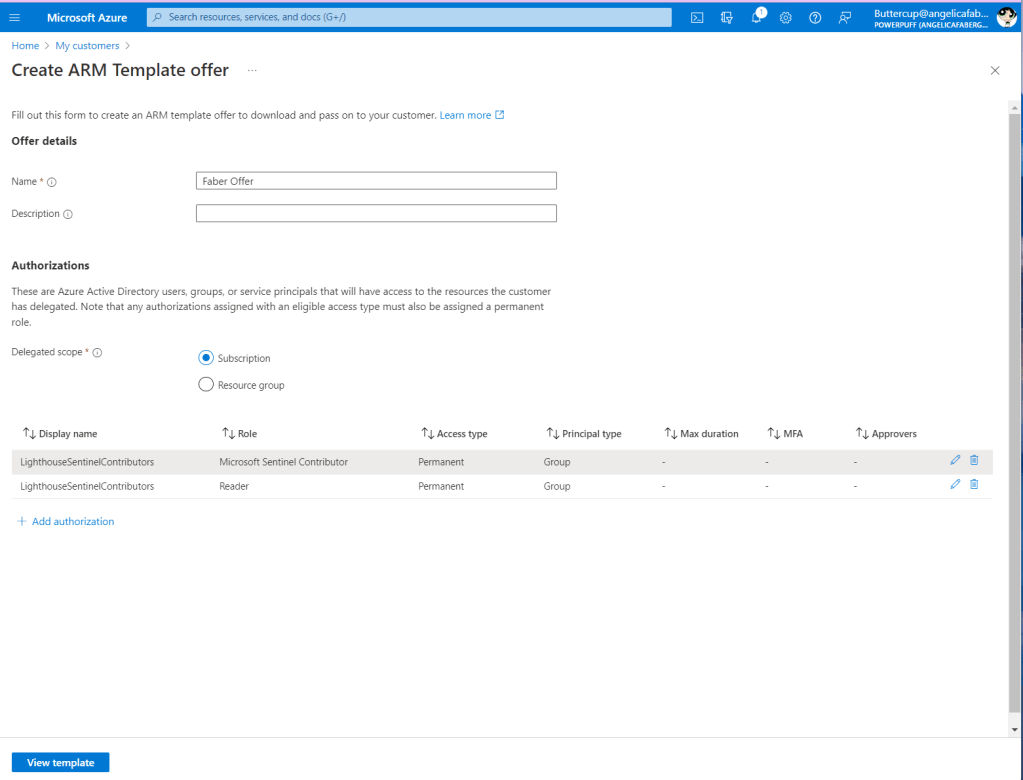
Navigate to “My Customers” and click on “Create ARM Template” as shown below:
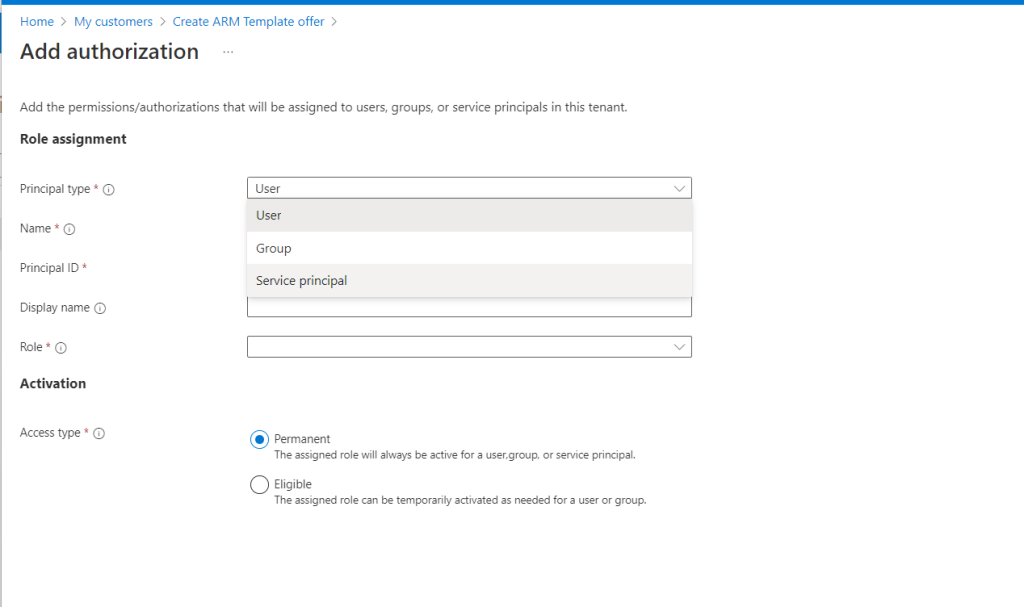
Name your offer and choose if you want your customers to delegate access at “Subscription” level or “Resource group” level, then “Add authorization“.
You can choose to delegate access for a User, Group, or Service principal. I usually recommend you use Group over User, because the MSSP team members will change with time.
You can choose to assign the role “Permanent” or “Eligible”. If you’ve worked with PIM (Privileged Identity Management) previously, then you are familiar with the process. The eligible option will require activation before the role can be used. For eligible, you can also choose a specific maximum duration, and whether multifactor authentication and/or approval is required to activate.
In order to see your customers in the “Customers” blade later, you will need to include “Reader” role, as shown below. Click “View template” to be able to download it.
Download the ARM template file.
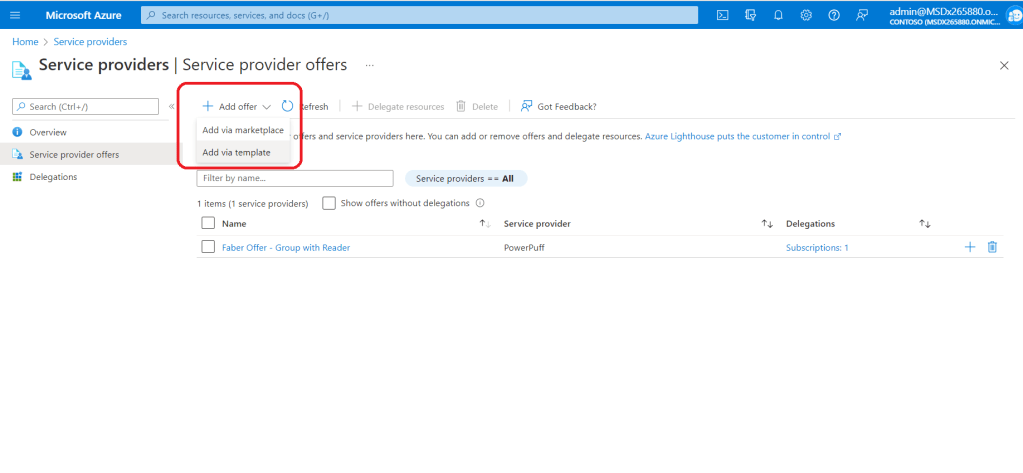
From the customer tenant
Before you import the template, ensure you have the correct permissions on the subscription. You can follow the steps here to ensure you can deploy the ARM template.
Click “Add offer” and select “Add via template”, as shown below.
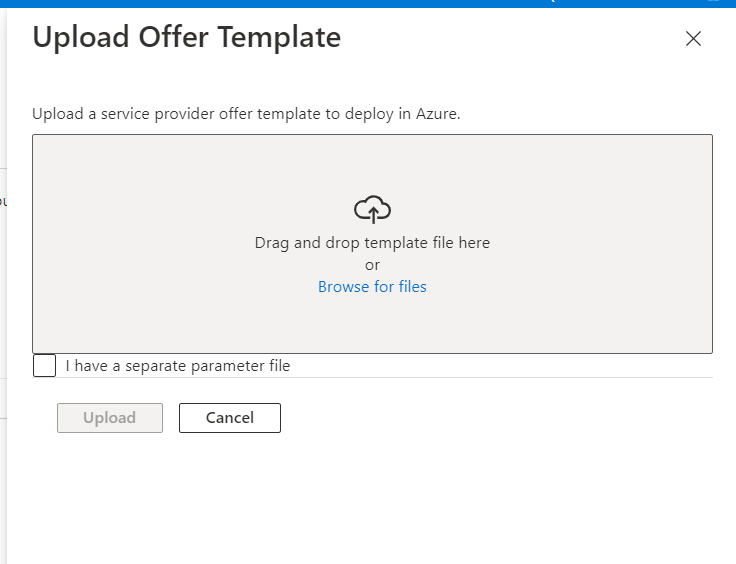
Drop the template file you created or upload, as shown below.
Once the file is uploaded, you’ll be able to see it, as shown below:
You can also see the “Role assignments” that were delegated to the MSSP tenant, as shown below.
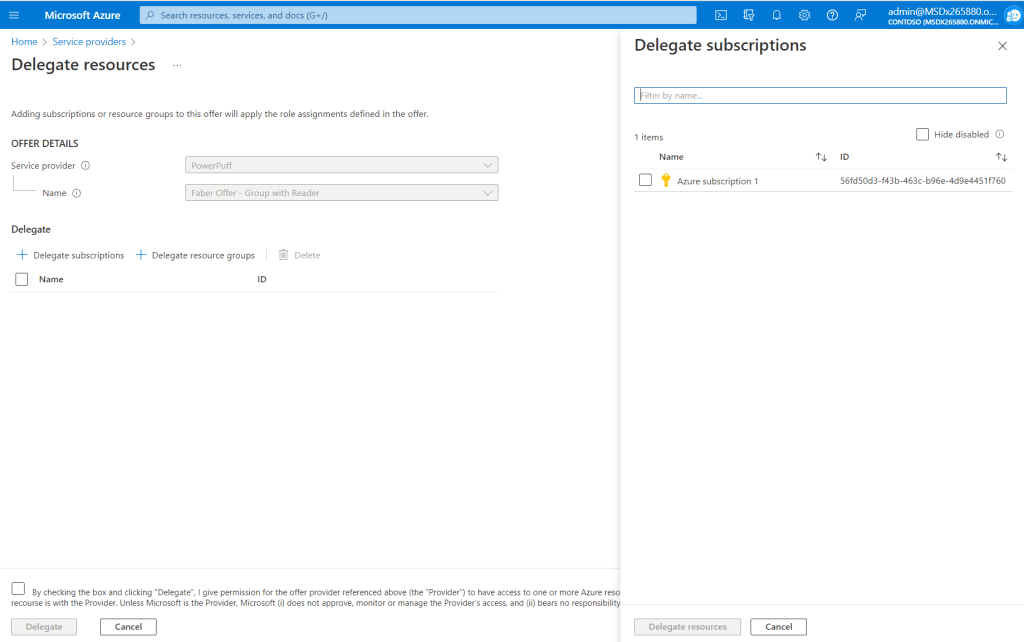
And if the customer tenant needs to delegate access to new subscriptions, they can do so by clicking on the ‘+’ button, as shown below.
And selecting any other subscriptions or resource groups that need to be delegated.
Back to the MSSP tenant
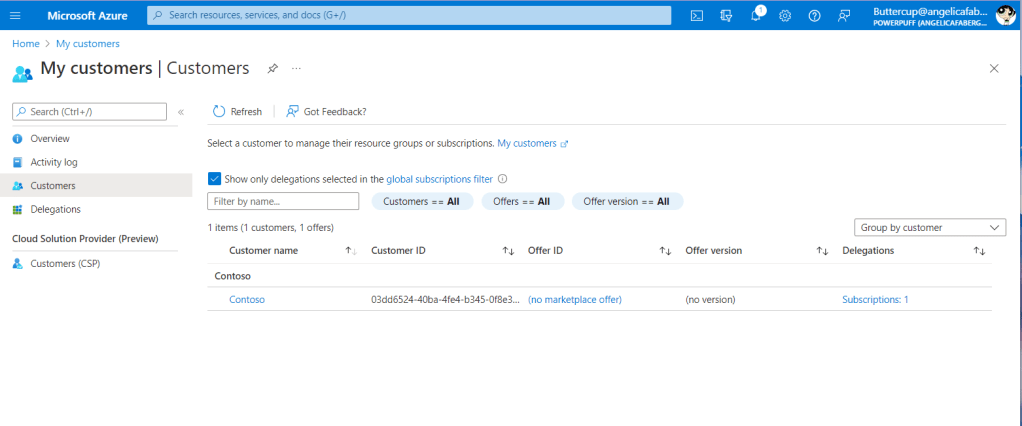
Now you can see your new customer from the “Customers” blade, as shown below.
Since the delegation included Sentinel Contributors, now you can manage the customer tenant workspace from the Microsoft Sentinel navigation within the MSSP tenant, as shown below.
Bonus: Since you have reader access, you can also see the subscription from Defender for Cloud, Environment settings. You can always delegate additional roles, if you need to manage MDC for this tenant.
Quick note on delegations at Resource Group level. I’ve seen instances with Resource Group delegations, where the ability to update the global filter takes a little while to allow you to select the newly added tenant and subscription that is associated with the resource group. However, after waiting for those updates to kick in, you should be able to modify the filter by selecting the filter from the blue menu bar, as shown below, and updating to include all directories and all subscriptions.
In my opinion, a POC is the best way to experience the wide variety of features within Microsoft Sentinel. You can even use the free trial that is available for 31 days. Another great resource that I always recommend for teams starting to get familiar with Microsoft Sentinel is the Sentinel Training Lab, which is available from the Content Hub blade in Sentinel. Finally, for MSSPs, http://aka.ms/azsentinelmssp is an invaluable resource to get a good overview of the recommended architecture.
TL;DR –Just a few of my favorite MDCA features, which you may already be paying for.
I previously mentioned my strong belief that Sentinel and MDC are best buddies. Similarly, I firmly belief MDCA (Microsoft Defender for Cloud Apps) is definitely a member of the MDE squad. If you are using MDE (Microsoft Defender for Endpoint) and you haven’t tested MDCA, you may be surprised how well they work together and guess what? You may already be paying for it!
MDCA, which was previously known as MCAS (Microsoft Cloud App Security), is a CASB (I am going for a record number of acronyms in this post!), which stands for Cloud Access Security Broker. In an over simplified way, the job of a CASB is to enforce security policies. I think MDCA does that and more, and quite honestly, I am continuously discovering new features. In this post I am going over a quick list of some of my favorite features.
Cloud Discovery / Shadow IT
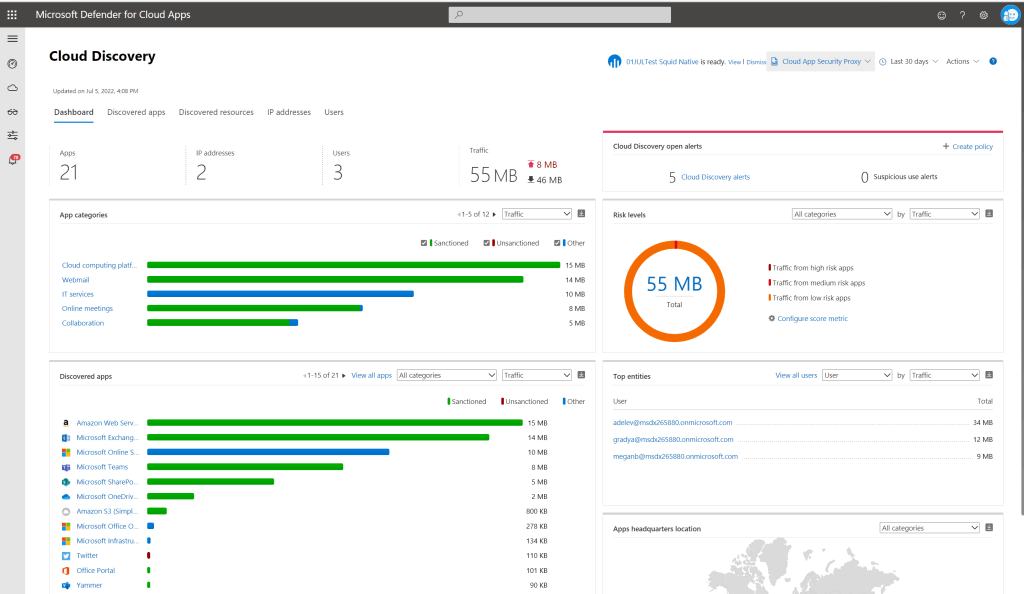
MDCA can discover applications (31,000 on the last count) through various means:
As part of the MDE squad, it can integrate with MDE to get data from managed Windows devices, as shown above. This integration also gives you the power to block apps as well. More on that a little later.
Log Collector over syslog or FTP and various Docker images are available.
You will also see data from the Cloud App Security Proxy, so that means even if it’s not from a managed Windows device, you will get some data from the other devices as well, as shown below.
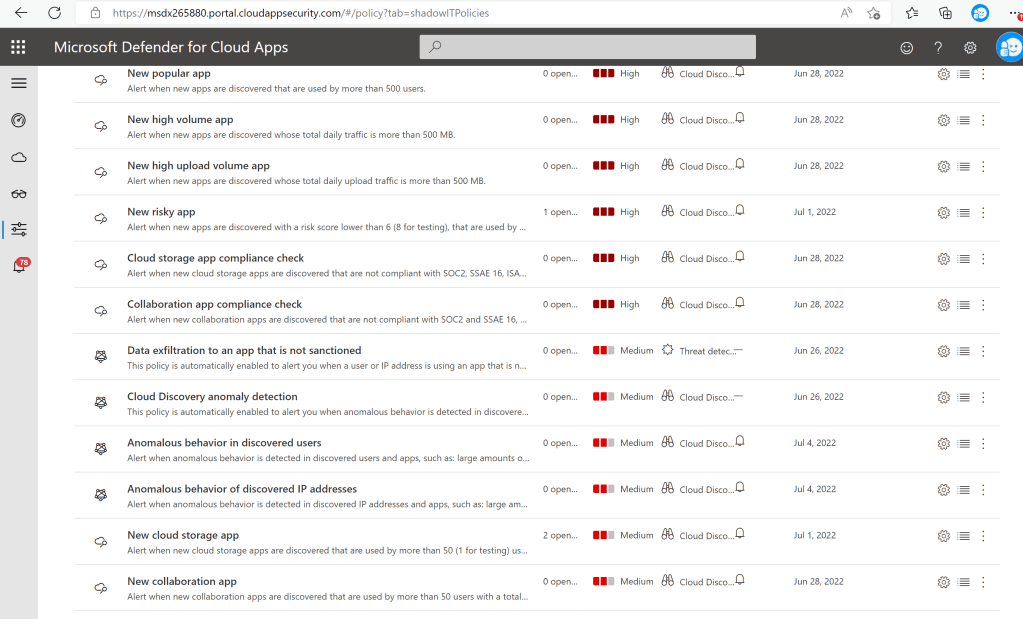
And I can also create policies that will alert for Shadow IT, such as the ones shown below:
Block Apps
There are a few ways apps can be blocked as well. One of those is through the integration with MDE. I configured a few applications as unsanctioned for testing purposes, as shown below.
So, when I try to access one of those applications from a managed Windows device, I receive the following error:
And it’s not just Edge! See the error message below from Chrome on the same device:
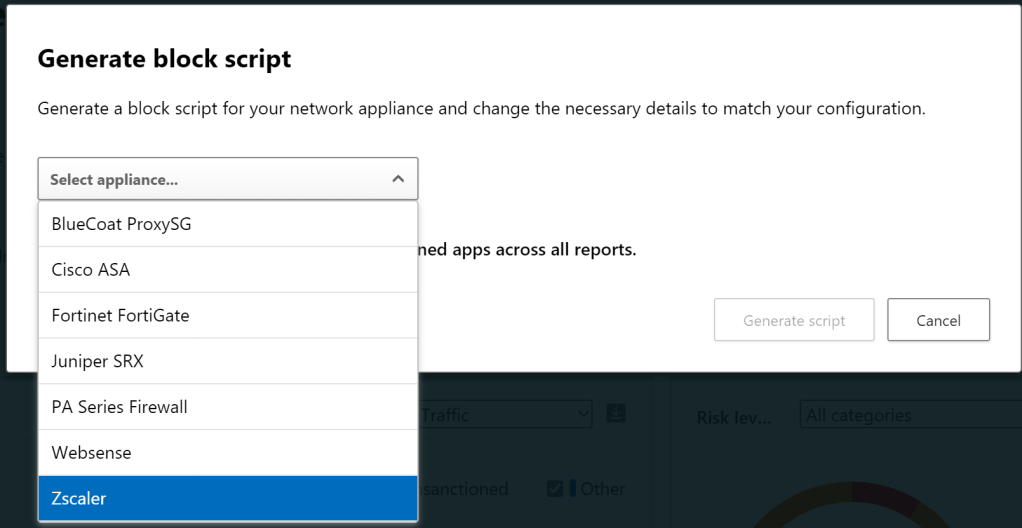
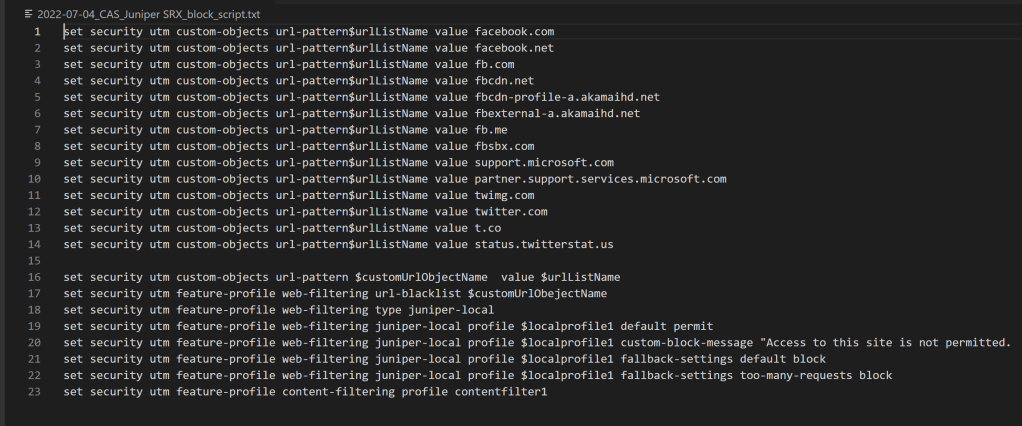
I can also “Generate block script” for various types of appliances, as shown below:
Here is an example based on the applications I’ve set as unsanctioned:
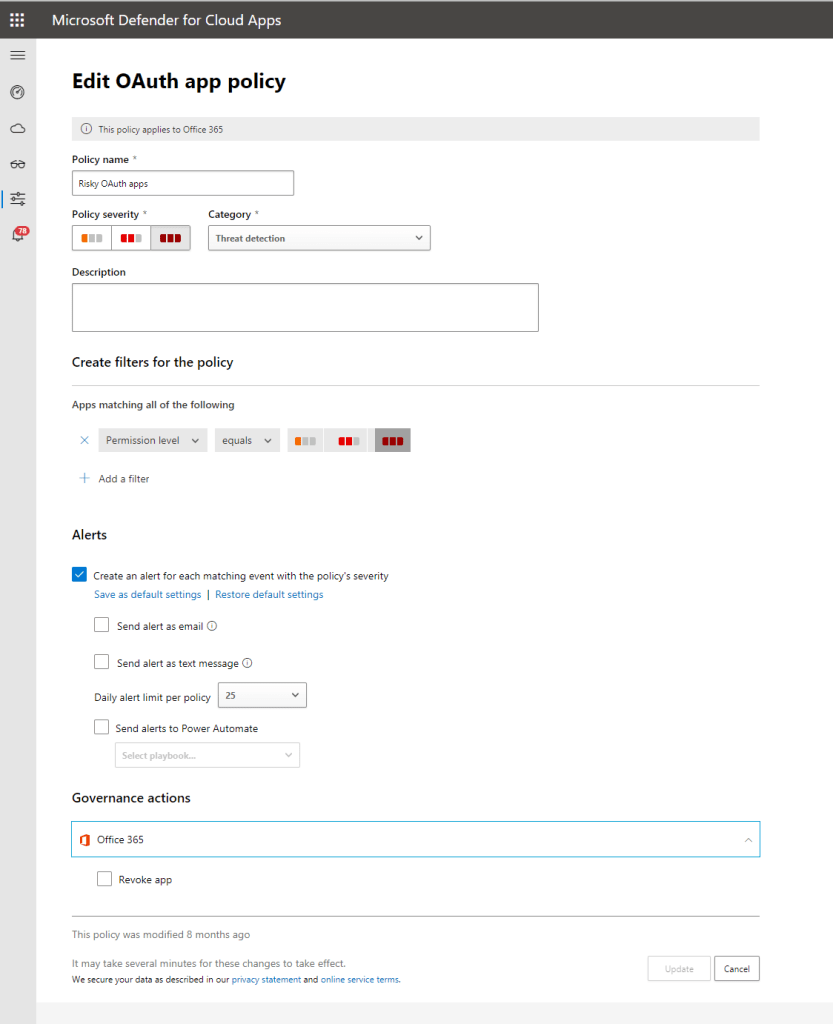
Ban OAuth Apps
Solorigate anyone? MDCA can help you monitor OAuth apps in various ways, as shown below, where you can discover and either ‘approve‘ or ‘ban‘ risky apps.
Once you mark an app as ‘banned’, the Enterprise Application is updated with “Enabled for users to sign-in?” set to “No”. I also noticed that the application disappeared from “MyApps” for those users that were previously assigned to the application.
You can also create policies that will automatically revoke risky apps, as shown below.
Conditional Access App Control
So, technically this is done with another member of the squad, Conditional Access. The same Conditional Access we know and love that controls initial access is also capable of controlling access within a session when it works with MDCA.
I have a few very powerful policies, as shown below.
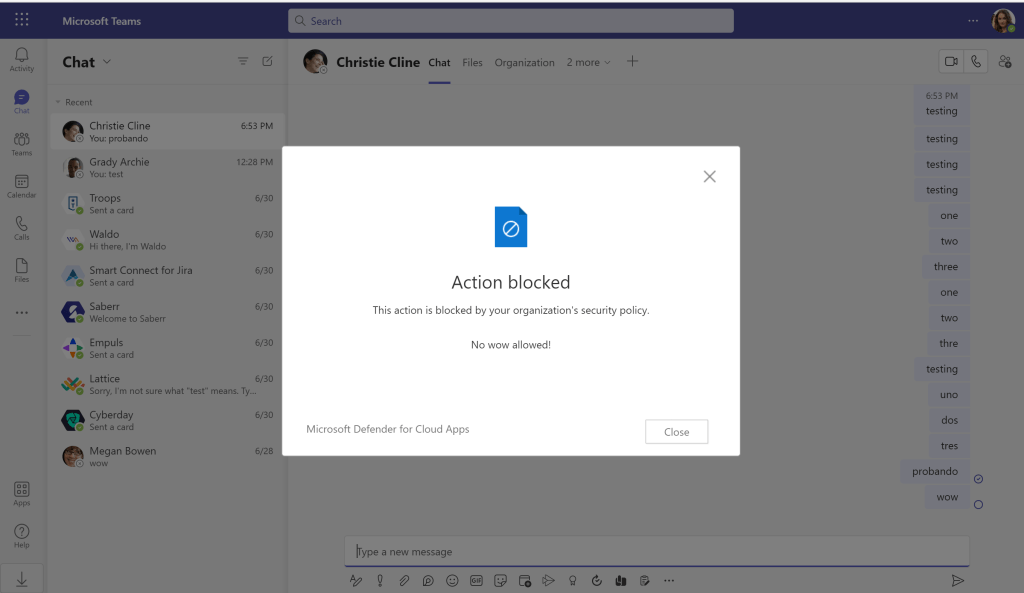
The second “Block sending of messages based on real-time content inspection – wow” is a way to prevent Teams messages based on a specific word and in this case from a non-compliant device. In my example, I want to block the word ‘wow’. Maybe ‘wow’ is my new super secret project and I only want people discussing it from compliant devices. So, if you try to send a message with the word ‘wow‘ from a non-compliant device, you would see the following:
Yes, the message is customizable :). And it prevents the message from being sent, as shown below:
Next, “Block sending of messages based on real-time content inspection – SSN“, it’s very similar to above, except, it’s not just a word, but rather a pattern, an SSN pattern. So, the user would see a similar message and it won’t be sent either.
Note: This is not real data, it’s just sample data used for DLP testing purposes.
Next, “Block upload based on real-time content inspection – CCN and SSN“, it’s similar, but now I am checking for content within files that are uploaded, whether it’s being attached to an email, being uploaded to a SharePoint site, etc.
Finally, “Proxy – Block sensitive files download – SSN”, it’s similar, but upon download.
Information Protection
Ok, so you saw some information projection above, but there’s more!
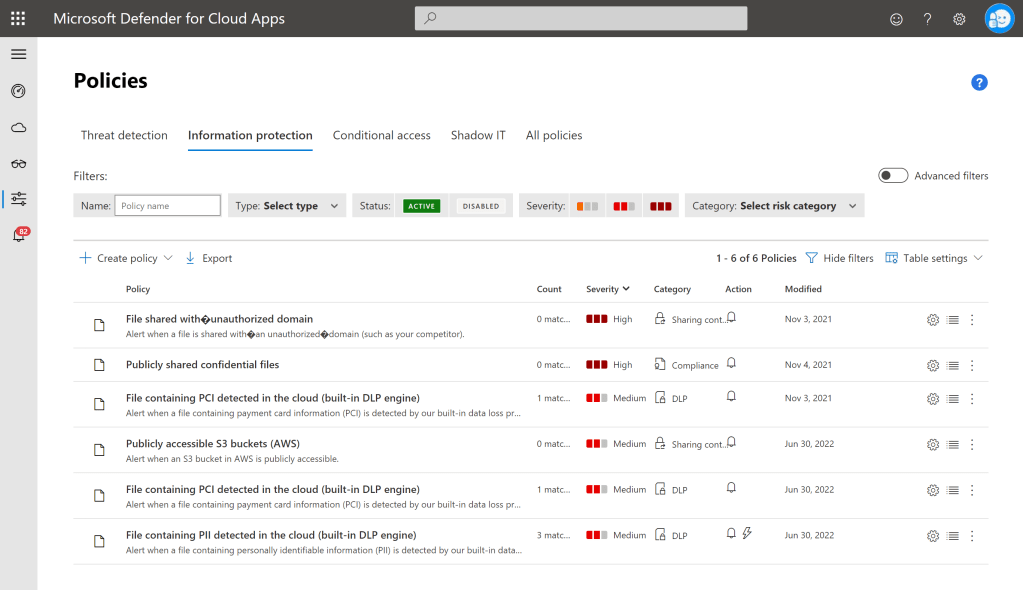
One of the policies above is “File containing PII detected in the cloud (built-in DLP engine)“, which automatically labeled a file, based on the contents, as shown below:
Threat Protection
There are some pretty powerful possible controls within this area, as shown below:
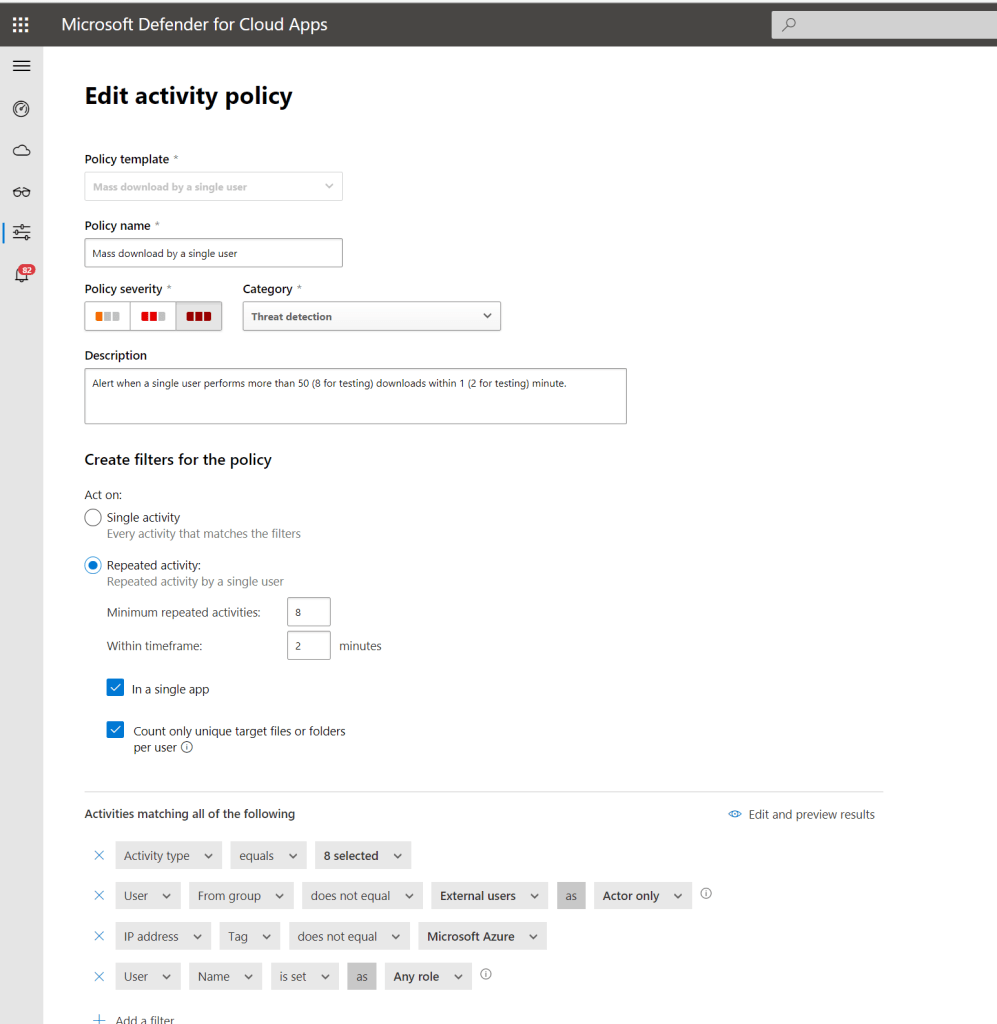
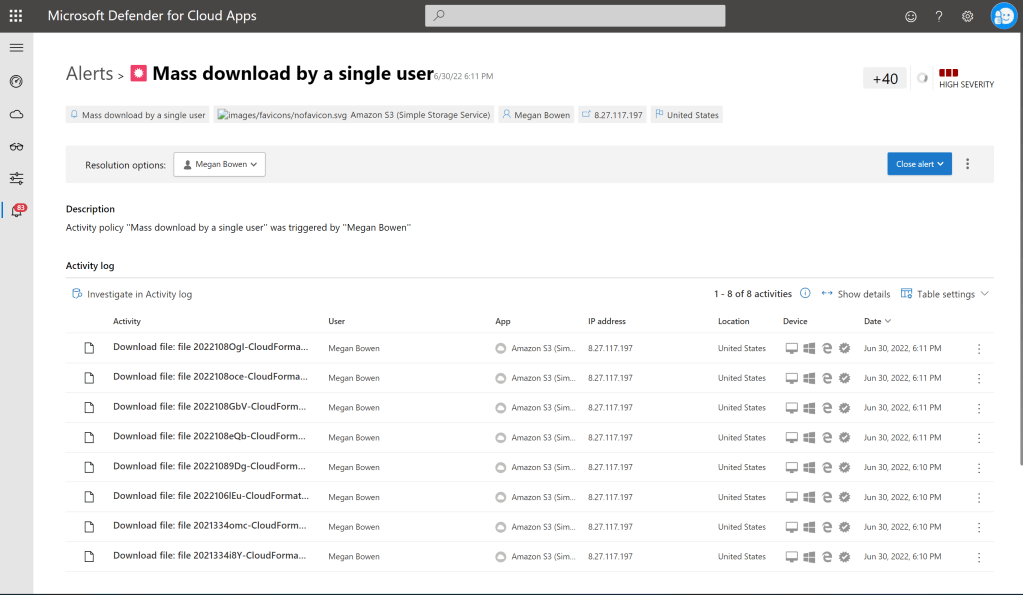
But I have chosen to show you how this “Mass download by a single user” policy works. Note that I have adjusted some of the values, so I can generate an alert for my test.
Because I know you may be thinking ‘but this is all within Microsoft services‘. So, check this out! This alert was generated by a user that downloaded files from an AWS S3 bucket, as shown below:
Honorary Mention 1 – App Governance
App Governance is technically an add-on, but I think it’s pretty cool, so I am including it. Note that this is now under the new Cloud Apps menu in security.microsoft.com.
App governance uses machine learning and AI to detect anomalies in OAuth apps. It can alert you on applications from an unverified publisher that have been consented to by your users. It can also alert on overprivileged applications, with permissions that are not even used, and various other anomalies.
Honorary Mention 2 – Security Posture for SaaS Apps
Security Posture for SaaS apps is super new, still in preview, but I can see the incredible potential. Currently, only available for Salesforce and ServiceNow, but I am sure more are to come. It makes recommendations on security best practices within those SaaS applications, as shown below:
More
I’ve only described some of my favorite features within MDCA. MDCA also integrates pretty closely with MDI (Microsoft Defender for Identity) and various other Microsoft and 3rd party security services. There is a lot more to MDCA than I included here, but I hope this post gives you an idea of how this service can help you secure your organization.
TL;DR – Testing the new MDC governance rules to automatically assign and track owners for recommendations.
I was telling one my partners this week that Sentinel and Microsoft Defender for Cloud (MDC) are best buddies. I have written about some of that nice integration in a previous blog. This week I read about a new MDC feature that I think is going to be a huge help especially to those security professionals tracking pending remediation, recommendations, and security exceptions (hi Roberto!).
Governance rules
This new feature was included in the Microsoft Defender for Cloud RSA announcements, and it is very well documented in our official documentation. To configure, navigate to the “Environment settings” blade and select either an Azure subscription (as shown below), an AWS account, or a GCP project (more on those a little later).
Then you can see the new “Governance rules (preview)” blade, as shown below. For this test I configured a rule that will assign all the “MFA” recommendations for this subscription to a specific user.
I selected the user I want to own those specific recommendations. And I also set a remediation timeframe. I could also choose a grace period, which means it won’t affect the secure score for that amount of time, but I didn’t enable it for my test. And the icing on the cake are those notifications, for the items that are open and overdue.
Now, when I look at those recommendations, I can see the owner, due date, and wether it’s on time or not. Neat!
But wait, there’s more!
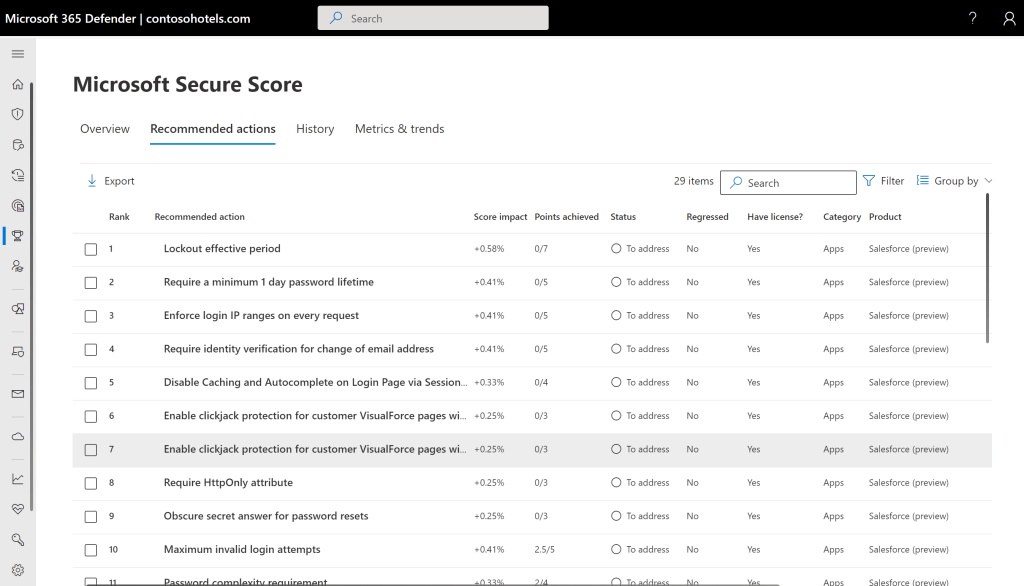
It’s not just for Azure subscriptions, you can do the same for AWS accounts and GCP projects that are connected to MDC. In the example below I have chosen to assign all ‘CloudFront’ recommendations to a specific user, as shown below:
Also, when you first create the rule, it will ask you if you want to apply the rule to any existing recommendations, as shown below. For my example, I chose to apply it.
In the same manner, I can now see the recommendation, the owner, due date, and the status, which is currently, ‘On time‘.
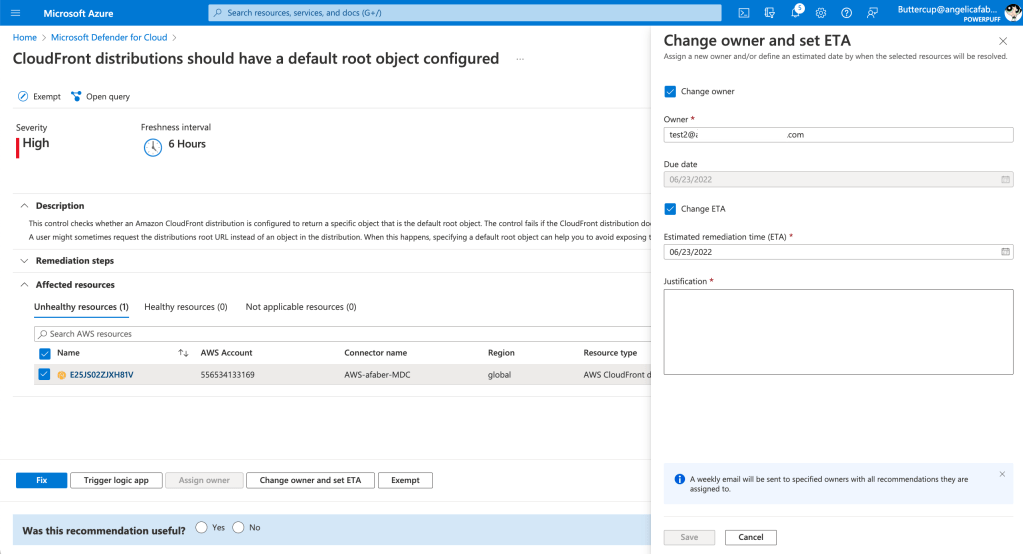
And you can also update the owner and the ETA, because sometimes life happens.
And if you have an extension, you can see that information as well, as shown below.
I know this new feature will be very useful and will automate some of the hassle associated with tracking the security recommendations. It’s simple to configure, but a huge help for all those security teams working to protect their organizations.
TL;DR – Testing the new ingestion time transformation features in Microsoft Sentinel.
When I read the word “transform“, I immediately think of Optimus Prime and Bumblebee, you know “robots in disguise” (I can hear the song too!), doesn’t everyone? But that’s not the transformation I am blogging about today. This week I’ve been testing a new feature in Microsoft Sentinel that allows you to configure rules to transform data upon ingestion. It’s a feature many of my partners have requested previously, so I gave it a shot and I was really amazed how easy it was to configure.
Transforming AWSCloudTrail
AWSCloudTrail is the largest data source I have in my tenant, so I figured I would try to test the scenario where I filter out some data that may not be as useful for security purposes. However, while I was at it, I might as well test adding of some custom fields, because that may come in handy as well. If you are looking for the current list of tables that supports this feature, it’s here.
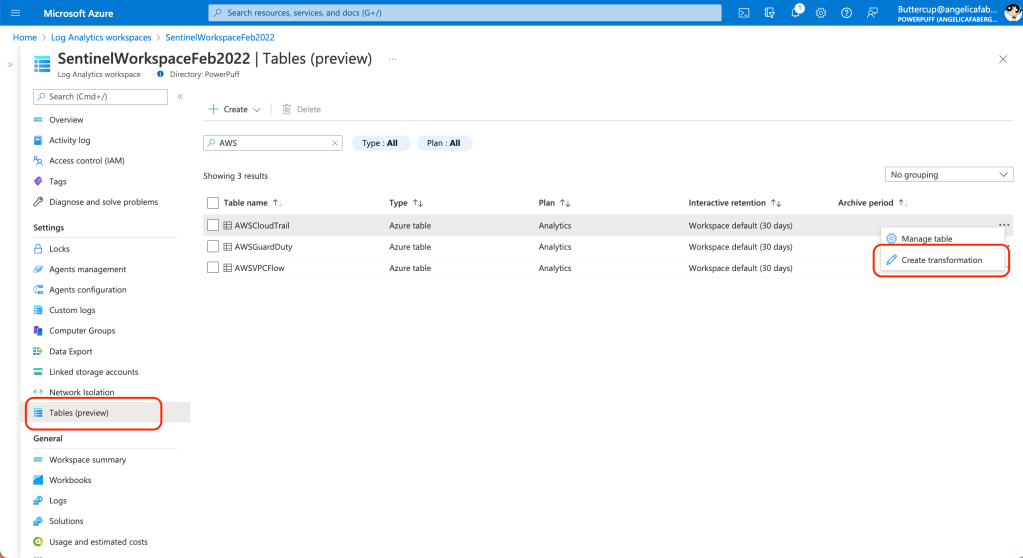
You can find this new features by navigating to the shiny new “Tables” blade within the Log Analytics Workspaces menu, as shown below:
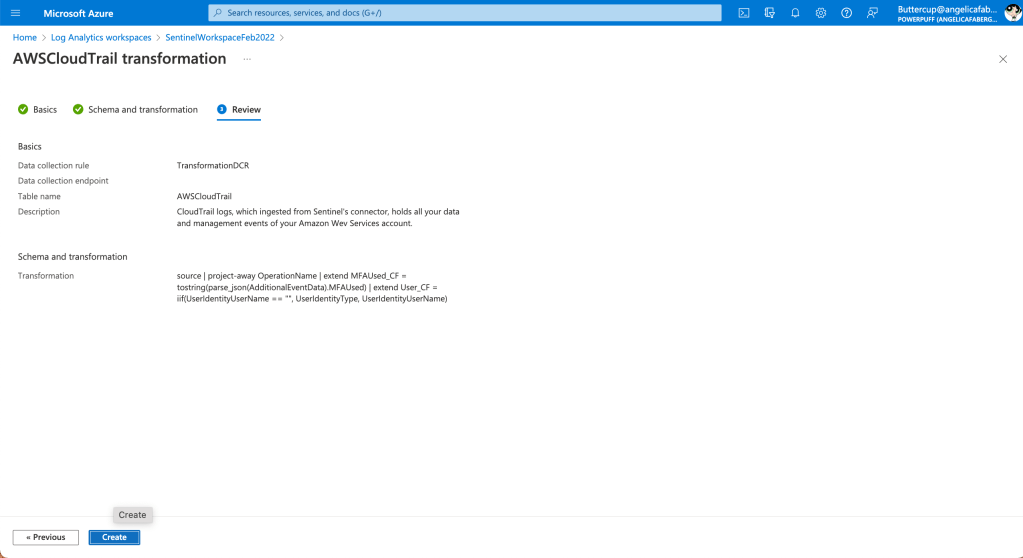
In my case I am testing with the AWSCloudTrail table, so I chose to “Create transformation” within the menu of the table, and then I gave my new rule a very creative name “TransformationDCR“.
I then specified the columns I don’t want to ingest and the ones I want to add within the “Transformation editor“. In my case, I don’t want to see “OperationName” because all the rows have the same value, “CloudTrail“, so I use project-away to filter that out. But just for testing purposes, I am adding two new columns, “MFAUsed_CF” and “User_CF“. The ‘_CF‘, which I *think* stands for custom field, is only needed for non-custom tables.
By the way, if you don’t add the “_CF”, you will see the following error: “New columns added to the table must end with ‘_CF’ (for example, ‘Category_CF’),” as shown below:
And that’s it!
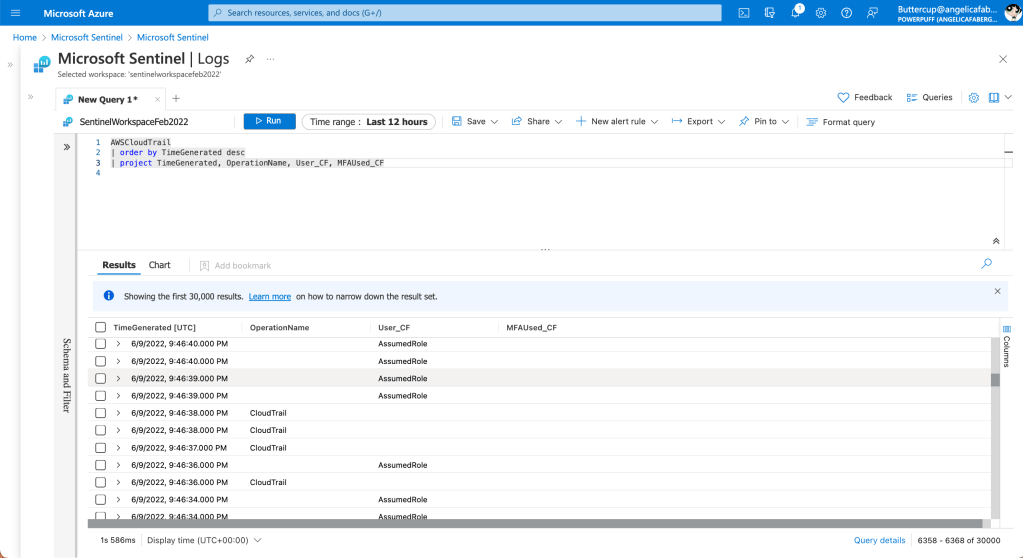
Once the change takes effect, I can start to see where the data in “OperationName” is no longer showing and I can start seeing values in my new columns, “MFAUsed_CF” and “User_CF“, as shown below:
Masking data during ingestion
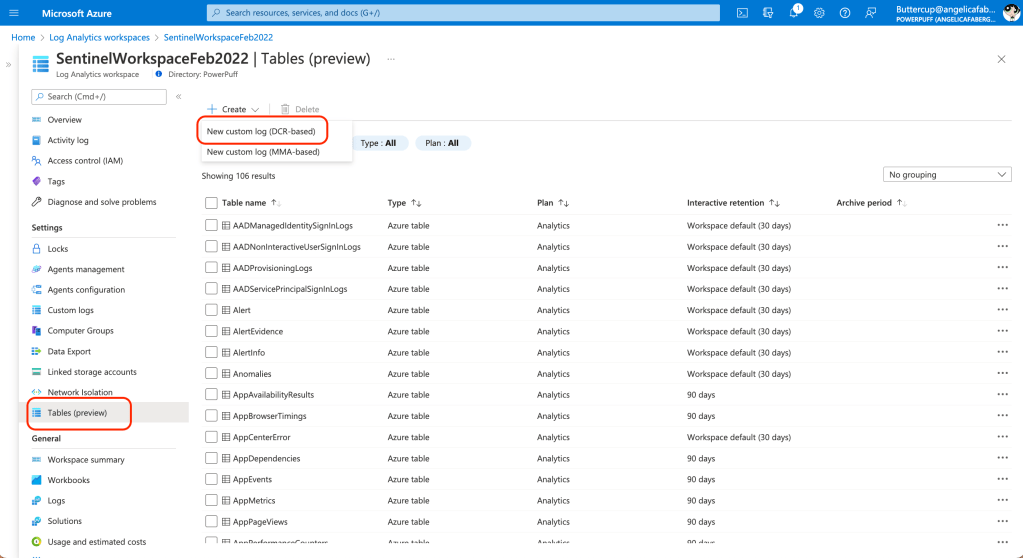
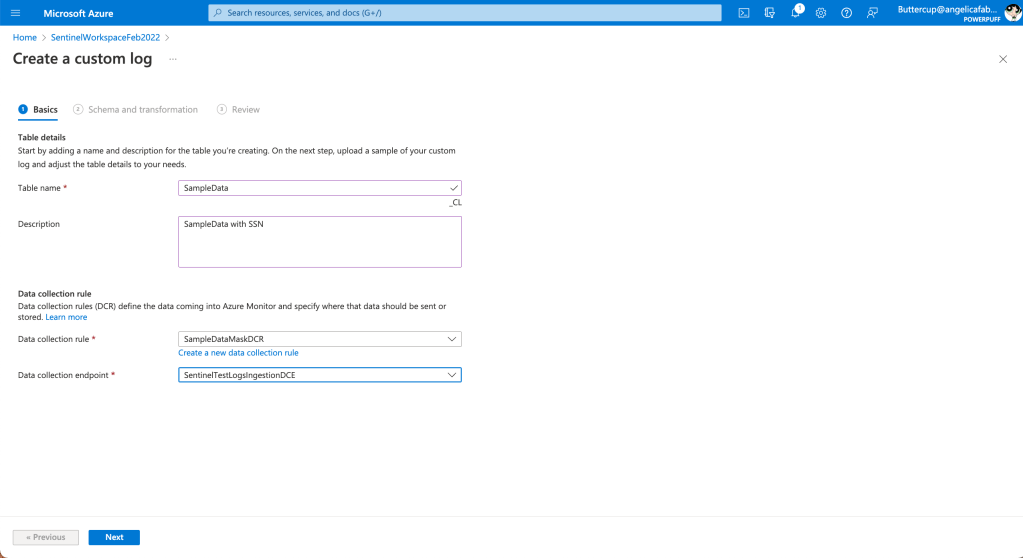
You can also configure Data Collection Rules for custom tables, by using the “New custom log” option under “Create“, as shown below:
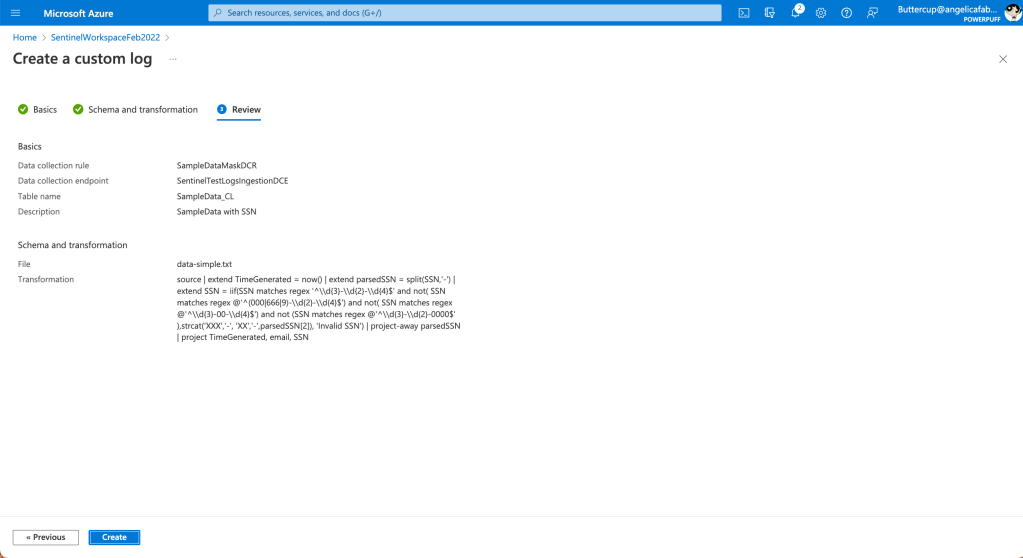
I am choosing the ingenious name of “SampleData” for my custom table and the DCR will be have the innovative name of “SampleDataMaskDCR“, as shown below:
Please note, the data I am using here is just sample data I use for DLP tests, it’s not valid data.
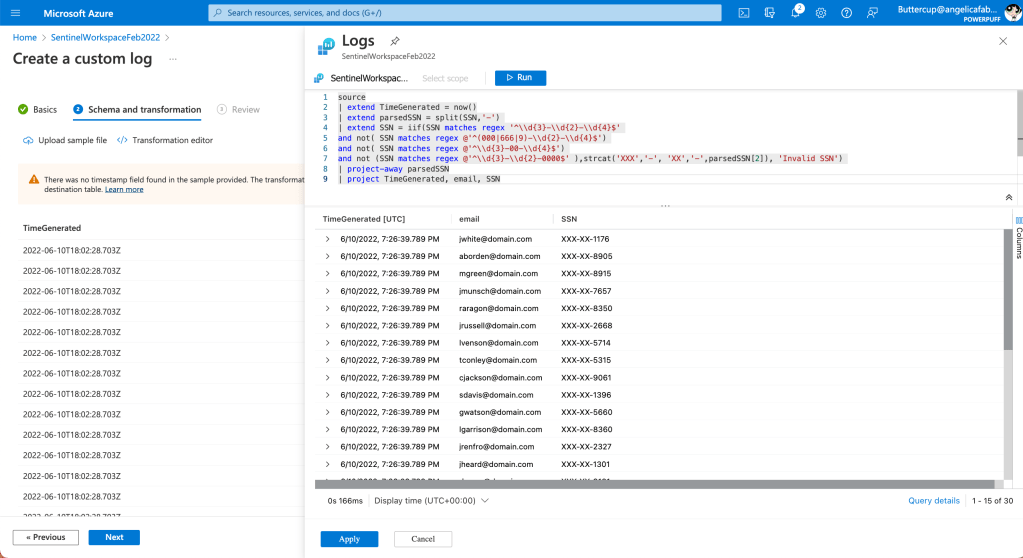
When I upload the json file, it automatically warns me about the missing timestamp.
It then automatically adds that first line (TimeGenerated), which I will leave as is, since I just need it for testing purposes. Then I added one of the masking samples found in the library of transformations to mask the SSN values, as shown below:
And that’s it!
I can see my new table is created, as shown below:
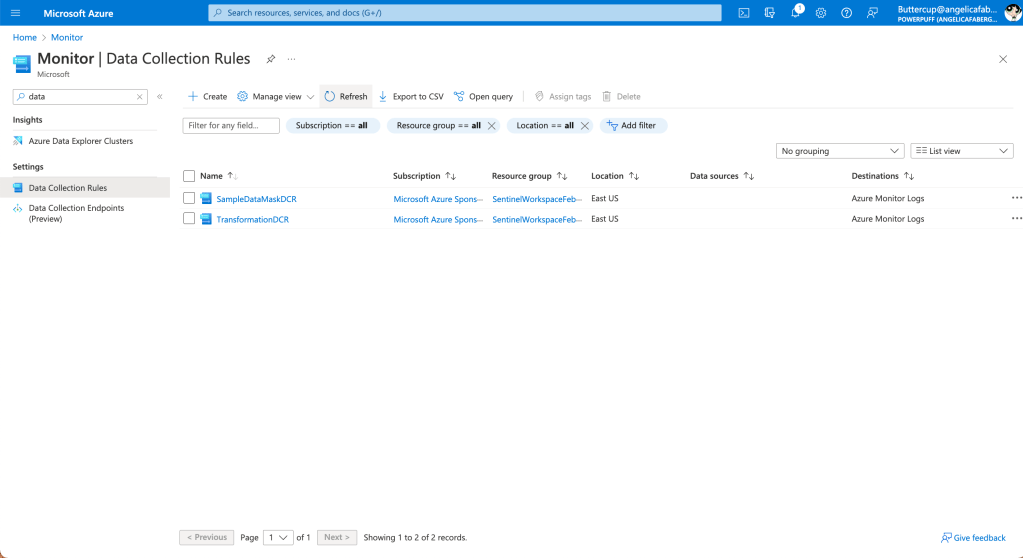
Also, if I want to check the DCRs created, I can see that information from the Monitor portal, as shown below:
More info
If you want to give this a shot, there are a couple tutorials in the Microsoft documentation that I found very useful. There is also a Tech Community blog and a library of transformations that gives you a head start with some of the most common scenarios, not just for filtering, but also for masking data, which some of my partners have previously requested. Happy testing!
TL;DR – Sharing my initial experience with verifiable credentials.
Update: Verifiable Credentials is now Microsoft Entra Verifiable ID and is now part of the Microsoft Entra family.
This week I’ve been playing around with verifiable credentials. Yes, playing – that’s exactly what it felt like, because learning about verifiable credentials has been a lot of fun! I’ve been following developments related to decentralized identifiers (DIDs) for a while because I can see that this is the technology that will finally allow people to have full control of their identities.
This week I’ve been following the instructions in the Microsoft documentation, which I have to say are pretty detailed and helpful. But I did run into a few issues, likely due to my lack of experience with verifiable credentials and decentralized identities in general. In this blog post I am documenting my experience and the few issues I ran into, hoping that if someone else runs into the same issues, they can find a possible solution. Please note, I am not going into details about the concepts, since those are well documented already. However, if you are interested in learning more, there is also a fantastic whitepaper and an FAQ that can be very helpful.
First error
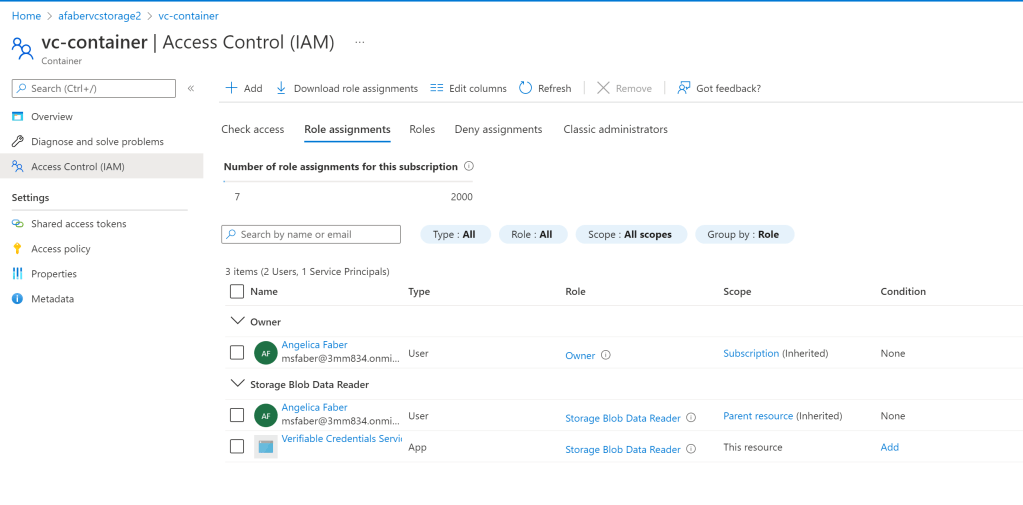
The first error I encountered was when I was creating the credentials. The error was “We couldn’t read your files. Make sure your user has the “Storage Blob Data Reader” role assigned in the selected container” as shown below:
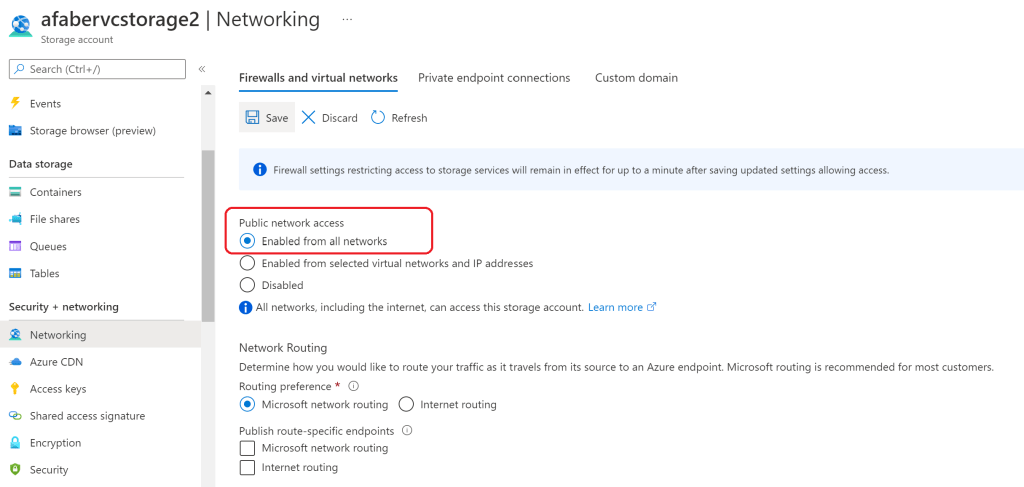
In my case I had two problems. The first problem was that when I created the storage account, I had chosen to enable network access only from my IP, which does not work. It has to be enabled from all networks at storage account level, even though the container is private.
The second issue I had was that I originally assigned the ‘Storage Blob Data Reader‘ at container level, but it had to be at storage account level.
And with that it will be inherited by the container as well, as shown below.
Second error
My second error was when I was building the project, where I received these errors:
error NU1100: Unable to resolve 'Microsoft.AspNetCore.Session (>= 2.2.0)' for 'net5.0'.
error NU1100: Unable to resolve 'Microsoft.Identity.Web (>= 1.18.0)' for 'net5.0'.
error NU1100: Unable to resolve 'Newtonsoft.Json (>= 13.0.1)' for 'net5.0'.
The fix was to add a new package source to my NuGet configuration files:
Finally, I thought I had everything just right, but when I tried to scan the QR code with the Microsoft Authenticator, which is my credential repository, I received this message: “Sorry, you can’t go any further. Tap OK to go back“
Selecting “View Details” gave me the option to “View logs”, which had a TON of details. Among them the following error (thanks Matthijs!) “Unable to access KeyVault resource with given credentials“. The solution was to add permissions that were missing from my key vault, as shown below:
The key permissions here are ‘get’ and ‘sign’.
Now it’s working!
After those issues were addressed, I could follow the entire flow as described in the tutorial.
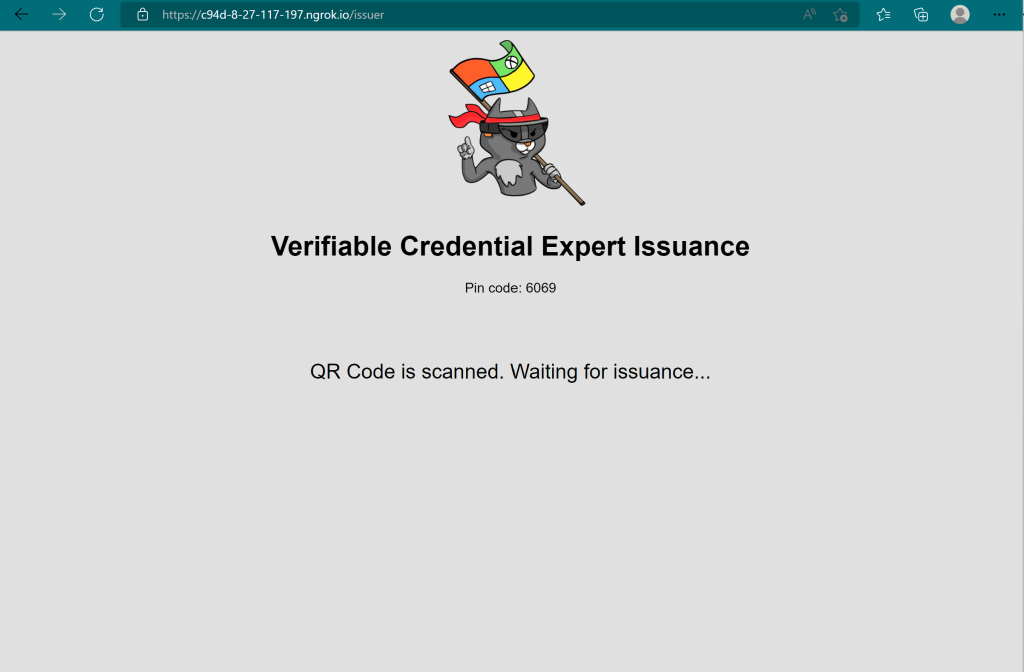
When I scan the QR code to issue a credential, I see the following:
And in the authenticator app, I see the following:
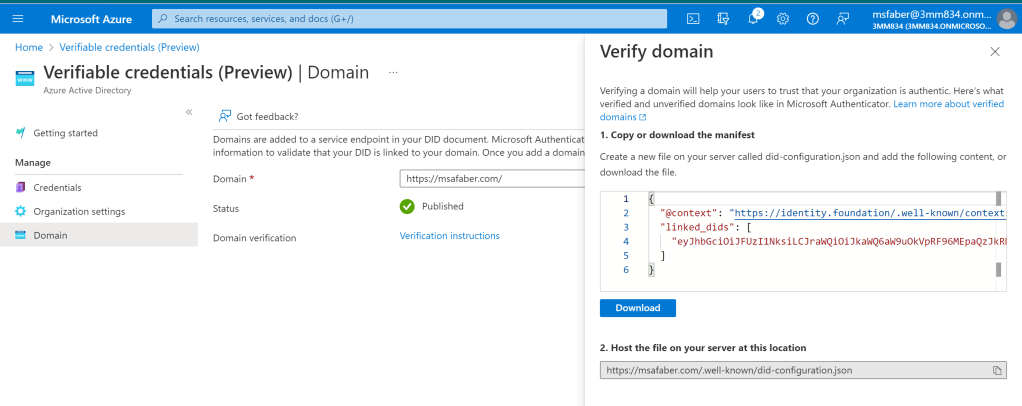
This is where I enter the pin that is shown in the application, where I scanned the QR code. One quick note here, the reason I see the little “Verified” blue box above is because I followed the steps to verify my domain, as noted below:
So, after that I can see my credential has been issued, as shown below.
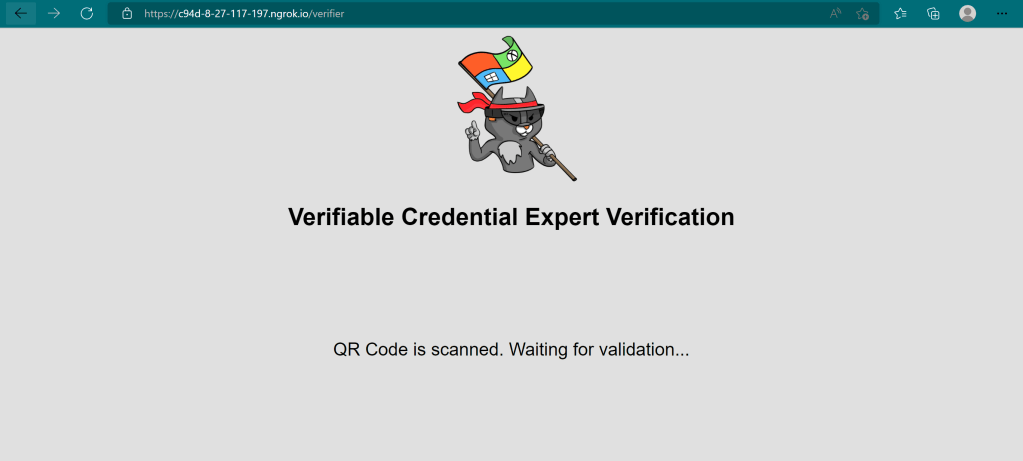
And I can also verify my credential. Once I scan the QR code to verify the credential, I see the following:
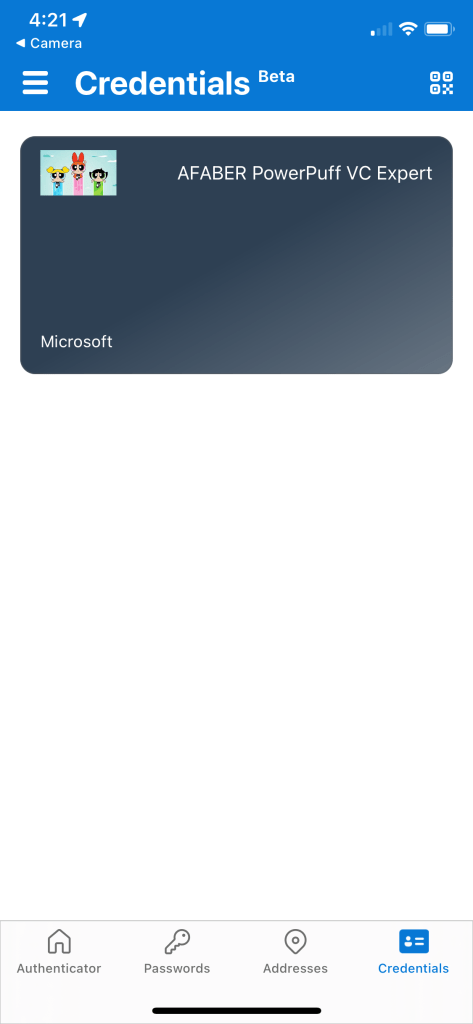
And the authenticator gives me (as the holder of this credential) the option to ‘allow‘ this application to confirm that I am indeed an “AFABER PowerPuff VC Expert“, as shown below:
And later I can also see that the activity associated with this credential, as shown below:
There are many reasons to become familiar with Verifiable Credentials. They are private because they allow holders to share only the information they want to share about themselves. They are tamper-proof, so they are secure. They are available when needed and they are portable, because they are stored in the holder’s credential repository. It’s the best of all worlds! I hope you are inspired to go test these new features, so I am not the only one having all the fun!
TL;DR – CloudKnox initial setup and the incredible value it brings to organizations and the security professionals working hard to keep them secure.
Update: CloudKnox is now Microsoft Entra Permissions Management and is now part of the Microsoft Entra family.
If you’ve been working in security longer than you care to admit or just a month, then at some point you’ve found yourself trying to implement least privilege and doing your very best to explain to ‘Overpermissioned Dave‘ that really, he doesn’t need ALL those permissions. Ultimately, no one wants to be the owner of the account that is misused by an attacker. I spent a portion of this week learning about CloudKnox, a Cloud Infrastructure Entitlement Management (CIEM) solution, and I can already see the huge value it can bring to any conversation around permissions.
Configuration
The Microsoft documentation (and videos!) walk you through the initial configuration, which is clear and very helpful, so I won’t spend any time covering that. However, I will say that if you are planning to give this a try, the time is now! CloudKnox is free while it’s on preview, so you’ll have some time to onboard your Azure subscriptions, AWS accounts, and GCP projects without associated costs.
When you initially go to enable CloudKnox, you will see the following:
As shown above, the preview will stop working after it goes GA, unless you contact your sales team to license the released version.
Once your configuration is done you can just come back to the Azure AD Overview blade to find the link to CloudKnox, as shown below.
You will also notice a new service principal, as shown below:
Onboarding Azure, AWS, and GCP.
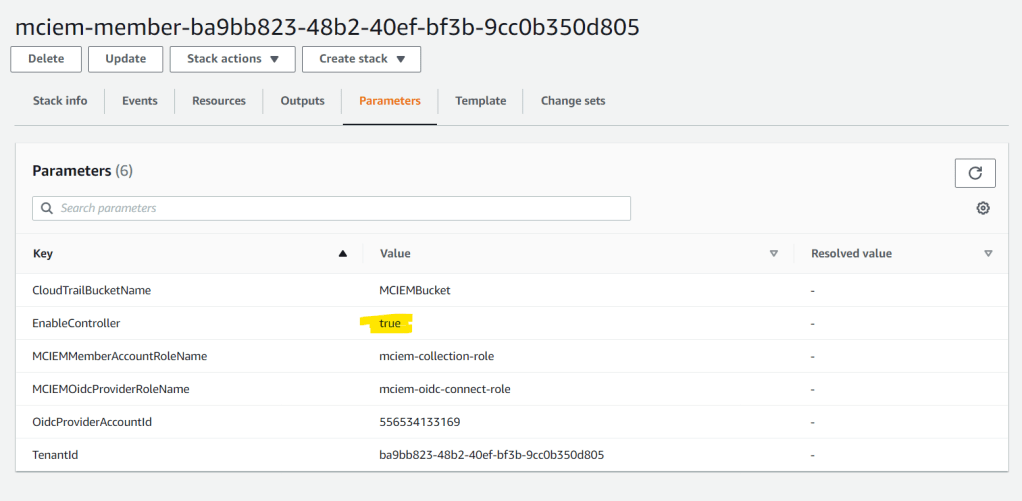
Again, the Microsoft documentation does an excellent job of walking you through the Azure, AWS, and GCP onboarding process. However, in my case I wasn’t fully paying attention when I did the configuration for one of my AWS accounts, so the controller was showing as disabled, as shown below.
Note: I also noticed that when you do the initial setup, it will show up as Disabled until it syncs up completely. In my case I forgot to flip the default flag when creating the stack in AWS, so I had to update it after the initial configuration.
I was able to update it by creating a change set for my stack in AWS, specifically the one for the Member Account Role, for which I just used the default name of mciem-collection-role, as you can see below. I want the EnableController to be set to true because I want to be able to trigger remediations from CloudKnox into my AWS account, but this is up to the organization.
Then I came back to CloudKnox and just selected “Edit Configuration” under “Data Collectors” tab for my AWS account and then I clicked on “Verify Now & Save“, as shown below.
After that when I go into “Authorization Systems” tab, now my controller status shows “Enabled” for both my accounts.
I also ran into an odd issue when onboarding GCP, that I think may be related to recent authentication flow security changes that causes “gcloud auth login” to fail with this error: “Error 400: invalid_request Missing required parameter: redirect_uri”. The fix for me was to use “gcloud auth login –no-launch-browser”.
So, what information do I get from CloudKnox?
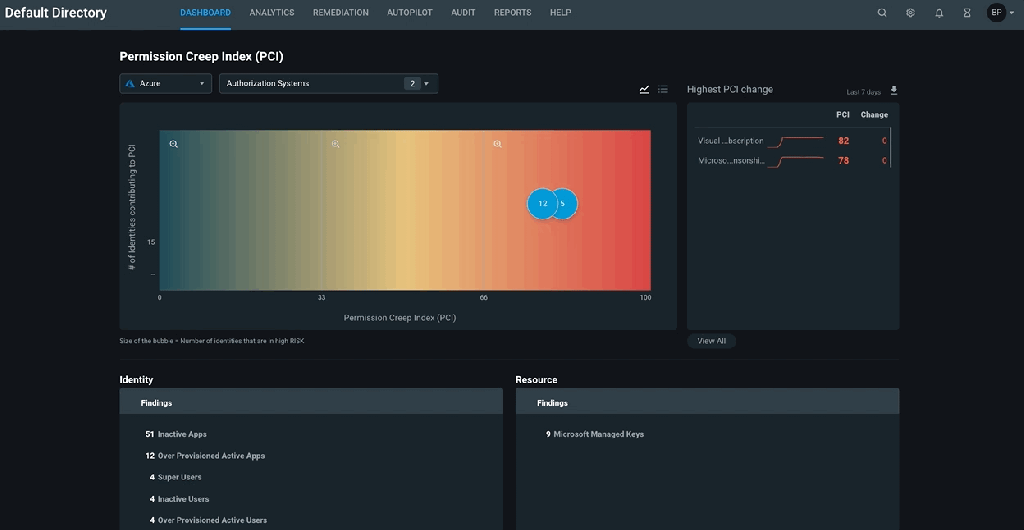
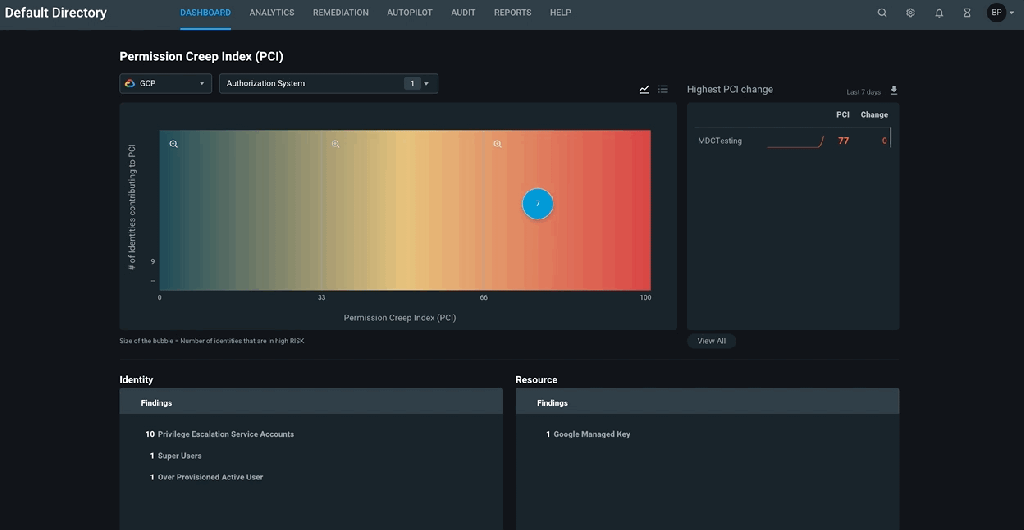
After you onboard your various Azure subscriptions, AWS accounts, and GCP projects, the first thing you will get is access to the PCI or Permission Creep Index. PCI is basically your risk level based on how overpermissioned your identities and resources are. Below you can see the PCI for my various subscriptions, accounts, and projects.
Azure
AWS
GCP
I don’t have a lot of resources in my various subscriptions and accounts, but I can already see the potential to restrict those permissions. For example, in one of my AWS accounts I have this user I creatively named Administrator that has been granted 10793 permissions and has used exactly 0 of those!
This type of information would clearly show ‘Overpermissioned Dave‘ that really, he doesn’t need ALL those permissions.
More
In this blog I just wanted to share an initial overview of the potential of CloudKnox. There is a LOT more you can do with this tool, including the ability to take immediate remediation actions to right size permissions by removing policies, creating new custom roles, even scheduling permissions for users only when they need them. You can also create autopilot rules to automatically delete unused roles and permissions. I hope you give it a try soon and let me know how it goes!