TL;DR – Discussing various Sentinel and Microsoft XDR detections related to multi-tenant applications, including the ones that are possible and the ones that are not.
A while back I created this post Cross-tenant workload identities with a single secret focused on an application that was registered on one tenant, but with access to other tenants and it used a single secret. Recently I’ve seen posts about detecting various scenarios within Sentinel related to this type of application, i.e. multi-tenant application. This post is about various Sentinel and Defender XDR detections related to these applications, the ones that are possible and the ones that are not.

Before I go on, the steps I followed on my previous post involved creating the application registration on tenant A with a secret and some application level permissions. Then the service principal was created through a link to a user on tenant B. Of course, that user on tenant B would need to have permissions to consent to the application permissions the application is requesting. At the end, the application registration exists on tenant A only. The only object that exists on tenant B is the service principal (i.e., enterprise application), which is the local representation of that application on tenant B.
Adding credentials
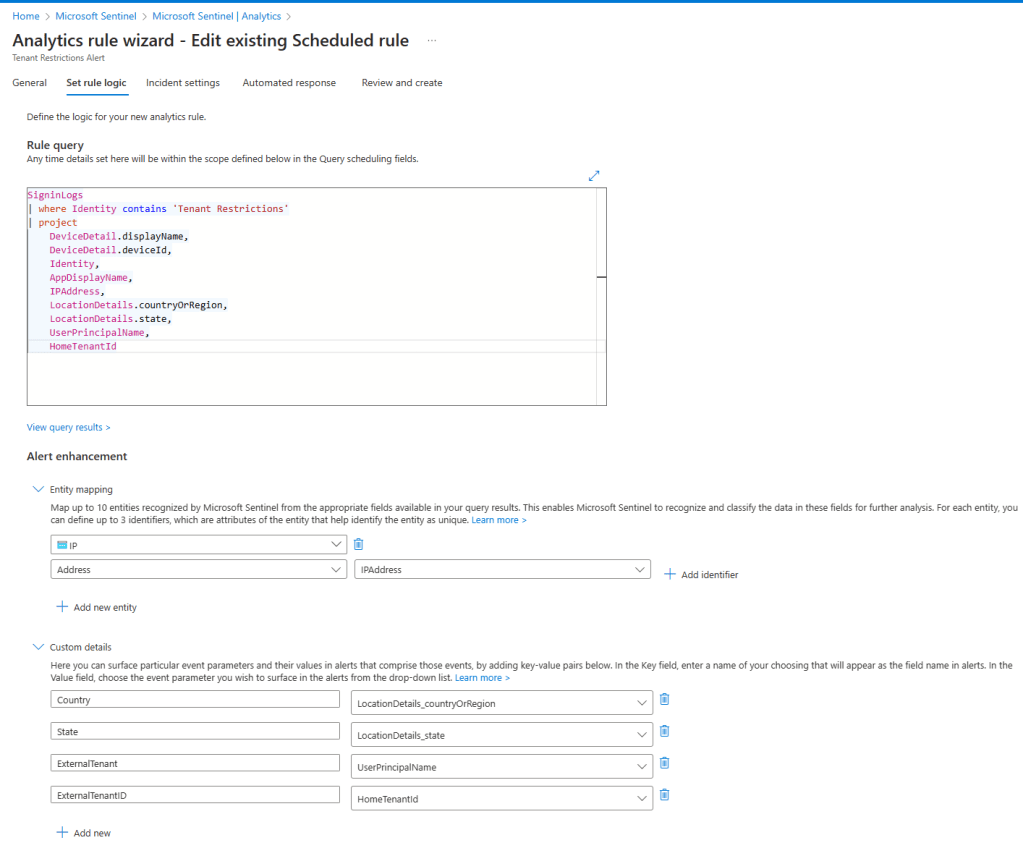
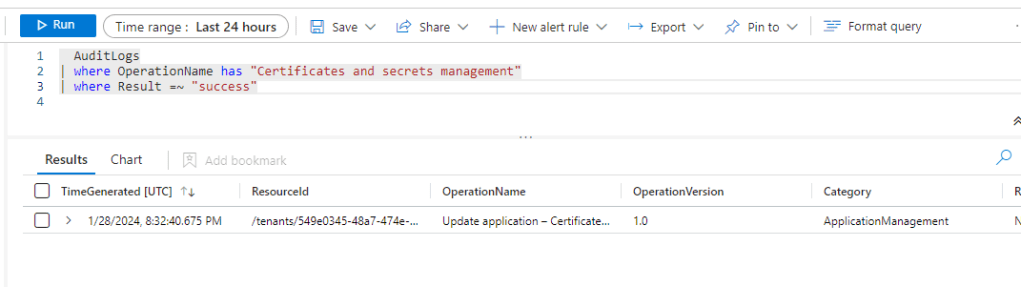
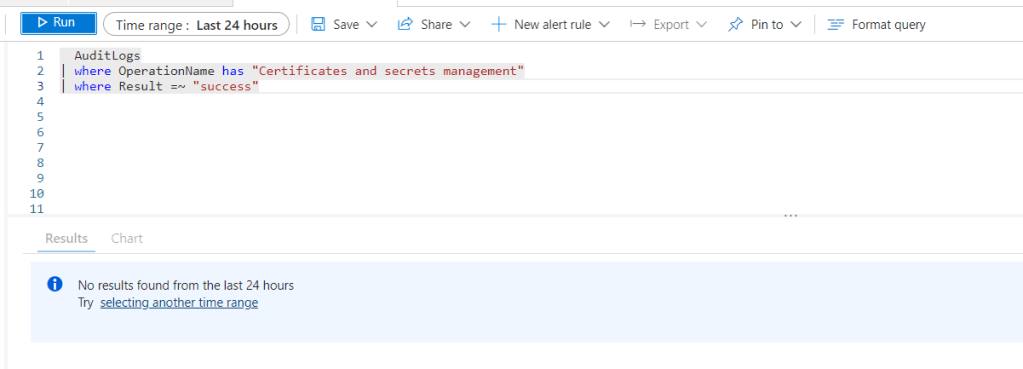
There are a few OOB analytic rules on Sentinel that look for specific events, such as the updates of credentials. These rules are querying AuditLogs for OperationName “Update application – Certificates and secrets management“. These queries are not going to generate any results on tenant B, because the secrets are being updated on tenant A only.
I can see output on tenant A:
But not on Tenant B, as expected:
Addition of the Service Principal
There are other OOB rules, such as “Service Principal Assigned App Role With Sensitive Access“, which are querying AuditLogs specifically for a few highly privileged permissions, those would detect the addition of that service principal on tenant B because the rule is specifically looking for OperationName =~ “Add app role assignment to service principal“. This rule focusing on the service principal, not the application registration, which is why it generates results.

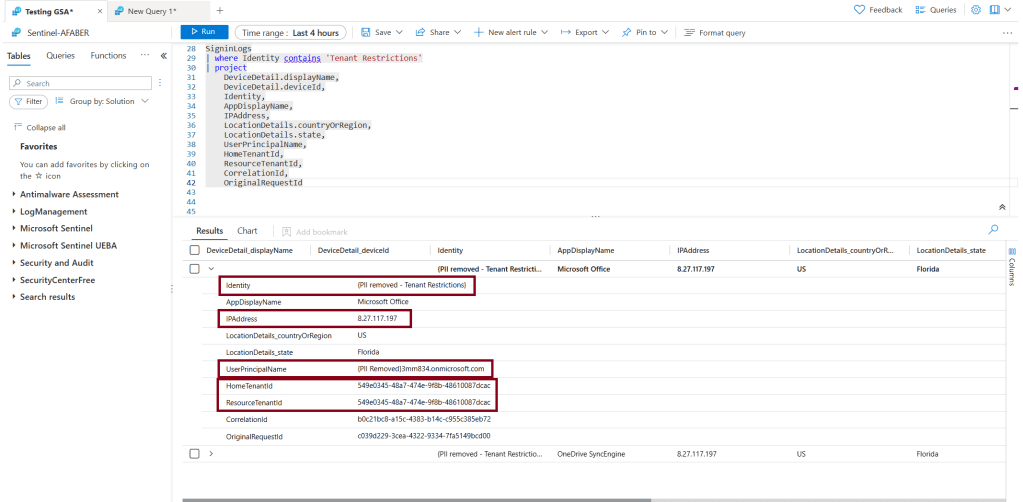
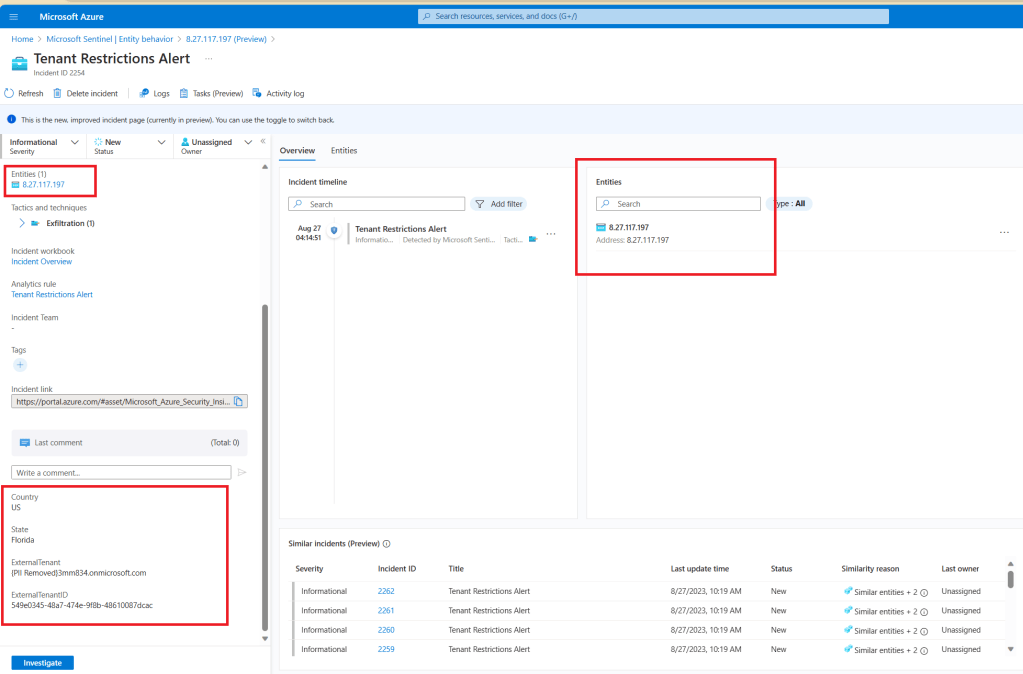
The originating tenant
I was trying to see if any of the logs detects the originating tenant, but I wasn’t able to find it in any of the logs. However, if you run this CLI command you’ll be able to see it by looking at the attribute appOwnerOrganizationId:
az ad sp list --display-name <name of the MultiTenantApp>
Someone uses the Service Principal
The detections related to the use of the service principal will depend on the permissions granted. This is probably a good time to go back to a different post I created called Building secure applications using modern authentication (part 2), where I explain the difference between application and delegated permissions. The short version is that delegated permissions are bound by what the user has access to, but application permissions are not. In general, application permissions tend to have a much broader set of permissions because they are meant to be used for background processes, which do not have interactive end-user access.
In that post I used the example of the Mail.Read application permission, which “Allows the app to read mail in all mailboxes without a signed-in user“. This was the scenario I tested this week, so I could see where I would be notified when that multi-tenant application was used. For that test, I created a PowerShell script that connected with the multi-tenant application and secret to just read emails for one of my users, Barbie. For more details on OAuth client credentials flow, see Building secure applications using modern authentication (part 1).
From Sentinel, there are a few analytic rules that detect anomalies on MailItemsAccessed operations, such as this one, which queries the OfficeActivity table. In my case it didn’t trigger, but this is my test instance, so I don’t really have a good history for my user Barbie in this case. There are also various hunting queries including this one, which queries the CloudAppEvents table. In my case this query returned the AppId that I was using with the PowerShell script.
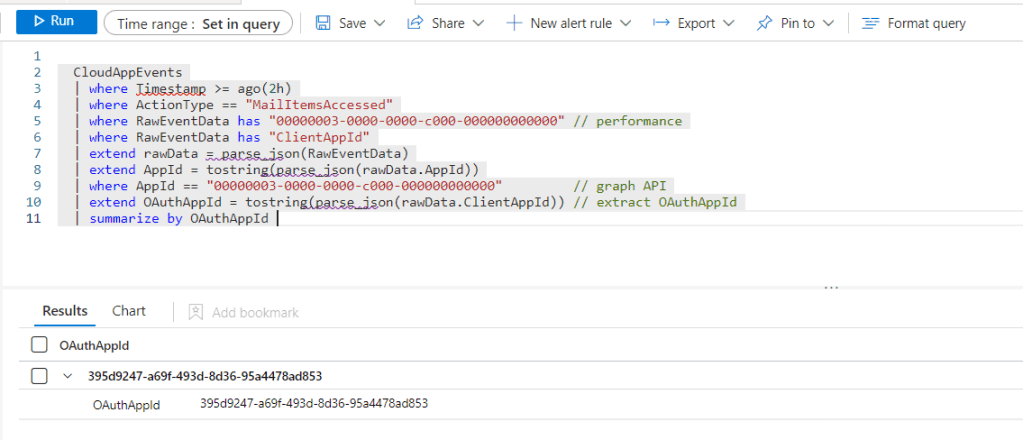
By the way, if you are not seeing any records in CloudAppEvents, navigate to Settings > Cloud apps > Connected apps > App Connectors and make sure your Microsoft 365 connector settings have the correct events checked.

From Defender XDR, I also triggered the Access to sensitive data alert:
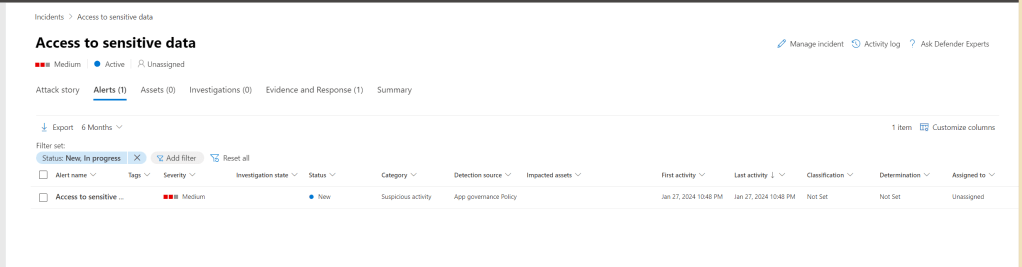
This alert is coming from Defender for Cloud Apps, specifically from App Governance:
The Access to sensitive data is a predefined policy within App Governance, but you can also add additional policies here.
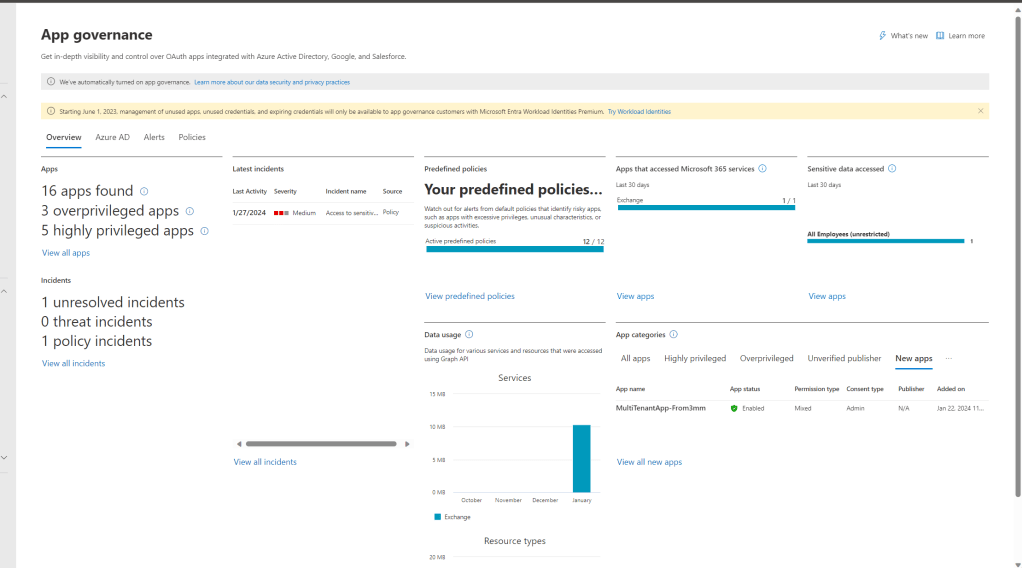
App Governance is also where I can find a lot more information on this service principal.
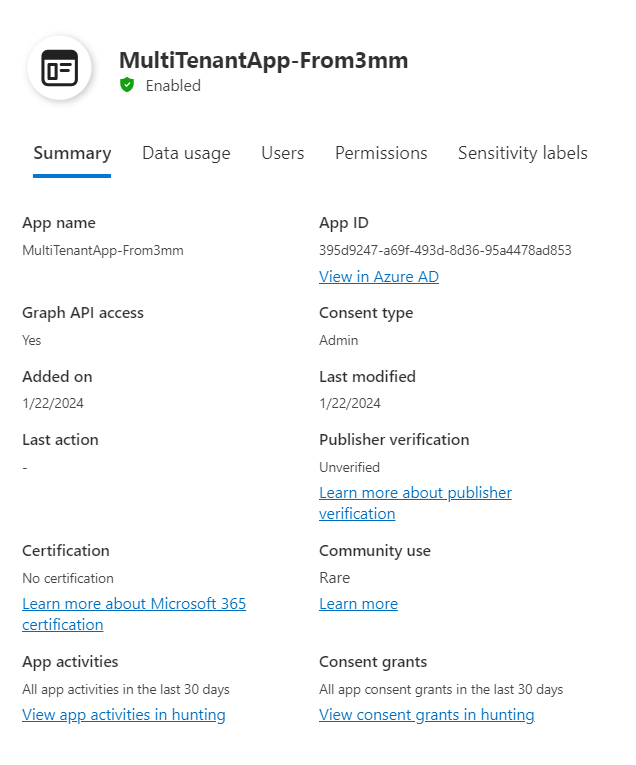
Including the permissions assigned:

Also, App Governance used to be an add-on, but it is now included with E5, so if you haven’t enabled it, I suggest you do. You can follow the steps here.
Not a new Service Principal
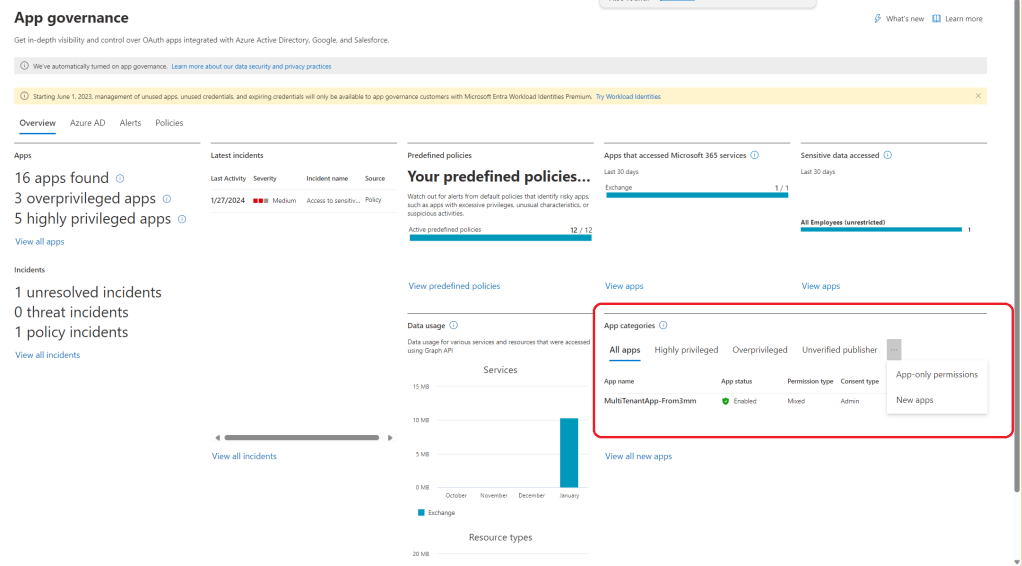
So far, I’ve gone over a few options to detect the addition of the service principal and the actual use of it, which led me to App Governance within Defender for Cloud Apps. But this a good area to focus on, even before you see the alerts coming in. This is especially important when the service principal is the only object you see within the tenant, which is the case for this multi-tenant application.
As you can see below, there is a section within the dashboard that focuses on App categories, where you can dive into specific applications, such as those that are Highly privileged and Overprivileged.
Closing
Adding some of the detections mentioned above is very useful to detect the changes, such as when the service principal is created or when it’s used. However, that only alerts based on new or updated applications. A better scenario would be to detect those unfortunate opportunities before attackers do. A good security review process for consents is a must. However, for organizations that haven’t had that process in place, I always recommend to our customers that we start with a thorough review of these existing applications. This is especially important for those that include application permissions, if those are the only permissions assigned and especially if they are mixed with delegated permissions.
As usual, I hope this post is useful! And I hope it inspires you to tackle the early spring cleaning of OAuth apps! 🙂