TL;DR – You can have cross-tenant workload identities authenticating using the secret or certificate from their home tenant.
File this one under ‘you learn something new every day‘. I always thought that since application registrations are global and service principals are local, that any multi-tenant application would have to authenticate locally. The documentation describes a multi-tenant applications as those with an audience of “accounts in any Azure Active Directory“, which makes perfect sense for the typical multi-tenant interactive application that allows end-users to access applications in their home tenant, where they also authenticate.
Well, it turns out, multi-tenant also means an application ID can authenticate in another tenant (tenant B) with the credentials that were originally created in the home tenant (tenant A). This is useful for background services or daemon processes applications that require application permissions (as opposed to delegated permissions). See my previous blog on this subject.
Register the application in tenant A
For example, I create an application, creatively named ‘MultiTenantApp’, in tenant A (Contoso).
I then add some permissions. In this case I am just testing to verify the domains in the tenant, using the domains endpoint, since that will later confirm I am connected to the right tenant. So, I am using Domain.Read.All.
And then I add a secret to this application, which will only ever exist in Tenant A (Contoso).
So, to verify I can login using the app-id via the CLI command.
az login --service-principal -u <app-id> -p <password-or-cert> --tenant <tenant>
And I can list the domains as shown below. I just want to verify I am connected to the correct tenant, which for now it’s the domain on the tenant A (Contoso).
Create the service principal on tenant B
So, now to create the service principal (without any secrets) in tenant B (PowerPuff), I use the browser to navigate to:
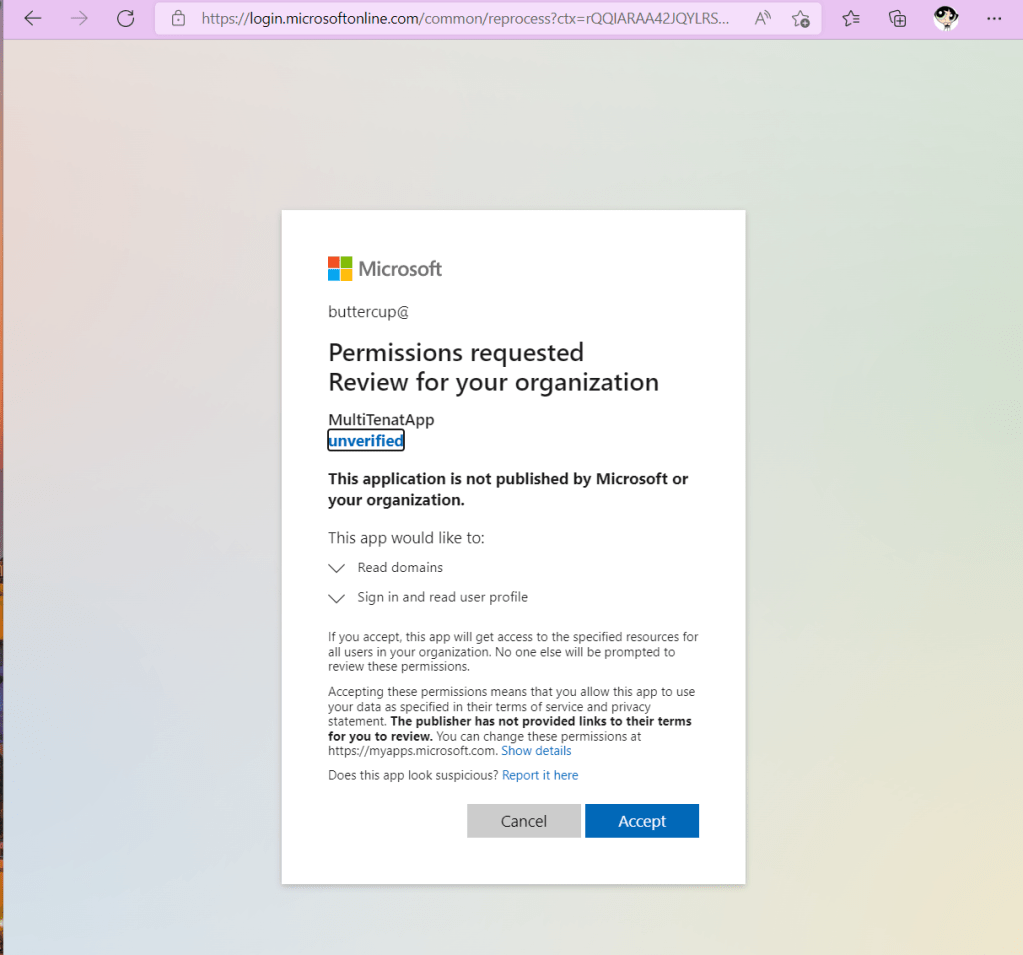
I am logging in as the Global Administrator, so I can consent to the permissions, as shown below:
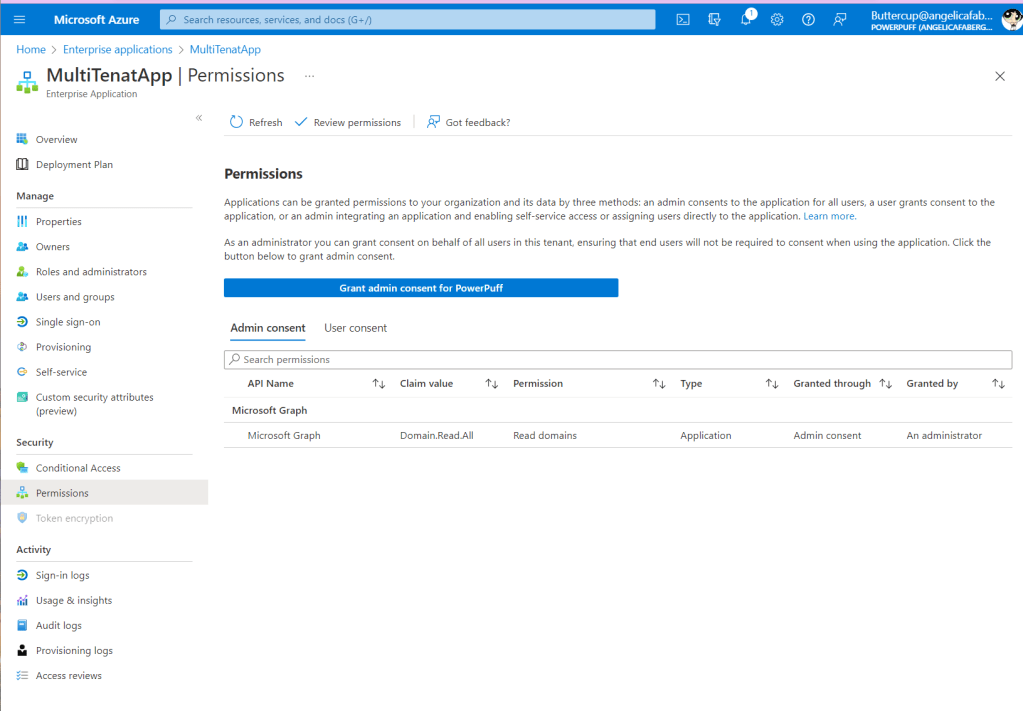
I then verify the service principal (Enterprise Applications) is created with the correct permissions, since I consented as the Global Administrator above.
The step above is only done once, because I just need to create the service principal and consent to the permissions in tenant B (PowerPuff) one time.
Now I can test
I login with the app-id and the secret that was created in tenant A (Contoso), but I will access tenant B (PowerPuff).
And it works! I can authenticate with the app-id and secret from Contoso, as long as the Service Principal exists on any other tenant. This means I don’t need to keep secrets for each and every tenant that I need to access to run this background application.
TL;DR – A story of how I left an RDP port wide open (oops!) and MDC and Sentinel came to my rescue when my resource was attacked.
Nope! I didn’t do this on purpose. Normally, I do a lot of testing to generate alerts and incidents in MDC, Sentinel, Defender 365 etc., but this one was not planned, not part of any test to generate alerts. This was a real attack.
Recently, I launched some resources as part of a lab to test Azure Purview, because… well, data governance. One of the resources included in the lab was a SQL Server on Azure VM and, unfortunately, the network configuration left the RDP port open. I was lucky to have previously configured Microsoft Defender for Cloud (MDC) and integrated it with Microsoft Sentinel.
The first thing I noticed
The Sentinel incidents started coming, this is how I first noticed there was something wrong. These were incidents and alerts that I did not expect within this workspace.
Digging in a little deeper on one of the alerts (‘Traffic detected from IP addresses recommended for blocking‘), I can see the entity associated was my Purview lab server and there was inbound traffic from IPs that may be malicious.
I could also see a link to go to Defender for Cloud and get more info, so I did. I could see that 32 different IPs tried to connect to my resource on port 3389.
I can see more details about those IPs as well.
And I could see actions I could take to “Mitigate the threat” and to “Prevent future attacks” as well. I could also trigger an automated response, which would mean running a Logic App, but in this case, the “Enforce rule” action available meant it would not require a Logic App.
When I clicked on “Enforce rule“, it gave me the option to immediately update the network configuration to block port 3389 for that server. This recommendation came from the adaptive network hardening recommendations, so it is based on a machine learning algorithm that “factors in actual traffic, known trusted configuration, threat intelligence, and other indicators of compromise, and then provides recommendations to allow traffic only from specific IP/port tuples“. That means the recommended rule will take into account any legitimate sources.
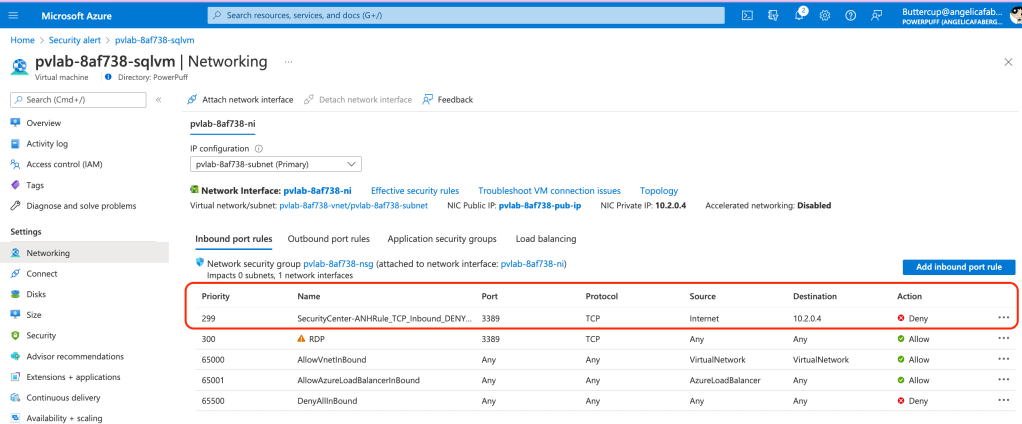
In my case I didn’t need any of the ports open from the Internet, so I would update it to deny all traffic on that port from the Internet, which is what clicking on “Enforce” did, as shown below.
A SOC analyst having the ability to make it stop right there by just clicking one button can mean their effectiveness is that much more valuable. Also, the fact that the recommendation they are following comes from the evaluation of the legitimate traffic as determined by the machine learning algorithm, means it is likely the way it should have been configured initially for the specific requirements of that resource. And if you wanted to automate this response in the future, you can do that from either Sentinel (playbooks) and/or MDC (workflow automation) using Logic Apps.
The other alert
You probably noticed there were two different types of alerts on Sentinel, the other one was ‘Suspicious authentication activity‘, as shown below.
Digging in deeper on the MDC side (by following the links from Sentinel above), I could see all the details about the various users the attacker tried to use. I could also see the actions recommended by MDC, which include the various recommendations to prevent future attacks. Because MDC is both a Cloud Workload Protection (CWP) solution and a Cloud Security Posture Management (CSPM) solution, so it can alert during an attack, as well as prevent attacks. The same policies can even prevent resources from being configured incorrectly initially, but that’s a subject for another blog.
The original setup
You are probably wondering ‘where are all these alerts and recommendations coming from and why are they showing up in Microsoft Sentinel’? They are coming from Microsoft Defender for Cloud because I enabled the enhanced security services for my resources, as shown below.
This enables these workload protections and various other features, as described in the documentation. And that allows it to alert me when these attacks happen. You can also see the same alerts shown here to the right, under “Most prevalent security alerts“.
And they are showing up in Microsoft Sentinel because I have the Defender for Cloud connector enabled for the subscription where my resource is located and some analytic rules enabled as well.
Multi-cloud and Hybrid
And if you are thinking, but this only works on Azure resources, you will be pleasantly surprised to know that MDC is multi-cloud. So, everything I just shared here can apply to resources on AWS and GCP natively, and on other clouds as well as on-prem resources using Azure Arc.
Just a little further
Since I was able to see these alerts in Sentinel, I was also able to run some playbooks to go to RiskIQ and find out if they knew anything about these IPs that were trying to connect to my resource. If you want to know more about this setup, please reference my previous post, RiskIQ Illuminate Content hub solution within Microsoft Sentinel. And here’s how that information shows up in Sentinel for this specific case.
As you can see above, after running that playbook, the incident was updated to ‘Active‘, the Severity was raised from ‘Low‘ to ‘Medium‘, a tag was added ‘RiskIQ Suspicious‘, and 33 comments were added with more information about the various IPs that were included in the incident. In this case, I had already resolved the issue from MDC, but in other situations a SOC analyst can also make use of this data to correlate to other open incidents.
While this incident was a complete surprise to me, it was a great opportunity to see the power of these Microsoft Security services working together to make a resolution to these types of attacks that much easier for any SOC analyst.
TL;DR – Just a few tips and tricks for configuring the Azure Activity Connector in Microsoft Sentinel.
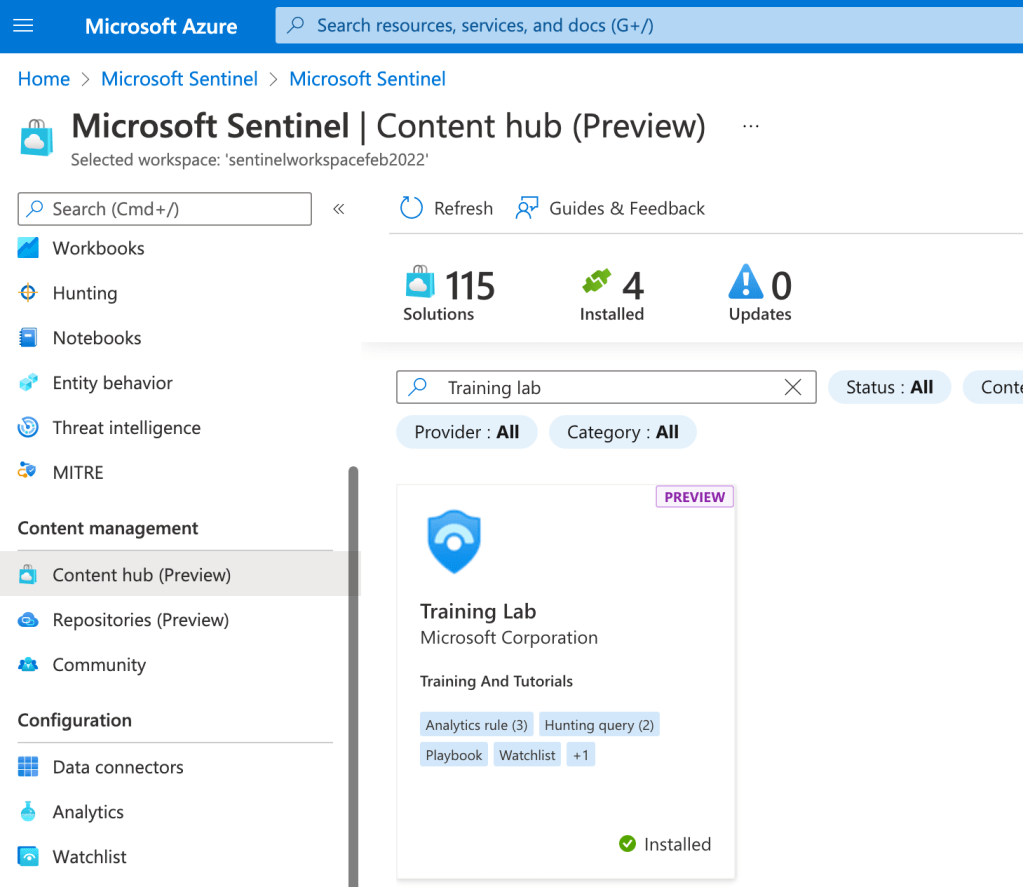
Personally, I learn by doing, so whenever anyone asks me what’s the best way to learn Microsoft Sentinel, I point them to the Training Lab, which is available right from the Sentinel Content hub.
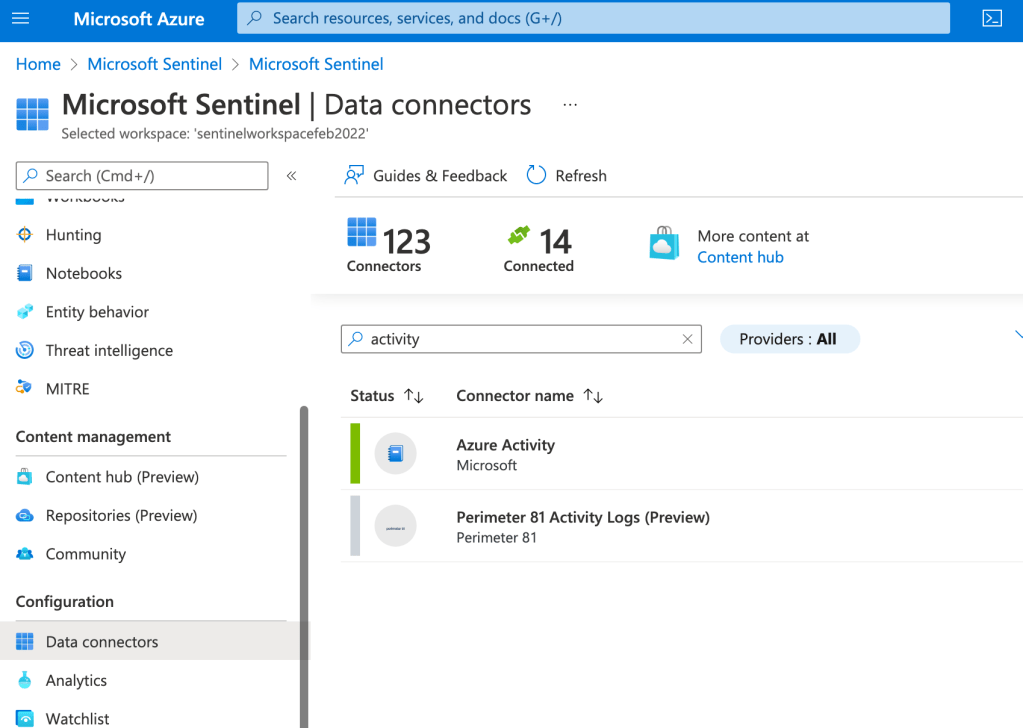
It’s a wonderful tool to learn the basics and get comfortable with Microsoft Sentinel. As people move through the training lab modules, one of the most common questions I get is when they reach module 2 and they need to configure the Azure Activity connector, because they follow the steps, but the connector still remains ‘not connected’ (not green, as shown below).
Normally, it is a straight forward configuration, however, if you are using a subscription that was previously configured to send logs to another source or if you set the scope to a higher level (i.e. root management group), then it may not be updated as expected immediately.
First, you need to ensure you check the box to ‘Create a remediation task’ so that when the new policy is assigned to your existing subscriptions, they are updated to send logs to the specified Log Analytics workspace, the one that is configured for Microsoft Sentinel.
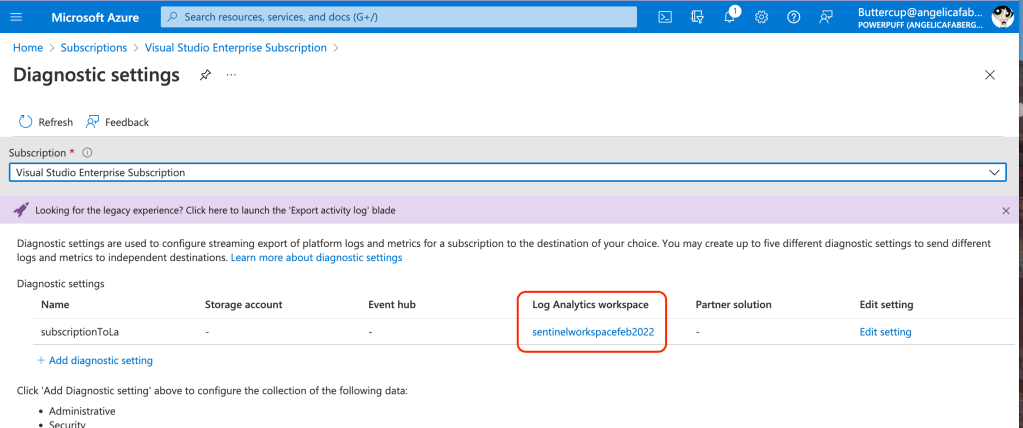
Then, to verify the subscription was updated to send logs to the correct workspace, navigate to your subscription, select the ‘Activity log’ blade, and then click on ‘Export Activity Logs’, as shown below:
Ensure the ‘Log Analytics workspace’ value is the same workspace you configured with Microsoft Sentinel:
If it isn’t, go ahead an update it. Once you update it and the workspace starts receiving data, you should see the status of the connector change to green, while also showing the time the last log was received, as shown below:
You should still check the Azure policy assignment to ensure only the expected policies are assigned and configured at the correct level, which may be management group level, subscription, or resource group level. Also, ensure the parameters specify the workspace that is configured with Microsoft Sentinel.
If you haven’t tried out the Training Lab, I highly recommend you do. You can use the free trial that is available for the first 31 days. Have fun learning!
TL;DR – An overview of RiskIQ Illuminate solution available through Microsoft Sentinel Content hub.
The last few months I have been spending quite a bit of time with Microsoft Sentinel, to the point that a day hasn’t gone by that I don’t at least mumble the word ‘Sentinel’. It’s truly an impressive service and it’s quite intuitive.
We have been receiving questions on RiskIQ and Microsoft Sentinel, specifically around the new RiskIQ Illuminate solution that is available in the Microsoft Sentinel Content hub. This blog will go through the process to configure and test this solution.
Install RiskIQ Illuminate Content hub solution
Install of the solution is just a click away, just click on ‘Install’. Yes, it’s that easy!
As you can see above the solution comes with 27 playbooks (currently). These playbooks will basically go find out if RiskIQ knows anything about the entities (hosts or IPs) associated with specific incidents. And if so, then it enriches the incident by increasing the severity, adding some useful tags, and comments with links to the information found on RiskIQ. This ensures the SOC analysts working these incidents have this very valuable information easily available when they need it.
RiskIQ Community Account
In order for the playbooks to have access to RiskIQ you will need a RiskIQ community account with access to Illuminate. Follow these steps to configure it:
Register to create an account on the RiskIQ community, if you don’t already have one.
Activate the Illuminate trial. Click on ‘Upgrade’, then follow the steps to activate the trial.
Once you activate the trial, you need to get your API key through the Account Settings page.
Configure Playbooks
After installation of the solution, you’ll see the RiskIQ playbooks through the Automation blade as shown below.
To ensure the playbooks have access to both RiskIQ and Sentinel you will have to ensure the associated API connections show as “connected”.
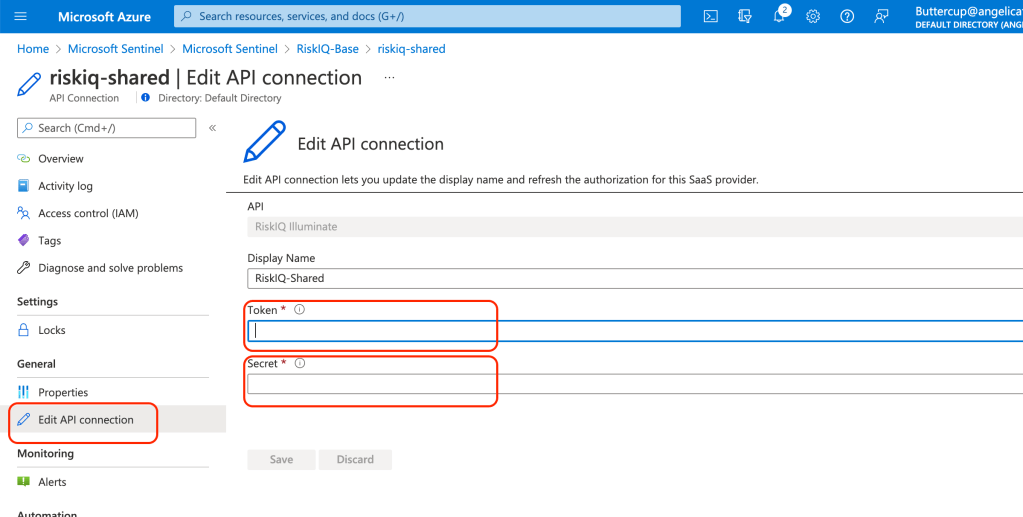
We’ll first start with the API connection to RiskIQ. Click on the “RiskIQ-Base” playbook:
Then select the API Connection ‘riskiq-shared’
Then enter the API key information you got from the RiskIQ community account settings page and save.
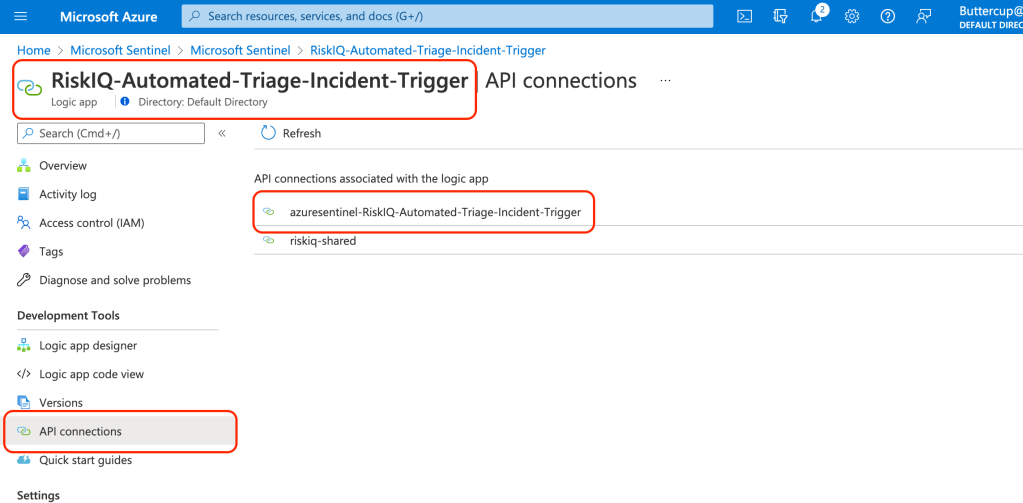
Now, for the rest of the playbooks you need to authorize the associated API connections. Click on the playbook, for example, “RiskIQ-Automated-Triage-Incident-Trigger”, then click on the associated API Connection as shown below:
Click to Authorize, which will prompt you to login with your user with required permissions. And don’t forget to ‘Save’.
Repeat those steps for the remaining associated API connections for the remaining playbooks.
And then I created an analytic rule that just reads from the watchlist, as shown below.
I also configured entity mapping for the IP address as shown below:
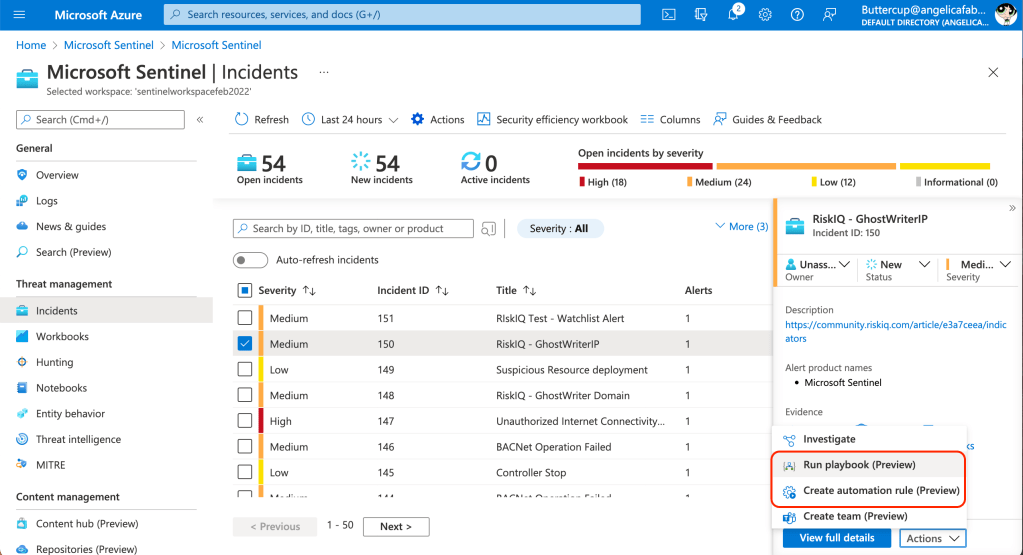
While I am here, notice that this incident (150) was automatically created with a ‘medium’ severity, since that’s what I configured in the analytic rule. Now I can run the playbooks from the incidents blade as shown below.
Or I can schedule an automation rule that will trigger the playbooks to run automatically based on a set of conditions as shown below:
For this test I am going to run the playbook manually, so I can show the incident updates.
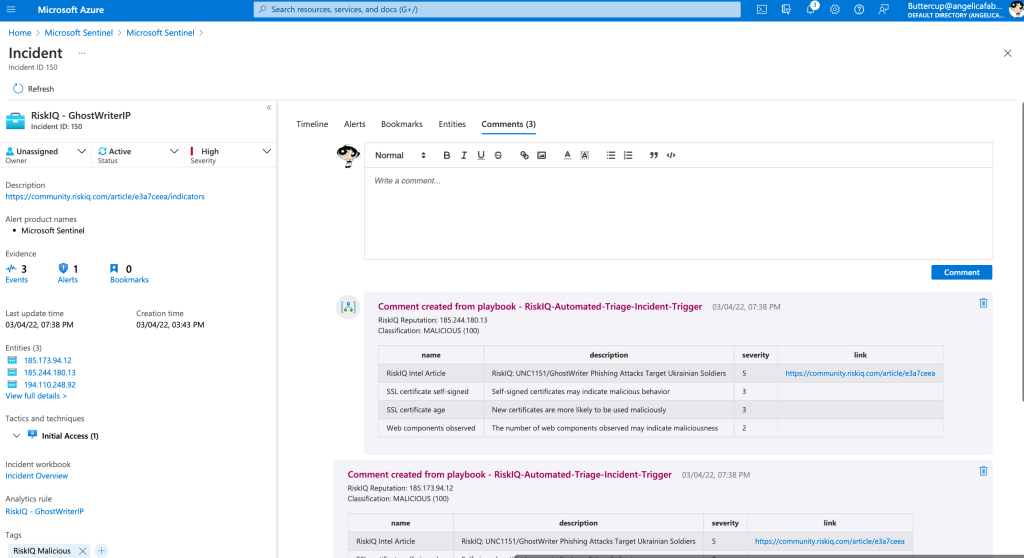
After the playbook runs, the severity is now raised to ‘High’, there is a new tag added ‘RiskIQ Malicious’, and the status changes to ‘Active’.
Additionally, these useful comments are added to the incident:
Including a link to the associated RiskIQ article:
In the same way that I can run these playbooks at the incident level, I can also run them at the alert level, for any alert associated with the incident, as shown below. This because the solution includes both incident and alert trigger playbooks.
As with any other playbook (logic app), I can also look at the history of the runs:
And just like any other playbook (logic app) I can troubleshoot in case of issues:
Summary
Playbooks in Microsoft Sentinel are used for many different SOAR tasks. This RiskIQ Illuminate solution makes great use of these playbooks to enrich incident data that can make a SOC analyst’s life just a little bit easier. Because we know that these days every little bit counts!
SoD is sometimes referred to as ‘segregation of duties’. The typical example used for SoD is Accounts Payable and Accounts Receivable, because having access to both allows a single user to intentionally or unintentionally commit fraud and cover it up. This concept of checks and balances goes hand in hand with the concept of least privilege, which is imperative to enforce security policies for data access. Using SoD rules or policies when defining roles and entitlements is essential to prevent or limit the likelihood of a single user’s ability to negatively impact our systems. These policies not only protect the users from making mistakes, but they also limit how much damage an intruder can make if they are able to impersonate that user. SoD rules and policies ideally should be preventative measures. A good identity governance solution should provide the means to enforce these policies during the access request and approval process.
Azure AD currently offers this feature in preview. You can add specific incompabible access packages:
Or specific incompatible groups:
This means that if the user already has the incompatible access package assigned, or is a member of the incompatible group, then they cannot request this access package.
Certification / Attestation
We couldn’t possibly talk about access without mentioning access reviews. Because no process is ever perfect, including the JML process, we need to certify or confirm access. Access reviews are typically part of the Identity Governance solution and the purpose is to certify privileges a user is assigned are still required by the user. There are two main parts to the UAR process:
Reviewers, who are typically the LOB owners for those privileges, review the users that are assigned and either approve or deny the access going forward.
The privileges are automatically removed for any users who were denied by the reviewers.
Azure AD also offers options to send notifications and reminders to the reviewers to ensure they provide feedback within the allotted time. There are also options to automatically remove the access on denied or not reviewed outcomes, basically for anything that wasn’t specifically approved by a person.
Continuous access reviews for privileged access group membership and privileged role assignments are essential to re-certify, attest, and audit users’ access to resources.
Azure AD offers access reviews for:
Access Packages
Teams/Groups and Applications
Privileged roles and groups managed via PIM (see next section)
Privileged roles are at the top of the priority goals for attackers, that’s why they have to be protected with an equivalent urgency level. Microsoft has done a fantastic job of documenting recommendations to protect privileged users, especially when it comes to protecting those highly privileged users from on-prem attacks.
Azure AD offers Privileged Identity Management which provides the ability to assign privileged roles either active or eligible. This means that if a user doesn’t need access for their daily job, they can then be assigned that role as eligible, which means they have to activate it when they need to use it. That activation can then require additional requirements, such as:
Azure MFA
Justification for activation
Ticket – if a support ticket is required for auditing purposes
Approval
As you can see above, the activation can also be restricted to only a certain number of hours, and it can be scheduled. So, if someone is expecting to work on a Saturday morning, they can get their approvals earlier in the week and schedule the activation for the hours they plan to work.
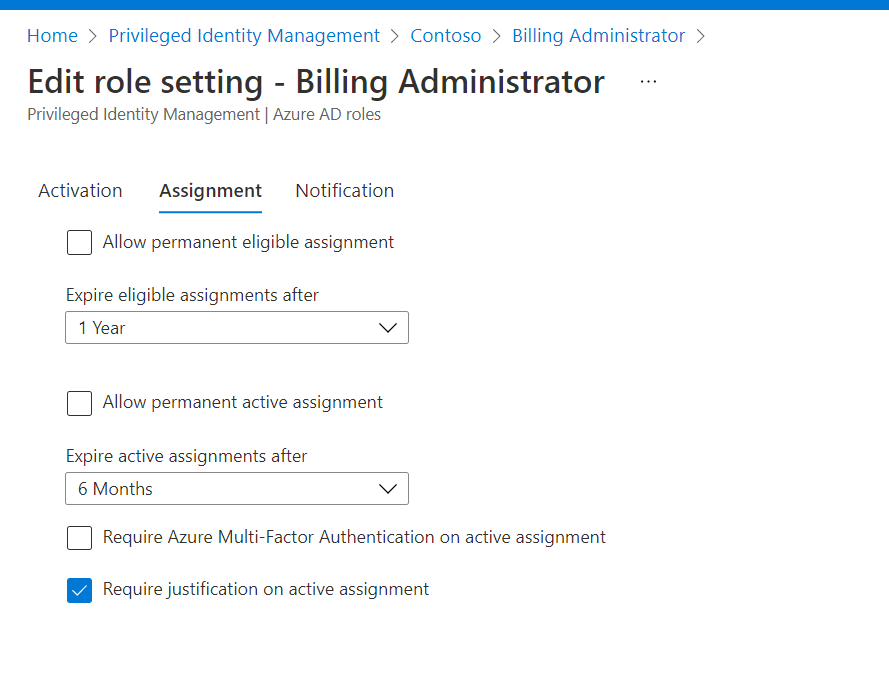
Another great feature is the ability to expire those role assignments. Many times privileged roles are assigned for a specific project and sometimes in an emergency situation and there’s really no need for those users to keep the roles forever.
In this case PIM allows the assignments to expire and the users can then request extensions if they still need the roles.
Azure AD PIM currently supports the following groups and roles:
Azure AD roles
Azure resources (RBAC roles for subscriptions)
Privileged access groups (preview), these are groups that can be assigned roles and have enabled privileged access.
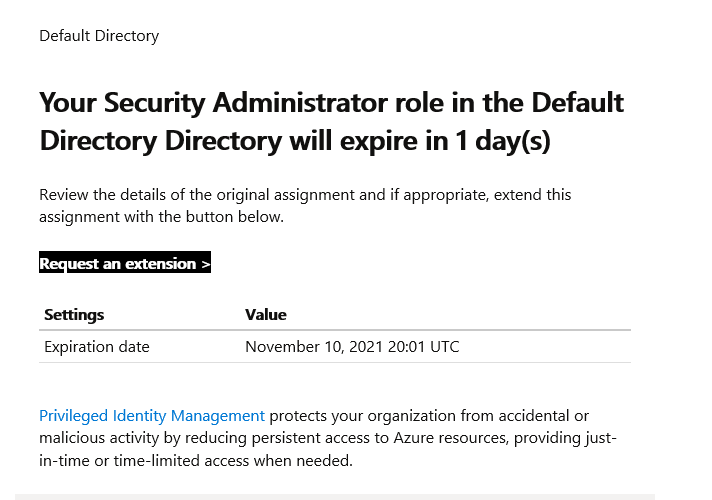
Finally, one of my favorite features of PIM are the email notifications to ensure that once you implement PIM the assignments remain within the guidelines the enterprise has deemed necessary. The users that are assigned Global Administrator, Security Administrator, and Privileged Role Administrator will receive these notifications.
These administrators will be able to see if users are assigned roles outside PIM and/or assigned permanently, and they are provided with links to adjust the assignments as needed.
There is a LOT more to identity governance, but hopefully I have given you an idea of what an enterprise level solution should include and the tools that Azure AD provides to build on top of the robust solutions offered. On the road to implementing zero trust solutions, establishing a solid JML process is a big step forward for any enterprise. I know it’s called ‘governance’, but it’s much more than governance, it’s preventive security.
Update September 2022 – Microsoft released a new service called Lifecycle Workflows that helps with the automation of tasks based on the Joiner-Mover-Leaver cycle. I will write a separate post on this topic soon.
RBAC / ABAC
You may ask, how does this all relate to the access controls models we’ve heard about? Well, I could present a full dissertation on ABAC, RBAC, MAC, and DAC, but I’m just going to mention the difference and that the JML process is closely related to these terms because these are the most common access control policy models.
DAC – Discretionary Access Controls
MAC – Mandatory Access Controls
RBAC – Role Based Access Controls
ABAC – Attribute Based Access Controls
DAC is based on ACLs or a matrix of rules, such as OS permissions. MAC is mostly used for government, as its based on security labels or clearance levels. RBAC is probably the one most people are familiar with, since it’s essentially the foundation of ABAC, you can consider RBAC the ‘birthright’ or ‘default’ role privileges, based on job responsibilities, as I mentioned on the previous post. And ABAC, as the name implies, is based on attributes and/or combination of attributes, and for that reason is the most granular. It is also the most flexible, and quite common for more modern SaaS services, including most cloud resource services.
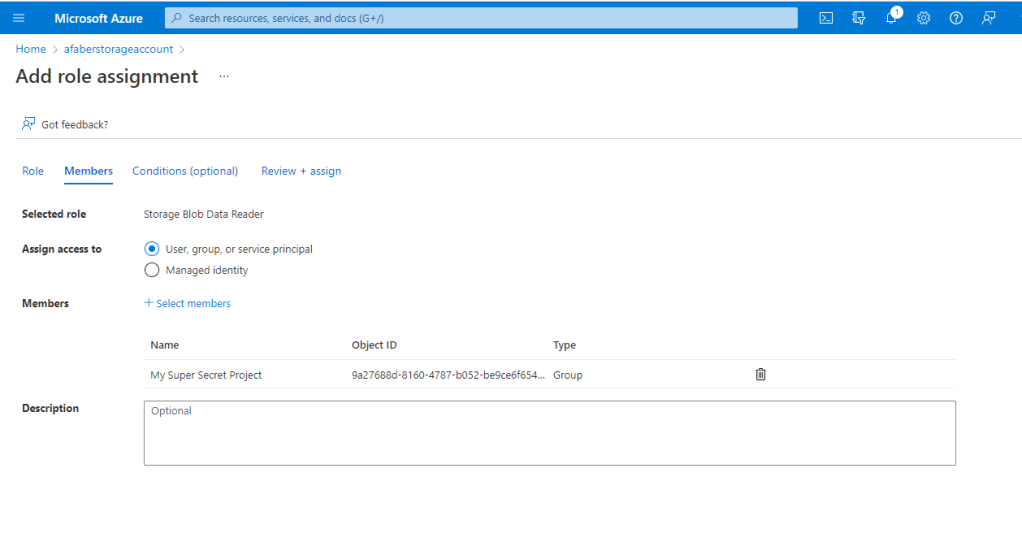
In the ABAC example below, I created custom security attributes (currently in preview). In my example I am using clearance levels of ‘Confidential’, ‘Secret’, and ‘Top Secret (TS)’, and I’ve assigned a different level to three different users.
So, when I go to assign the Storage Blob Data Reader role, I can assign it to a group that includes all three users, as members of the ‘My Super Secret Project’ group:
But I can add a condition that only allows them to read, if they have SecurityClearanceLevel attribute value of ‘Top Secret (TS)’.
As you can see it can get very granular. That’s why the approach is typically to start with RBAC, which includes the bare minimum privileges a specific role will need, and then expand to ABAC, to be able to control granular access privileges.
Entitlements Management
So, to start with RBAC enterprise teams typically work with the identity management operations team to create specific access packages for the various roles within their team. These packages are just groups of privileges that may include membership to security groups, target application roles, even access to sites where files are stored. These packages exist within catalogs that end users can then request from based on certain criteria. However, some packages will be deemed “birthright” for a specific position and/or department combination, so those packages can be automatically assigned to those end-users. The triggering of the automatic assignment may be based on values or combination of values on the user record, such as department, job position, etc. The automation of the assignment and removal of these privileges can be achieved using existing tools, such as Logic Apps that communicate with the Microsoft Graph API to trigger assignment of access packages.
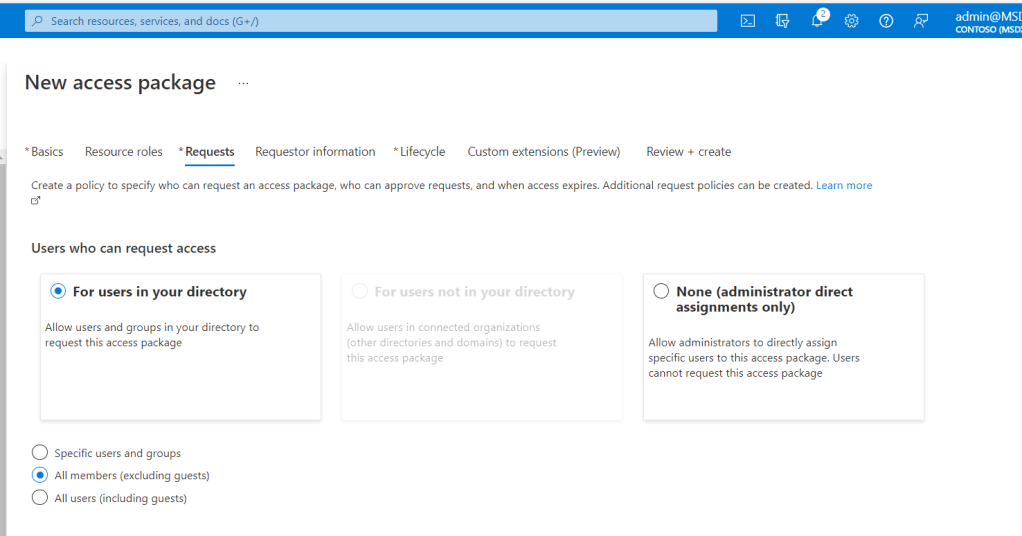
In the example below, I am making the access package available to be requested by “all members (excluding guests)”, that way I can isolate specific set of permissions from my guests and maybe I can create a separate access package that is just for guests, with those permissions that the enterprise has deemed appropriate for guests.
Notice above the “For users not in your directory” is greyed out, this is because this access package is created within a catalog that is not enabled for external users, as you can see below. This is a flag that can be controlled and can be very useful to isolate permissions.
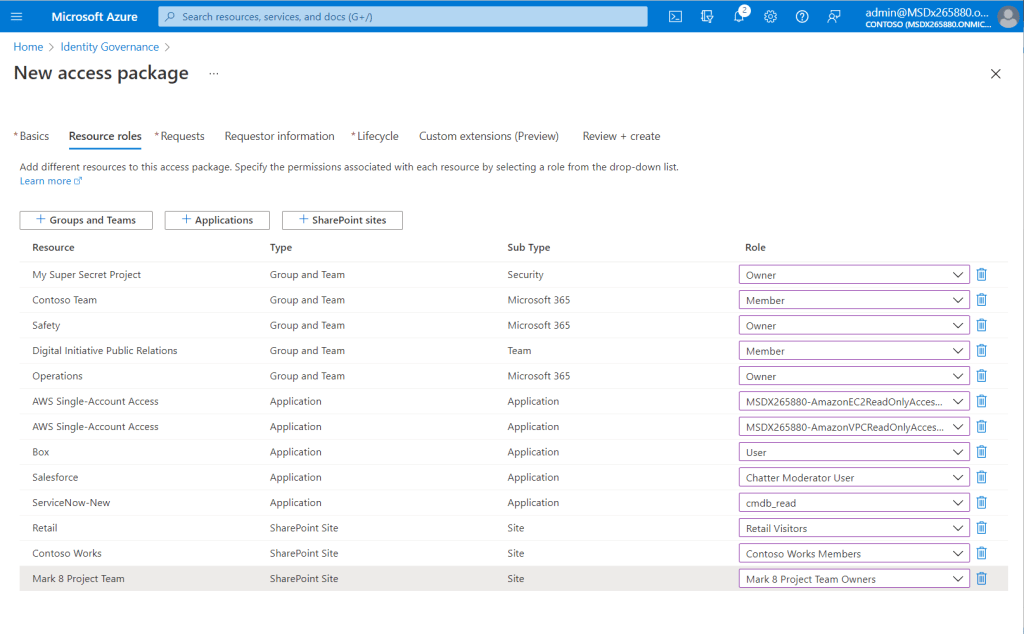
In the example below I am creating an access package that will include all the access that any person joining a specific team will require on day 1. One thing to notice here is that I have the ability to include more than just security groups. I am able to include security groups, teams, SharePoint sites, and application roles, which is a huge Azure AD benefit that is not possible with other identity providers, as I discussed in detail in my previous post, Groups vs Roles.
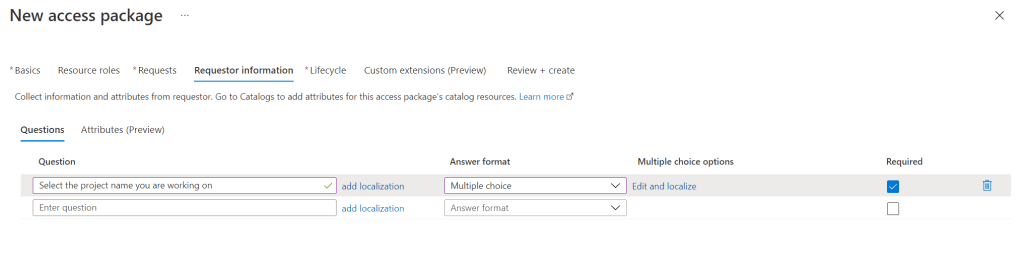
I can also add specific questions to be answered during the request, data that may be required for auditing and compliance purposes:
Another fantastic feature is the ability to collect data that is required for specific resources. In the example below, the ServiceNow resource requires an additional attribute maybe because provisioning has been configured to populate that value on the target application or maybe I need it to trigger additional logic apps, so I am able to add that attribute to be included during the request process, as shown below:
The ability to enforce least privilege goes hand in hand with the ability to remove access when no longer needed. Normally, the minimum any identity provider should provide is access reviews, which I cover on part 4. However, Azure AD goes above and beyond by providing the ability to expire access packages. I’ve seen this be a hard to meet requirement for some compliance frameworks, especially those related to government compliance requirements.
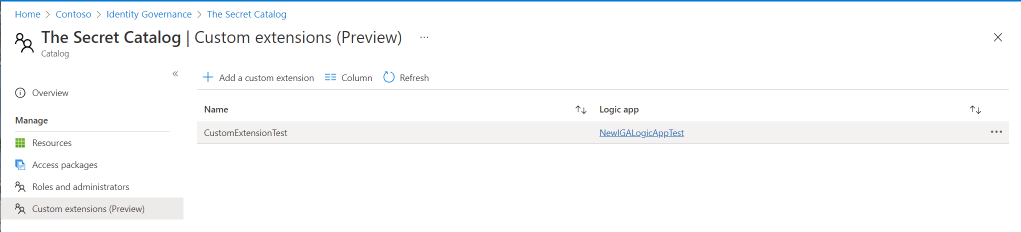
Finally, one of the newest features that is currently in preview is the ability to trigger other actions during a specific stage of the access package.
This is the ultimate flexibility because these custom extensions are used to trigger custom Logic Apps, which many Azure developers are already familiar with. This is something where Microsoft partners can build on top of the Azure AD solutions to enhance the JML process for enterprise customers.
One important note here. As I mentioned in part 2 of this series, it is highly recommended to use solutions that support the SCIM protocol for provisioning/deprovisioning. Logic apps are great for additional changes that may be required on target applications, additional flags that need to be set, etc., but the actual provisioning/deprovisioning of the users and their access should use SCIM where possible. I’ve seen other identity providers use tools to provision that do not rely on the SCIM protocol and it has been the source of many headaches.
Access Requests and Approvals
Other packages, such as those that include administrative privileges, may have to be requested and approved by various levels. Keep in mind that the same package that may be deemed “birthright” for a member of the security team may be a package that requires approvals for members of a different engineering team. Azure AD provides the ability to create different policies for different requirements:
The benefit in creating access packages is that they are typically associated with a specific role, and so the owners of those roles can determine the level of access required in every single application, which can then be assigned or requested by members of teams, without having to request dozens, sometimes hundreds of different permissions.
As noted above, within each policy, not only can I designate which users or groups can request the specific access packages, but I can also designate who will approve the access for each of the levels and if there is a backup action to be taken, in case someone doesn’t approve/deny the request within a specific amount of time.
And don’t forget about connected organizations, which allows the ability of controlling specific access to my tenant from specific external tenants.
With connected organizations I can designate some access packages to only be requested by a specific external tenant, and I can also set an expiration on those! So, if the access expires then the guests can be removed automatically from my tenant, when they no longer require the access.
In the final part of the series, part 4, I cover the final identity governance requirements an enterprise should expect from their identity solution.
Lifecycle Management targets the creation of users and their privileges as they join, move, or leave an organization. It must be done from a central solution, in order to ensure accurate reporting and auditing, and because that’s the only way to ensure there are no lingering accounts or access when they are no longer needed.
User Lifecycle – Provisioning / Deprovisioning of users
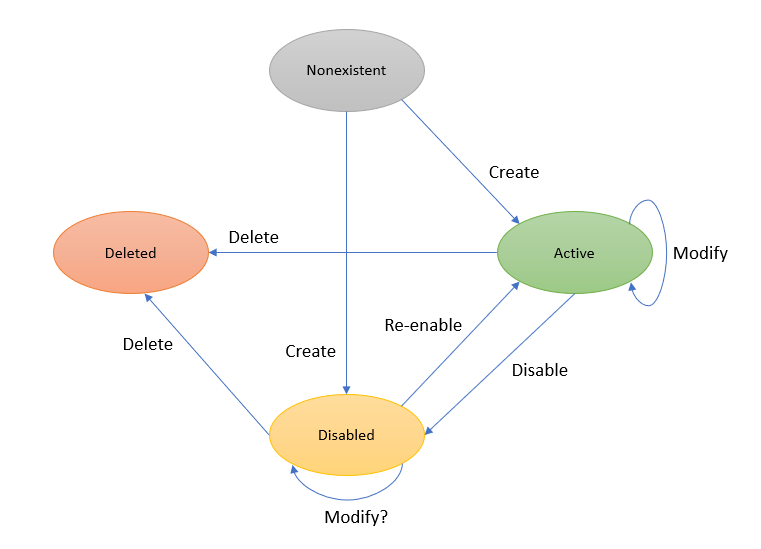
User identities go through various main stages in the lifecycle. The typical stages are non-existent, active, disabled, and finally deleted. There are also possible transitions between those stages, as depicted below:
Each of these transitions is triggered typically by either the initial record creation on the “source of truth” or by updates to the attributes of the existing user records. This is the first component of the JML process, the provisioning and deprovisioning of users. When those transitions occur within the sources of truth, the provisioning solution receives that data and processes the equivalent required transitions on the target applications. For example, the hiring of a new user in an HR solution, will trigger the creation of a user in various target applications, including the main enterprise directory, an email solution, etc. A transition that triggers the creation of all users on a specific target application is sometimes referred to as a “birthright” application, because ALL users get access to that application, one example is an email target application, because typically all users require an email account. Some applications will only trigger the creation of users based on a specific attribute, for example, only users that are hired for the finance department will need accounts created on a financial application. A provisioning automation solution can use the value of ‘department’ to trigger the provisioning of users on a target application.
Some target applications do not require the users to exist at all in the target application to be able to grant access, because they use a type of federation that doesn’t require a local user to exist. You can see an example of that setup on my AWS Single Account Access blog post. You still need the user to exist on the identity provider (IdP), but they don’t need to exist on the target application. The privileges granted to the user are tracked on the identity provider only. This is a great setup because it eliminates the need to update users on those target applications.
However, the simple provisioning or deprovisioning of users on target applications does not constitute a full JML process. Normally when a user is provisioned to a target application, birthright or otherwise, they can be assigned “default” privileges, but most users will need different privileges, so default privileges are not always sufficient. That’s where the access lifecycle explained below comes into play.
Access Lifecycle – Provisioning / Deprovisioning of privileges
In the same way that users are provisioned and deprovisioned on the target applications, when required, they also may need specific privileges assigned and removed as they move through the lifecycle. For instance, an engineer that is part of a cloud implementation team will need access to specific accounts and specific resources within that account. In her first job role, she may initially need privileges such as Key Vault Contributor for a specific vault for a specific project. Later on the same engineer moves to a 2nd position in a different department, and she will no longer need the access to the previous account, but now needs a different level of access on different subscription, such as Azure Kubernetes Service RBAC Admin. This is the second component of the JML process, the provisioning and deprovisioning of privileges.
This second component of JML in itself has two main options:
Some privileges can be automatically assignedand removed as the user moves through the lifecycle. The automation of the assignment and removal of these privileges can be achieved using existing tools, such as Logic Apps that communicate with the Microsoft Graph API to trigger assignment of access packages. More on that on part 3.
Other privileges have to be requested because they require additional approvals.
Azure Active Directory & SCIM
As mentioned on part 1, SCIM (System for Cross-domain Identity Management) is the standard protocol used for provisioning and deprovisioning. Azure AD supports SCIM protocol for a large number of applications and services, including well known enterprise solutions , custom apps, and on-prem applications.
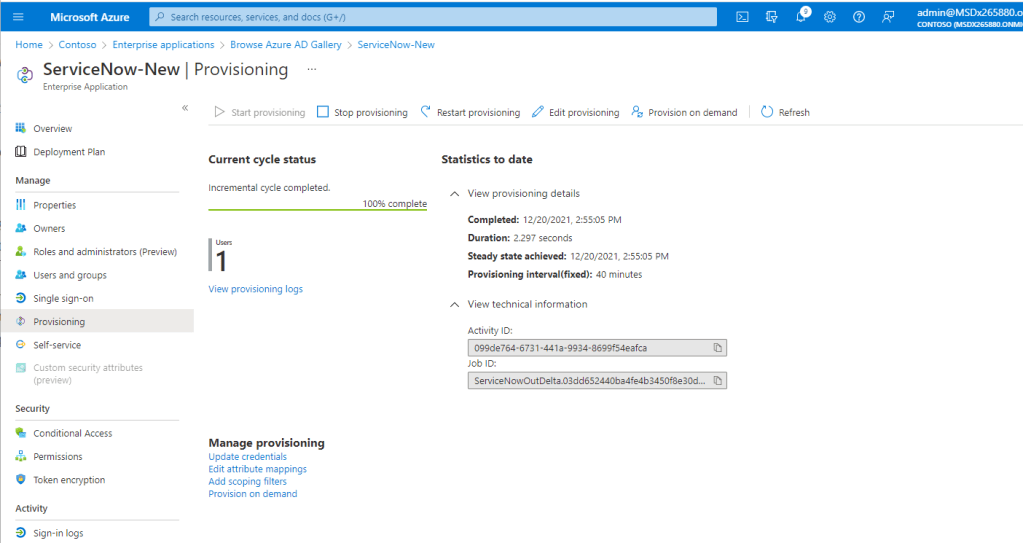
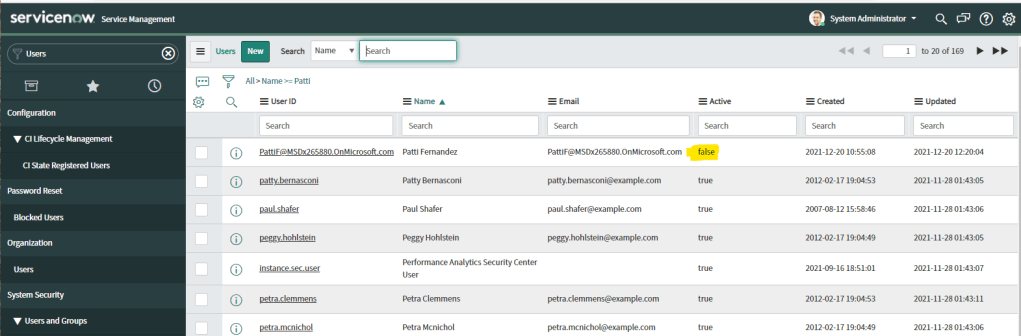
For example, on my demo tenant I configured a few solutions to provision users and their roles to target applications. This example is for ServiceNow, where I configured provisioning and the job runs every 40 minutes.
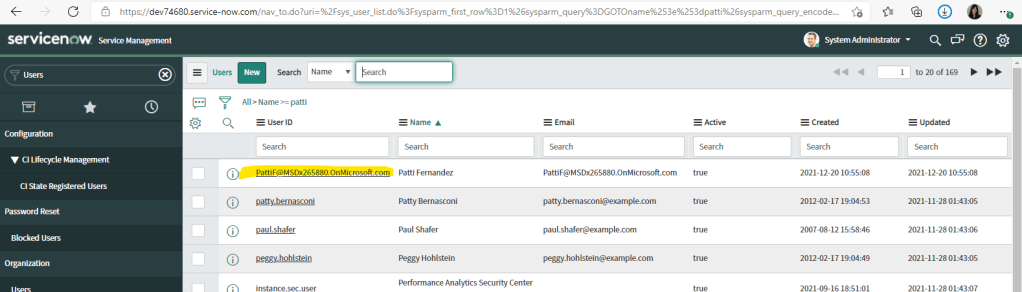
So, when I assign Patti to ServiceNow with the role of User in Azure AD:
The user is then provisioned automatically to the ServiceNow instance with that role:
And when I remove Patti from the assigned users/groups, she is also disabled in ServiceNow:
I will expand on how roles for various applications can be packaged together for specific users in the follow-up posts on this series.
I have only scratched the surface of what is possible with Azure AD and SCIM. Azure AD App Gallery continues to increase the number applications and services that support provisioning of users and roles as our partners continue to develop their own SCIM connectors. Additionally, solutions for on-prem applications are also being used that support SCIM protocol.
The ability to use the SCIM protocol for all types of provisioning requirements is a huge Azure AD benefit for performance, reliability, and security reasons. Unfortunately, I have seen what happens when identity providers create their own solutions to provision users that do not follow the SCIM protocol and the results are often unpredictable, which in turn cause unnecessary headaches for IT Operations, Governance, and Security teams.
Update September 2022 – Microsoft released a new service called Lifecycle Workflows that helps with the automation of tasks based on the Joiner-Mover-Leaver cycle. I will write a separate post on this topic soon.
In the next post, part 3, I cover the concepts of RBAC/ABAC, Entitlements Management, and Requests & Approvals.
TL;DR – An overview of the Joiners-Movers-Leavers process and how it can be implemented using Microsoft Azure Active Directory.
When we read about the zero trust model and specifically, the principle of least privileged access, most people think about just the authentication and authorization process. Although that is a huge part, we cannot forget about the processes associated with identity governance that are there to control the specific access those identities possess and how long they have the access. The ultimate goal for any enterprise should be to have one central Identity Governance solution because that is the only way to guarantee an auditable joiners/movers/leavers (JML) process for all employees. That’s the topic of the posts in this series:
I grew up in the Caribbean in a house that didn’t have A/C, needless to say it was HOT! When we go back to visit, my sons can’t understand how I survived all those years without A/C. The truth is I didn’t knowthere were better options. That’s what comes to mind when I see enterprise customers depending on identity providers that don’t provide all the identity governance tools to implement a full JML process. So, this post is an attempt to share what enterprise customers should expect from their identity providers when they refer to identity governance solutions to accomplish an enterprise level JML process. All of which is available with Azure Active Directory.
What is JML?
Joiners – The joiners process covers the identities that are created for the employees that join the company. The joiners process will also include providing the minimum required access on a variety of applications and services for that user to be able to do their job.
Movers – The movers process covers the removal and addition of access to the identities of employees that move to a different position, department, location, project, etc. For example, if the employee transfers from the accounting department to the sales department, then they should no longer have access to accounting applications and services, now they should be granted access to sales applications and services.
Leavers – As the employees retire or are terminated, the access they had should be removed, and their users should be disabled and/or deleted.
A simple goal, an enormous challenge.
The goal of a JML process is to provision, and eventually deprovision, user identities and their privileges to the target applications and services only for users that need it and only for the time they need it. It is a simple goal, but it is an enormous challenge to achieve for all identities in an enterprise. The challenge comes from the number of target applications and services and the number of identities. The higher those numbers are, the higher the complexity. Keep in mind, identities can be the individual user identities as well as their non-user accounts, such as accounts used for administrative tasks.
This complexity is why any enterprise should aim to automate the JML process as much as possible. And that is where a good Identity Governance solution comes in. Partners can then build upon the available solutions to automate the identity governance requirements for enterprises. I’ll cover the details of how that automation can be achieved in the follow-up posts of this series.
What about workload identities?
Even workload identities for machine-to-machine access should be included in some of the identity governance processes, such as access reviews, because they also have permissions associated and therefore we also want to enforce the principle of least privilege on those identities.
A quick note on sources and targets
I mentioned above “target applications and services”, but let’s cover the source first, because for a target to exist, there must be a source. What is commonly referred to as the “source of truth” in identity management is typically an HR system or some directory, where the users are created initially when they are hired as employees or contingent workers. Sometimes you have more than one “source of truth”, for example, if you have one system for employees and another one for contingent workers or if you are getting attributes from other sources. Keep in mind, the “source of truth” is not necessarily the identity provider, in other words, the source of truth is just the initial location of the user data where it exists, where any identity provisioning solution will pull information from about the user and its attributes. Which is not to be confused with the identity provider (IdP), where users authenticate for a SSO solution, because that’s a topic for a different day.
What are the targets then? The identity provisioning solution will get the data from the “source(s) of truth” and based upon the values of those attributes it will then provision and deprovision user identities and privileges to those target applications and services. You can see another over simplified diagram of the solution above. I am not going too deep, but just keep in mind we can also reconcile specific attribute data from target applications back to the provisioning solution, making the targets also sources for specific attributes, because other target applications may need those attributes as well.
As you can imagine, the values of those attributes don’t remain the same for the entire lifecycle. Attributes such as last name, department, job position, and many others are updated constantly. This is why a central identity management solution integrated with all target applications and services is essential to ensure all those dependent values are updated on target applications as changes occur. And more importantly, the updates of those attributes is what triggers the stage changes and privilege assignment/removal in target applications.
What does Identity Governance include?
A full identity solution should include identity governance and what that includes sometimes can be represented in different ways by different identity service providers, depending on what they offer. Some identity service providers do not provide identity governance solutions and if they do, sometimes they only provide a portion of these. Fortunately, Microsoft, and specifically Azure Active Directory, provides the full range of identity governance solutions required for a successful joiners-movers-leaver process at an enterprise level. Here is a simple list of what an enterprise should require:
Lifecycle Management – We need to be able to manage both the user lifecycle as well as the access lifecycle. It is very important that we do this from *one* central location, because that is the only way to ensure we know what access a specific identity has on any target application/service. This is also the only way to ensure accurate auditing.
Provisioning/Deprovisioning (SCIM) – Some applications and services require local identities to be created, so we need to be able to provision those users to the target applications when they are onboarded and then deprovision them once they no longer require access to those applications and services. SCIM (System for Cross-domain Identity Management) is the standard protocol used for provisioning/deprovisioning.
RBAC / ABAC – Role Based Access Controls andAttribute Based Access Controls. Basically, we need to assign those identities the access that is appropriate for the job they are doing, which can be based on their role, the project they are working on, the location they work from, etc., and only while they need it.
Entitlements Management – Entitlements are the access permissions that can be assigned to users. They can be in the form of group membership, application roles, OAuth scopes, etc. We need to be able to manage or group these permissions to enforce RBAC/ABAC. By now you know my opinion on groups vs roles and I also gave you some basic info on OAuth and it’s scopes.
Access Requests and Approvals – Users need to be able to request additional access that was not automatically assigned to them for valid reasons. And that access should be approved by the proper LOB owners or managers, etc.
Separation of Duties (SoD) – We need to be able to mitigate and reduce risk by isolating privileges that when combined can cause significant errors or intentional fraud. Think of this as ‘checks and balances’. SoD is sometimes referred to as ‘segregation of duties’.
Certification / Attestation – We need someone to be able to certify or attest that the permissions those identities have at that time are in fact required. This is normally achieved via scheduled access reviews.
Privileged Access Management – The access to roles that are considered highly privileged should have controls in place that reduce the risks by enforcing JIT (Just-In-Time) access.
I’ll cover how an enterprise can use Microsoft Azure Active Directory security solutions and how partners can build upon them to address all these requirements in parts 2, 3, and 4 in this series.
Finally, I just want to share a few additional security features to keep in mind when creating your applications.
In an effort to abide by the principle of least privilege it is highly recommended to implement RBAC (role based access controls) within your application. You can technically achieve this with either roles or groups, however I prefer roles for the reasons I detailed on my previous blog, Roles vs Groups. Organizations can further restrict the time and expiration of these roles by implementing PIM (Privileged Identity Management).
Use the Integration Assistant, which is a handy tool to generate specific security recommendations based on the type of application and wether or not it calls APIs.
A new feature announced recently offers a new secure option to use a federated identity to allow GitHub Actions (only one currently supported) to exchange tokens from GitHub for access tokens in AAD. These tokens then allow access to Azure resources without having to worry about using secrets or certificates. I think about these as external managed identities, for GitHub only (for now).
I hope this series of posts is helpful as you embark to create your own secure applications! I will do my best to keep these pages updated as more security features become available.
Whether you are building something as complex as a SCIM connector or a mobile application, or just a simple SPA application, chances are you want to share your application with customers or other partners. If so, there are a few security features you should be aware of.
Publisher Verification
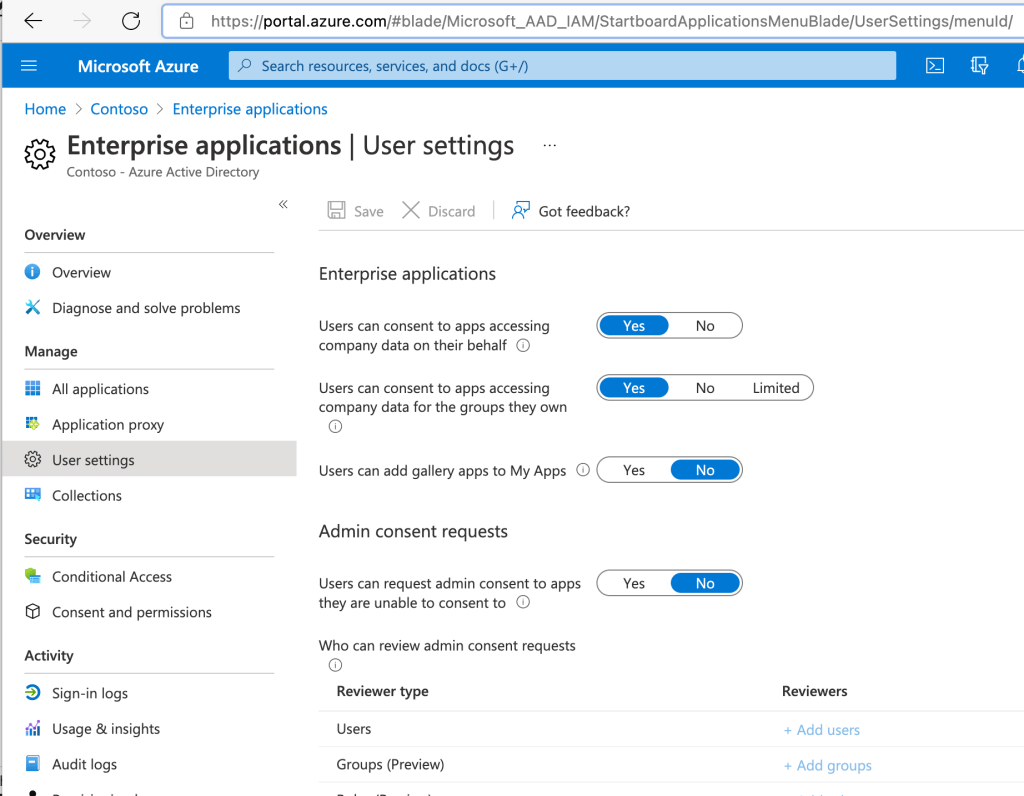
In part 2 I discussed the concept of consent and I briefly mentioned that organizations can control how and who can consent to the various permissions by updating the tenant settings. Well, those settings can be found here:
With the setting above organizations can prevent the users from being able to consent to share their data, and they can also configure a workflow that allows the users to request the consent from their administrators.
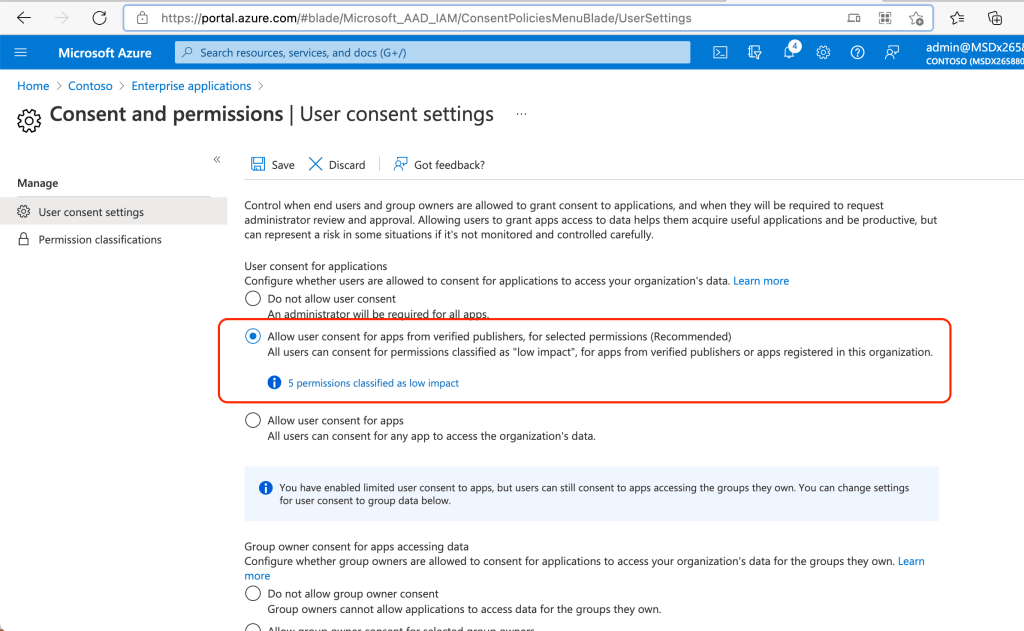
With the settings below organizations can allow end-users to consent to specific privileges they deem to be low impact only from verified publishers.
“Microsoft recommends restricting user consent to allow users to consent only for app from verified publishers, and only for permissions you select.” This is due to known risks associated with the abuse of application permissions that have either been forgotten by the organizations or simply not secured enough.
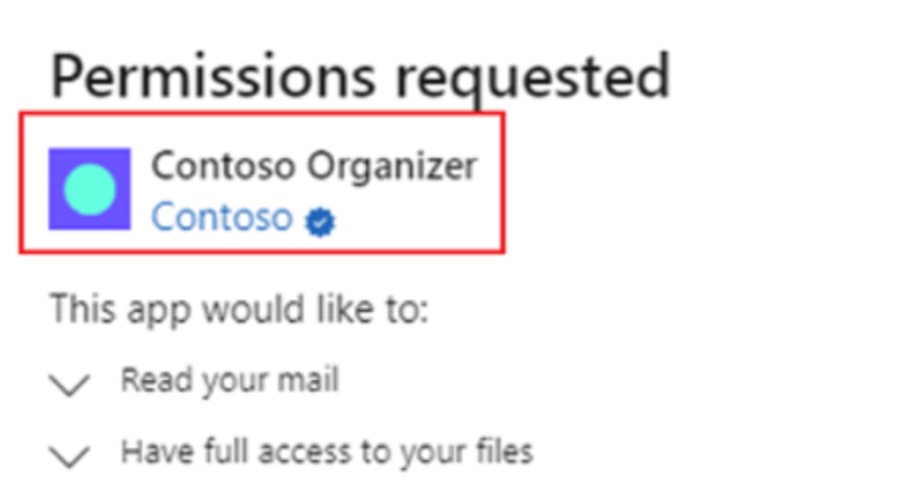
But what are verified publishers? Applications that are associated with a verified publisher provide the end-users with a trust factor. This is because becoming a verified publisher means the partner has a valid MPN (Microsoft Partner Network) account that has been verified to be a legitimate business. Once the process is completed any consent forms presented to users for applications associated with that MPN will show the verified publisher blue badge.
And as you can see above, it can also expedite the consent process if the tenants have the recommended settings that allow end-users to consent only for applications from a verified publisher.
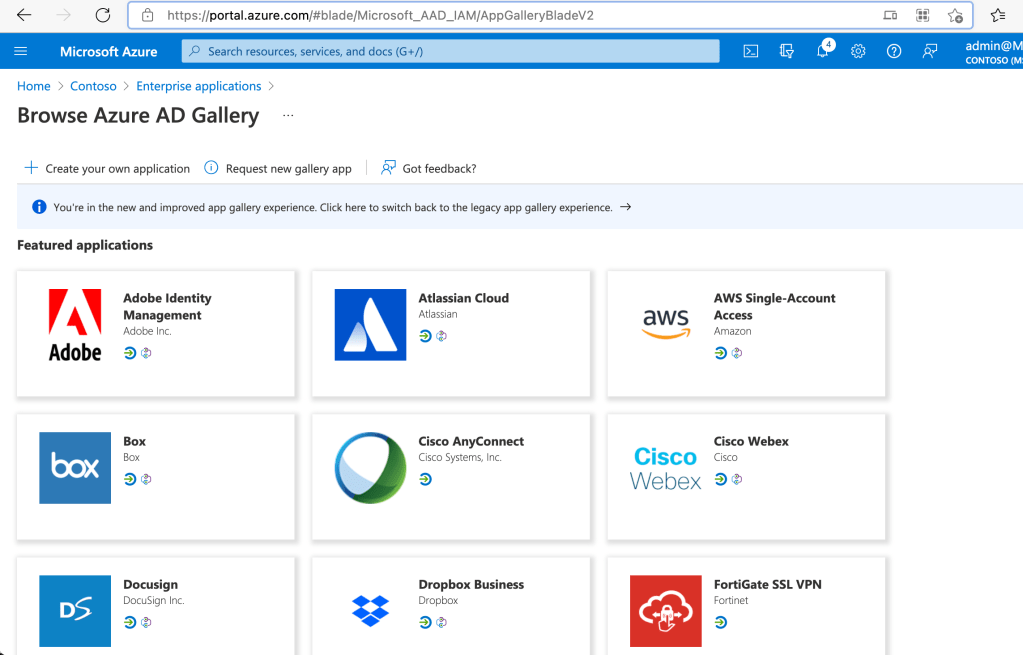
AppGallery
App Gallery is a “catalog of thousands of apps that make it easy to deploy and configure single sign-on (SSO) and automated user provisioning.” The nice thing about AppGallery is that you can make your app available to all your customers in a secure way via Enterprise Apps. Although offering SSO for your application is highly recommended for security reasons, you don’t necessarily need to have both SSO and user provisioning enabled, it could be one or the other, so maybe you can start with some features and then later add others.
Keep in mind there is a process review associated with publishing your app via AppGallery, you can find the checklist and the steps here.
In part 4 of the series I’ll cover a few additional security recommendations for your custom applications.