Global watchlists?

TL;DR – Managing lists globally and locally, i.e., on a customer-by-customer basis, using watchlists and externaldata.

A recurring requirement from MSSPs is a global watchlist that can be referenced by all their customers within specific analytic rules and the data contents can only be modified by the MSSP. One scenario is for network IPs that MSSPs want to be alerted on when they show up within any customer workspace. An extension to that scenario is the ability to have an equivalent local watchlist that can be modified by customers, so they can add their own untrusted IPs or locations. And then further, sometimes it’s useful if we can combine that into one incident, so they can all be investigated together. This blog post is about my recommendations to partners to achieve this scenario.

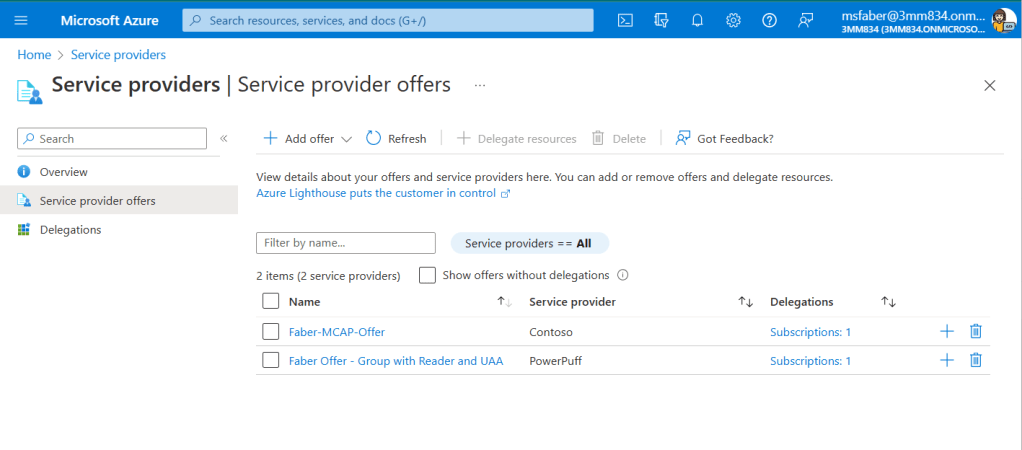
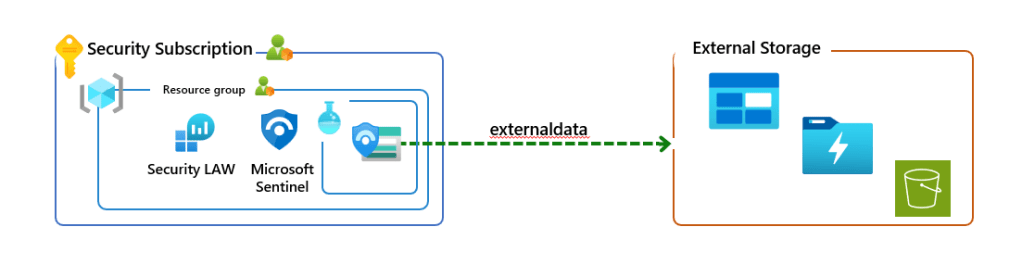
At this time there are some restrictions for watchlists, such as the fact that they can ‘only be referenced from within the same workspace‘. Also, you probably know that I am huge fan of both Repositories and Workspace Manager, but currently neither supports the ability to push watchlists to workspaces. However, even if they did, I think this scenario would still apply, because MSSPs likely want to completely block any modifications to that global watchlist.

Therefore, the recommendation I provide to partners is to configure a global lookup table, which is not a Sentinel watchlist, instead it uses externaldata operator, combine that with a regular Sentinel watchlist, which will be the local lookup table, and then combine within a single analytic rule, if required.

The global watchlist (?)

This is not a Sentinel watchlist. This is where the externaldata operator is used to point to an external storage file that the MSSP can configure to only be accessed by their team. Keep in mind that externaldata operator supports a specified list of storage services.

The analytic rule would look something like this:

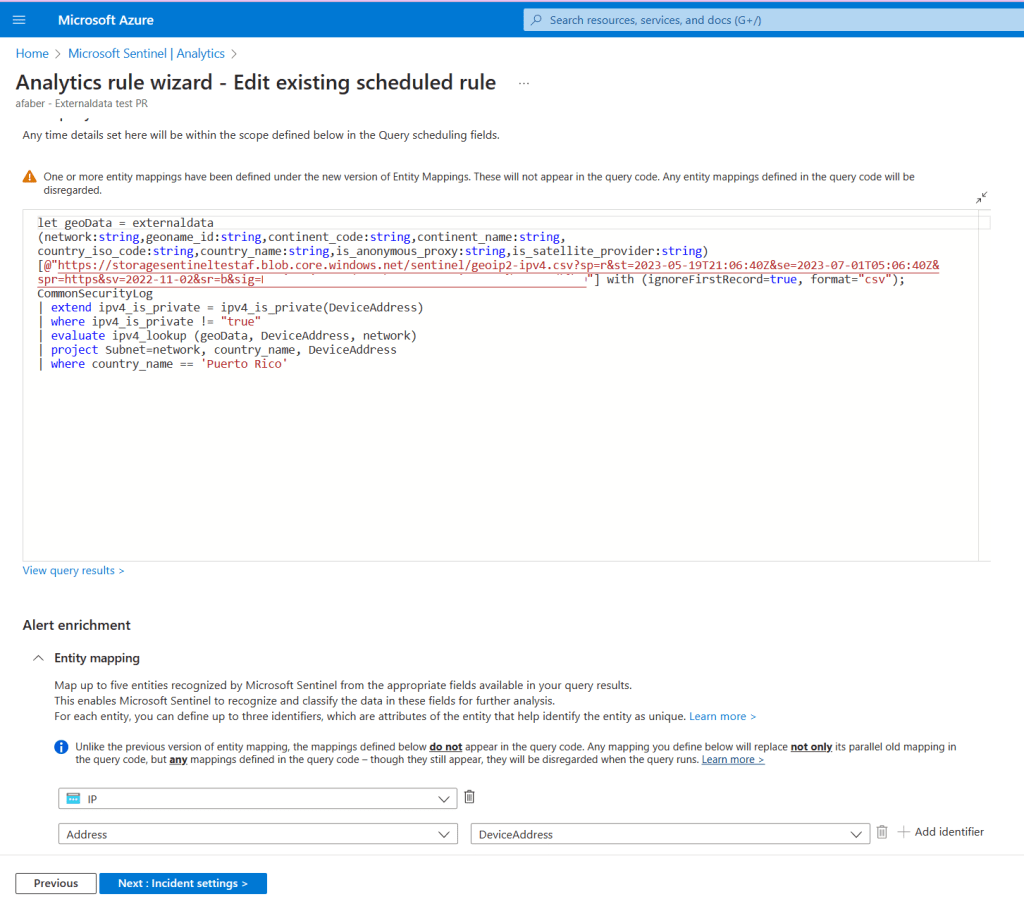
In the rule above, I am using the externaldata operator pointing to an Azure Blob Storage file, which is one of the options supported. Specifically, I am using a SAS token and URL with a predetermined expiration date. Also, in the example above, I am generating alerts for a specific country, Puerto Rico, aka Isla del Encanto😊, because in my test scenario I don’t expect any connections from that location. This is obviously just an example.

The local watchlist

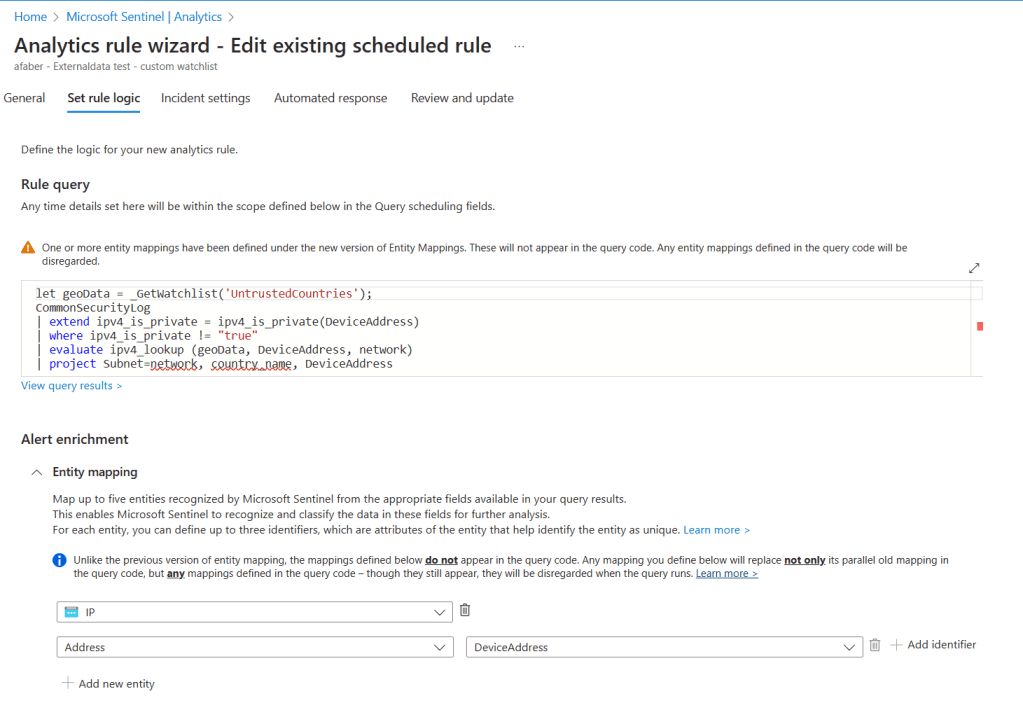
This is where I would use a real Sentinel watchlist, which exists within each of the customers’ workspaces. This is not meant to be updated by the MSSP, so you just need to create it initially and then the customers can update it directly as needed. When the MSSP creates this watchlist it should be created with a specific name, in my example I used UntrustedCountries. Although looking at the contents now, I probably should have named it UntrustedIPRanges.

The analytic rule would look something like this:

Also, in the example above, I am generating alerts for a specific IP range, which happens to be located in the United States, because in my test scenario I don’t expect any connections from that location. This is obviously just an example.

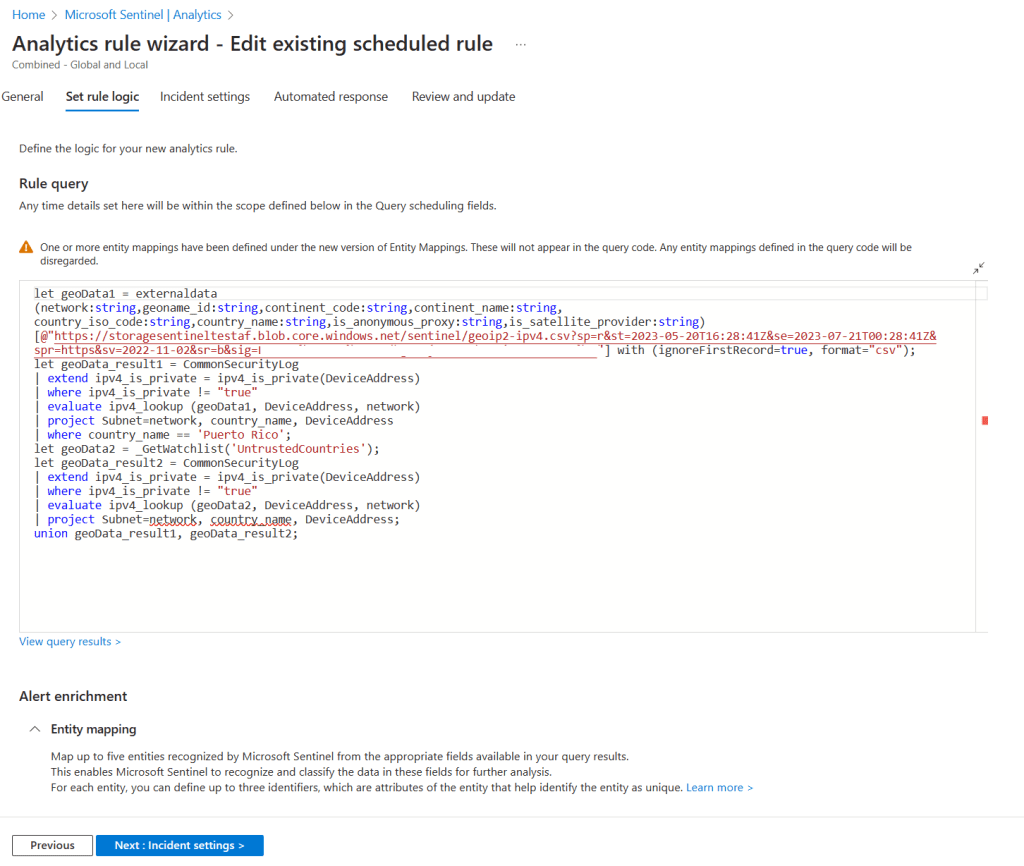
The combined analytic rule or correlation rule

I can just generate incidents based on those two separate rules, but sometimes it makes more sense to combine them. And technically, I have two options here:

1. I can just combine them into one analytic rule directly, as shown below.

2. Or I can just set the other two analytic rules to not generate incidents and I can create an overarching correlation rule that generates incidents.

In the correlation example above, I configured Entity mapping to allow me to preserve the entities from the original alert. At the end the result is very similar with the incident created, specifically when it comes to the incidents showing the original entities. In this case the entities are the IPs that are associated with those alerts.

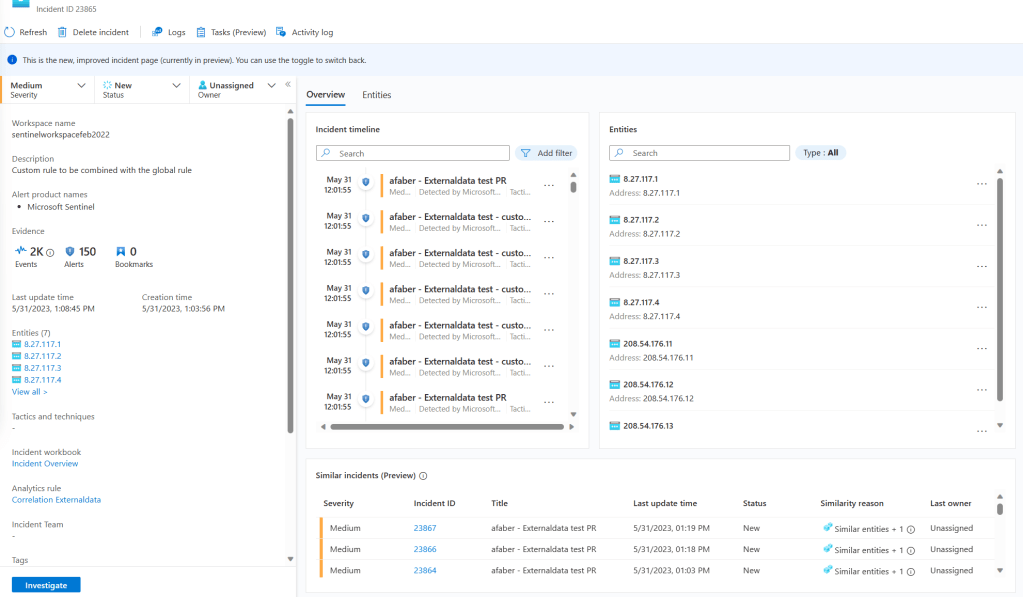
Also, is good to remember that MSSPs can still modify the name of the alerts, and how to group them or not group them as they would with any other analytic rule. That goes for either the combined one or the correlated rule.

Final thoughts

Some partners are concerned with the number of analytic rules, since there are limits per workspace, so the combined one may be a better option for some MSSPs. However, I wanted to provide both options, in case there are other constraints to take into account.

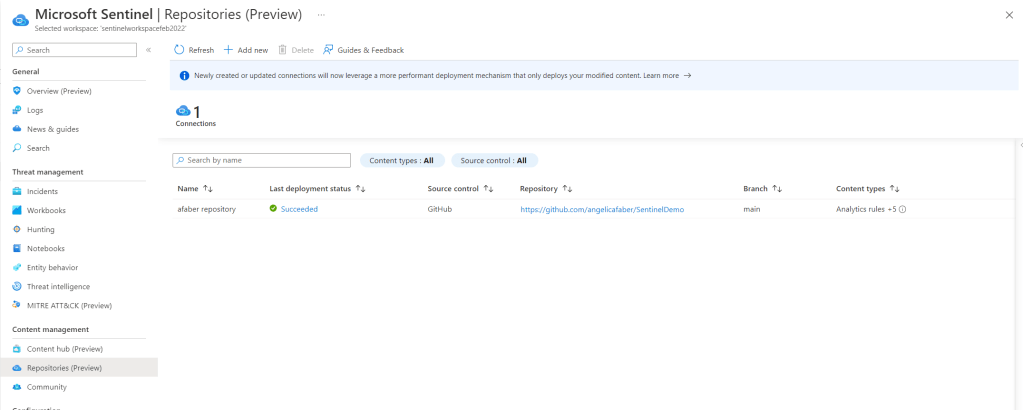
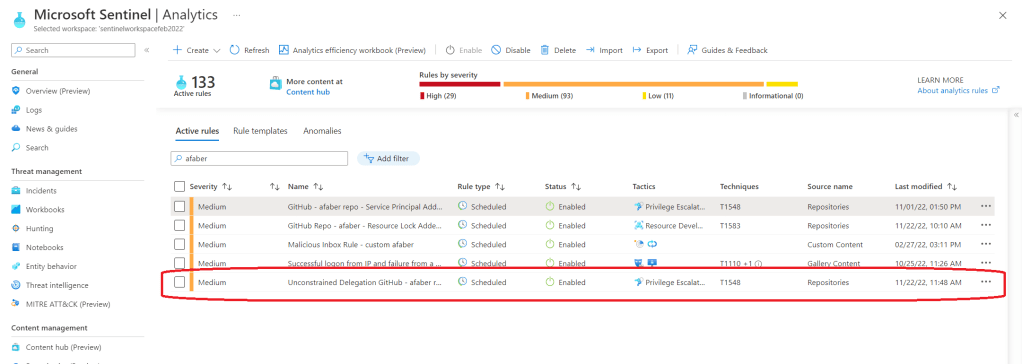
MSSPs can push these analytic rules to each of the customers’ workspaces and continuously keep them updated as needed using either Repositories or Workspace Manager. If you haven’t already tested these tools, I highly encourage you to do so. These tools are great to have in your MSSP toolbox!

Sentinel Playbook and Azure OpenAI 

TL;DR – Sentinel automation playbooks using a custom Logic App connector that uses the new Chat API with gpt-3.5-turbo and gpt-4. This time with Azure OpenAI vs OpenAI.

After RSA and a few weeks of DTO, I finally had a chance to document this for anyone that inquired about my previous post, Sentinel and OpenAI Chat API with gpt-3.5-turbo and gpt-4, but now using Azure OpenAI. In this post I am documenting the few differences between using Azure OpenAI vs OpenAI.

The custom connector

I am still using a custom connector, for the same reasons as the previous post, security of the authentication token. The differences with this custom connector are the following:

1. Host – The connection with Azure OpenAI is made to https://YOUR_RESOURCE_NAME.openai.azure.com/openai/deployments/YOUR_DEPLOYMENT_NAME/completions per the documentation. So, in my case my resource name is azureopenai-afaber, so the host name I used is azureopenai-afaber.openai.azure.com, as shown below

2. Authentication – Azure OpenAI offers two types of authentication, API Key or Azure AD. In my test I am still using an API key, so the HTTP header parameter I need to use for Azure OpenAI is api-key (vs Authorization with OpenAI). If you were using AAD, you would use Authorization with a bearer token, but that’s not the case in my test.

3. Request – Two differences here. First, there is no model within the body because as you see below, “Models can only have one deployment at a time” in Azure OpenAI.

So, when I specify the deployment in the URL, https://azureopenai-afaber.openai.azure.com/openai/deployments/gpt-35-turbo/chat/completions, it will specify the deployment, which only has one model. Yes, I named my deployment the name of the model, but you can use any name that works for you.

I still use Import from sample for both the Request and the Response using the same command I tested, as shown below. I am also adding max_tokens in my request, which is optional, but I like to use it.

The second difference is the api-version, which is required. If you don’t specify the api-version query parameter, then you receive a 404 error.

And the body will not have the model parameter in the Request, as I mentioned above.

And the Response as imported, will look like this:

For additional information on the required parameters and the supported api-version values, please see the documentation.

The playbook

For my Azure OpenAI playbook I used the basis of the playbook that I described in my previous post, but I expanded it a little based on a session that I delivered with a partner at RSA, so you’ll notice this playbook has a few differences, such as a LOT more detail in the system message and a few additional steps. However, overall, the playbook is pretty much doing the same thing as the previous post.

The differences are based on the connector parameters I noted above.

For example, I now have to use the api-version as shown below:

And I don’t need to use the model parameter, for the reasons I mentioned above.

Also, when I stored the api-key connection, I don’t use “Bearer YOUR_API_KEY“, which I had to with both the OpenAI connector and my OpenAI custom connector, as I mentioned on my original post testing with the OpenAI connector. If had used Azure AD, that should still be required.

Optional

This part is completely optional, and you don’t need to make any changes mentioned here to work with Azure OpenAI. However, you might have noticed that I added a few more steps and a LOT more detail in the system message role with this new playbook, so I wanted to explain why I did that.

This playbook was created to work with a specific connector in Sentinel, so I wanted the answers provided by Azure OpenAI to be a lot more specific and accurate. So, what I did was improve my system message with as much detail as possible. Yes, I am still restricted by the tokens I can use.

And when I ask it to generate a KQL query, I am feeding it the actual schema of the tables, as shown below:

The result of that are tasks that are a lot more accurate and that give the SOC analysts much more relevant information.

Of course, with Azure OpenAI, you also have the ability to fine-tune your model, so you can add your specific dataset to make it even more powerful. For more on that, please review the Azure OpenAI documentation.

Final Note

Yes, I have been testing with gpt-35-turbo and I haven’t been able to test with gpt-4, but I am on the waitlist, so I will let you know if I see any differences when testing with the gpt-4 model. I can see from the API description that the parameters are the same for both these models, but you never know until you try. So, I’ll keep you posted!

Sentinel and OpenAI Chat API with gpt-3.5-turbo and gpt-4

TL;DR – Sentinel automation playbooks using a custom Logic App connector that uses the new Chat API with gpt-3.5-turbo and gpt-4.

I went down the deep end on this one😊. A few of my partners are testing these integrations to be ready for current AI services and upcoming services. This blog post is about my experience building a new custom connector to use with my Sentinel playbooks (Logic Apps), which are part of the SOAR features within Sentinel. Specifically, I wanted a connector that would work with the new API, where I can use the gpt-3.5-turbo and gpt-4. models. Also, I used the public OpenAI service, because that’s what I have access to, but it should be equivalent with Azure OpenAI.

Why a custom connector?

First, the existing Logic App OpenAI connector only supports up to GPT-3 API, that’s because the API endpoint is different. So, while I could use text-davinci-003 model with https://api.openai.com/v1/completions, I can’t use it with the gpt-3.5-turbo and gpt-4 models. Those models connect to https://api.openai.com/v1/chat/completions.

Yes, I could probably just use the generic HTTP action, but that doesn’t allow me to store the API key safely. That’s especially important for partners that manage customer workspaces and some of the playbooks exist on the customer’s subscriptions. So, that’s how I ended up with a new custom connector, which was surprisingly straightforward.

My new custom connector

To create the new custom connector, just search for it within the search bar, as shown below.

To create, you just need to specify a subscription, resource group, name, and region. When you select the region, make sure to select the one where your Logic App (Sentinel playbook) will be created. Once it’s created, just click on Edit to specify the details.

Under General information, specify your host, which in this case is ‘api.openai.com‘. You can also select a custom icon and a description, as shown below.

On the Security tab, you will add an authentication type, which is API Key, as shown below

In the Definition tab, you will create a new action, which I called Completion. To define the Request, click on Import from sample and then use the data from the OpenAI API documentation to Create chat completion. Here, I didn’t just copy and pasted the sample one, because I wanted to also include the max_tokens parameter, so I made sure I added that parameter. So, the value I used was from my test below:

And it is a Post, so it looks like this. Then you can import it.

This is so the body ends up with that max_tokens parameter:

Then I had to define the Response, which I again copied and pasted from my test above. So, it looks like this.

And when it imports, the response looks like this:

And that’s it for the custom connector! Now, on to testing my Logic App, i.e., Sentinel playbook.

Using the custom connector

When creating your Sentinel playbook (Azure Logic App), you’ll find the connector under the Custom tab.

Then you’ll find the one and only action I created, called Completion.

And the reason why I went with the custom connector is so that I could store my API key safely. So, I created a connection.

So, if I ever need to update it, I can do so from the navigation shown below.

Notice, that I can’t see the value, I can only update it.

To create the steps in my playbook, I need to add the parameters that I included in my definition, as shown below.

And I can specify the model, which in this test is gpt-3.5-turbo, as well as the max_tokens, which I am using 200 for this test, but you can adjust as needed.

This is where I went down the deep end 😊. So, this new endpoint uses roles, and this is the definition ChatGPT gave me on those:

  1. ‘system’: This role is used to set the context and provide high-level instructions at the beginning of the conversation. It helps set the behavior of the assistant.
  2. ‘user’: This role represents you, the person asking questions or providing instructions to the assistant.
  3. ‘assistant’: This role represents the AI model, providing responses and information based on the context and instructions given.

And the way to use them makes a difference in the behavior, because the role of assistant is there so that it can remember previous responses in a continued conversation. So, you need to include those responses as content for the assistant role. This is what maintains the context and ensures that the AI model can provide coherent answers to follow-up questions. A typical conversation will have one system role content, followed by at least one user role content and maybe some assistant role content in between. However, this makes a lot more sense with an example, so let’s do that!

A playbook

This playbook gets a set of recommended steps from OpenAI to investigate a Sentinel incident. The steps are then updated to the incident as tasks. You can certainly update data into Sentinel as comments, or update the severity, etc. as I’ve done in previous blog posts with the older API. However, I wanted to explain the more complex scenario of tasks, because that’s where remembering the previous responses and having that context makes it that much more powerful.

This is what my playbook looks like all together. I’ll expand as I go, but I wanted to show what it looks like all together, so you can see the difference between that Initial Completion and the other completions I do within the each of the sections, i.e., the For each sections. Those ‘For each’ sections are all replicas, just different steps being updated as tasks. Then at the end I update the incident with a tag.

The Initial Completion looks like this.

It has a system role content that is just setting that initial context or behavior, which in my case is “You are a helpful Microsoft Sentinel assistant specialized in cybersecurity. Help the user with their security incident questions.” It then has one user role content, which in my case is using the Sentinel Incident Description to ask for recommendations, which I specifically request to be 3 steps.

That next For each section is where it gets a bit complex.

Let’s start with the 4 messages (red above). The first message is a system role, that’s again setting the context and it uses the same value as before, because that’s what I still need. It’s followed by a user content, which again matches the same value as the Initial Completion. Now, I add that assistant content, this is where I get to feed it the answer it provided during the Initial Completion. So, now it knows what answer it gave me earlier. And then I close with a user role content, which is where I tell it that I want only step 1.

So, then I can add that task to the Sentinel incident, using the action from the Sentinel connector. And here I add a content variable (blue arrow), which is the output from the 4th message above. How do I know which one? Because I get these two options and I chose the one associated with Step 1 Completion OpenAI GPT3.5, which is the one I need.

The other option here is the one I used above (green arrow), which is the content output from the Initial Completion.

All 3 sections are exactly the same, except I use steps 2 and 3 from the response.

Running the playbook

This is what it looks like when it runs. I run the playbook at incident level, because that’s the trigger I used.

I see it completed

And here are the tasks it updated:

A little more details

I can also see the Activity log was updated, including the tag I added, which was the last step in my playbook.

And that’s it!

I hope this information is useful to anyone else testing the possibilities, as I am. I understand these services are not perfect, they are still very new, but I see the immense potential they have to help us be that much more efficient. I also hope that by understanding how some of these endpoints and integrations work within OpenAI, that we are also able to see the possibilities and maybe even inspire creativity within the community. At the very least, I believe testing these integrations can get us all ready for those upcoming services, such as Security Copilot, which I can’t wait to test!

Sentinel POC – Architecture and Recommendations for MSSPs – Part 3

TL;DR – Common topics that come up when partners, specifically MSSPs, are testing Microsoft Sentinel features to evaluate its SIEM and SOAR capabilities. Part 3

This post is a part of series that covers various topics from the very basics, to ensure partners that may be familiar with other SIEMs, but that are not yet familiar with Azure can get all the information they need to be successful.

Agents and Forwarders

This topic always comes up during POCs. Most partners are familiar with the Log Analytics agent, also known as the OMS or MMA agent. However, the Log Analytics agent will be retired August 2024.  The new Azure Monitor Agent (AMA) is a consolidation of agents. It will replace the Log Analytics agent, as well as the Telegraf agent and the Diagnostics extension.  And best of all, AMA supports Data Collection Rules (DCRs), which supports filtering of data during ingestion time, not just for agents, but also for other types of ingested data.

The Azure Monitor Agent (AMA) and Data Collection Rules (DCRs) also allow you to send different types of data to different Log Analytic Workspaces, so if you have performance related data that is not useful for security purposes, then you don’t need to send it to the workspace that is associated with Sentinel. You can use XPath queries to filter out the events.

Partners have various options to install the AMA agent including, VM extensions, Azure Policy, or the Windows installer. My preferred option is using Azure Policy via Defender for Cloud (MDC). This works for any server on any cloud or on-prem. From the Settings & monitoring menu for the specific subscription, you can configure Defender for Servers to deploy the AMA and the specific workspace that will be used, which in the case of a Sentinel POC should be the Sentinel workspace. I prefer this option, because if I add any new servers, then they will automatically get the agent.

And with agent questions come forwarder questions during the POC. Yes, partners can configure a forwarder for CEF via AMA connector and you can forward syslog data to the Sentinel workspace using the AMA.  There is also a Content hub solution that include an
AMA migration tracker workbook.

Finally, if you are migrating from the Log Analytics agent to the AMA, there is also a script that removes the previous agent on all Azure VMs.

Sample Data

Another common question during POCs is how to generate sample data. There are various options partners can generate sample data on the workspaces acting as customer workspaces during the POC. I list some the options below:

Storage Options

This topic may not be of utmost importance during a POC, but some partners prefer to test their ability to take advantage of less expensive storage options during POCs, so I am including it here.

The default storage option for Sentinel ingestion is Analytics tables. The retention time of the tables can be adjusted for all tables within the workspace, or individually per table. Partners can also choose to use a different plan, which is called Basic and has significantly lower costs. Basic tables have an interactive retention of 8 days. There are some restrictions on Basic tables, such as not able to trigger alerts, as well as limited KQL commands. These tables are meant to be used with noisy logs, such as firewall logs or flow logs, that are normally used for debugging or troubleshooting purposes. Partners can also set a total retention for both Analytics and Basic tables, by configuring a total retention period, which will then move that data to Archive after the interactive retention period is over. The total retention is a maximum of 7 years.  Partners can also use the Search feature to query and rehydrate data from Archive as needed.

But wait, there’s more! All those options I mentioned are available within Log Analytics Workspace, but there are also external storage options, such as Blob Storage and Azure Data Explorer (ADX).  Partners can query Blob Storage using externaldata operator in KQL, which can also be used within an analytic rule. Additionally, ADX and Blob Storage can be combined, partners can create an external table in ADX that points to the whole container. 

Here is a summary of the various storage options currently available:

Repositories

This feature is essential for MSSPs, so it has come up for every POC I’ve worked on. This feature allows partners to push content, such as analytic rules, hunting queries, workbooks, automation rules, playbooks, and parsers to customer workspaces. I covered this feature in detail in a blog post creatively named Sentinel Repositories. I also cover this topic in my Microsoft Sentinel Deep Dive session (1hr:34min mark). There is even a Sample Repository available for testing the Repositories feature. Future and existing automation features may also be combined with Repositories to allow MSSPs to manage the content that is published on their customers’ workspaces.

Update: Workspace Manager

Workspace Manager is a new feature that was recently introduced, which allows MSSPs to configure the MSSP workspace to act as the parent or grandparent of various other workspaces, typically customer workspaces. Workspace Manager still depends on Azure Lighthouse, it does not replace it. To be able to configure workspaces to be managed from a central MSSP workspace the Azure Lighthouse relationship must already exist. Using Workspace Manager an MSSP can publish content to the child workspaces. For the list of artifacts currently supported by Workspace Manager, please reference the documentation.

This feature allows MSSPs to group customer workspaces depending on their requirements. For example, healthcare customers may have different analytic rule and workbook requirements than education customers, so MSSPs can group them and then publish different content to each of those workspaces. Workspaces can be part of different groups, so you can publish content from different groups to the same workspace. In my opinion, an ideal MSSP solution would include a combination of both Repositories and Workspace Manager.

Cross-workspace

In the previous posts of this series, I covered how customers can delegate access to partners. I also covered the fact that artifacts can exist on both the MSSP workspace as well as the customer’s workspace. This makes it easier to keep some artifacts that are considered intellectual property within the MSSP workspace only. What I didn’t cover yet is how those artifacts can be used to access customers’ data. Here are the options:

  • Multiple workspace incident view – This is a view that is available as soon as your customers delegate access to you using Azure Lighthouse or if you have multiple workspaces within your tenant.
  • Cross workspace querying – Through the Logs blade you can query multiple workspaces using the workspace() expression and the union operator.
  • Cross workspace analytic rules – Partners can create analytic rules that include up to 20 workspaces in the query. Keep in mind most analytic rules will run on the customer’s workspace, but you do have this option for cases where a cross workspace analytic rule is needed.
  • Cross workspace workbooks – There are various Content hub solutions that include workbooks that can query data across workspaces and partners can also create their own. For example, the Incident Overview workbook and the Microsoft Sentinel Cost workbook that allow partners to view this data across their customers’ workspaces, as long as they have access. 
  • Cross workspace hunting – Similar to the querying through the Logs blade, partners can also save those queries to hunt later.
Other Resources

To close I want to include a list of links that we put together to help partners that are ramping up with Microsoft Sentinel. You can find that list of links here: https://aka.ms/SentinelLinks. That list is constantly being updated. It includes all sorts of information including training links to the various Ninja trainings, as well as additional links on more advanced subjects, such as UEBA, Fusion, SOAR automation, etc.

I hope this information is useful to all those MSSPs planning a Sentinel POC. As much as I tried to include everything I could think of, I am certain I forgot something. So, who knows maybe there will be a part 4? Until then, happy testing!

Sentinel POC – Architecture and Recommendations for MSSPs – Part 2

TL;DR – Common topics that come up when partners, specifically MSSPs, are testing Microsoft Sentinel features to evaluate its SIEM and SOAR capabilities. Part 2

This post is a part of series that covers various topics from the very basics, to ensure partners that may be familiar with other SIEMs, but that are not yet familiar with Azure can get all the information they need to be successful.

B2B or GDAP

In the previous post I focused on accessing resources that exist within a subscription. However, partners can also manage other security services that exist at tenant level, such as the entire suite of Microsoft Defender 365 services, including Defender for Endpoint, Defender for Cloud Apps (CASB), Defender for Identity, etc. For partners to access tenant level services, they will need tenant level access. This becomes more important when testing Sentinel because there are links provided to Microsoft Defender 365 from the incidents that involve any of those services. For those links to work as expected, the user must have access to those services.

Both GDAP and B2B provide partners with the ability to access tenant level services for their customers. Most partners are already familiar with B2B, which is available for all tenants to invite guests into their tenant to collaborate. However, some partners, have either compliance or cybersecurity insurance requirements that prevent them from having an identity in their customers’ tenants. That’s where GDAP comes in. Granular Delegated Admin Privileges (GDAP) is available exclusively to Cloud Solution Providers (CSPs) and it is configured via Partner Center. GDAP allows partners to access customer resources in a secure manner and it doesn’t require the existence of an identity in the customer’s tenant. The diagram below depicts an example of GDAP delegations.

Partners performing a POC can choose to use either GDAP or B2B to access those tenants acting as customer tenants during the POC. For the Sentinel POC purposes, the access and the behavior of using GDAP vs B2B is equivalent. However, the ultimate goal for a production configuration should be to use GDAP, as well as implement the documented CSP best practices. If the requirement is to follow the same procedures during the POC that will be expected to be followed during go-live, then configuring GDAP is recommended. If the requirement is just to test Sentinel’s features for a period of time, then partners can just use B2B. For additional details, I recently delivered a session to partners on MSSPs & Azure Lighthouse, where I covered a few more details on GDAP, which I also mentioned briefly in my previous blog post MSSPs and Identity: Q&A.

More on CSPs

Partners that are Cloud Solution Providers (CSPs) can create subscriptions for customers. This is a great option to keep in mind because some customers migrating from legacy SIEM solutions may not have a security subscription. This may not be of importance during the POC, but it may be one of those scenarios that can also be tested, depending on the requirements of the POC. That subscription will then be billed through the partner, but it will still be associated with the customer’s tenant.

Where is the data?

As I mentioned previously in my blog posts, the customer’s security subscription, where Sentinel is onboarded, should always be associated with the customer’s tenant. Sentinel artifacts, such as analytic rules, workbooks, automation rules, playbooks, etc., can exist on either the MSSP workspace or the customer workspace. However, customer data should always be ingested into the customer’s workspace. This is very important to keep in mind during the POC, because features such as UEBA, and various connectors, such as Defender 365, will only work with the supported configuration, which depends on data being ingested into the customer’s workspace. There may be other types of data, such as Threat Intelligence (TI) data, that can be ingested into the MSSP tenant.

For more details on this topic and many other Sentinel MSSP topics, I highly recommend all partners to read (and re-read) the Microsoft Sentinel Technical Playbook for MSSPs

Migrations

Most MSSPs performing a POC are currently using a legacy SIEM that they need to migrate from. Luckily, we have great migration documentation available. Microsoft Sentinel can even run side-by-side with legacy SIEM solutions, as described in the documentation.

For POCs specifically, a common concern is usually how are they going to convert all those existing rules to Sentinel KQL. I always tell them to focus on the data sources first, because many of the connectors are available as Content hub solutions, that means that not only is the connector available, but it also comes with other artifacts, such as analytic rules, workbooks, playbooks, etc. There are now over 250 solutions in the marketplace. It’s a matter of figuring out which data sources need to be covered during the POC and then, as the migration documentation states, mapping the rules within the legacy SIEM to the rules provided within the solution.

Partners can end up with some gaps, but not all the rules will have to be converted. In fact, there are also repositories, such as the unified Microsoft Sentinel and Microsoft 365 Defender repository, that have many artifacts available as well. And that’s not the only one, there are various other community repositories that have additional resources available. As I tell my partners, don’t reinvent the wheel, there is likely something out there that is either what you need or close enough that you can tweak it to be what you need. There are also tools that offer free Sigma rule translations, such as SOC Prime’s Uncoder.IO. And my guess is Security Copilot will also help with this. I can’t wait to play with it! 🙂

Finally, as partners go through the POC sometimes they come up with their own solutions, it is useful to know that they can publish them to the marketplace.

Which connectors?

We get the connectors question quite frequently, but especially for POCs. Partners want to know which connectors they should configure and test during a Sentinel POC. The answer is always ‘it depends’ :). It really does depend on what compliance regulations or internal security requirements or internal priorities the partner must comply with.

There are many options to ingest data into Microsoft Sentinel. You can also find a list of connectors in the documentation. Even if you don’t see a connector for your solution, keep in mind that some connectors, such as syslog and CEF can support a variety of data sources. We always say that we haven’t met the data source we haven’t been able to ingest yet. It’s always a matter of figuring out the best way to ingest it. A great way to visualize the options is the diagram below.

Finally, there is a Zero Trust solution in Content hub that also has some recommended data connectors, and it sorts them from Foundational, to Basic, to Intermediate, to Advanced. Here are those referenced in the solution:

Foundational Data Connectors
Azure Activity
Azure Active Directory
Office 365
Microsoft Defender for Cloud
Network Security Groups
Windows Security Event (AMA)
DNS
Azure Storage Account
Common Event Format (CEF)
Syslog
Amazon Web Services (AWS)
Basic Data Connectors
Microsoft 365 Defender
Azure Firewall
Windows Firewall
Azure WAF
Azure Key Vault
Intermediate Data Connectors
Azure Information Protection
Dynamics 365
Azure Kubernetes Service (AKS)
Qualys Vulnerability Management
Advanced Data Connectors
Azure Active Directory Identity Protection
Threat Intelligence TAXII
Microsoft Defender Threat Intelligence
Microsoft Defender for IoT

Considerations:

  • Free data – Yes! Some data is always free, please reference the official list of free data sources.
  • Microsoft Sentinel benefit for Microsoft 365 E5, A5, F5 and G5 customers – Customers that are currently paying for those licenses can receive a “a data grant of up to 5MB per user/day to ingest Microsoft 365 data”.  For information on the Sentinel benefit, please review the information here and Rod Trent’s blog post on locating the free benefit.
  • Ingestion Time Transformation – Many tables also support ingestion time transformation, which is another way to reduce costs. Partners can use ingestion time transformations to filter out data that is not useful for security analysis. There is also a library of transformations available. If you want to see some examples, please reference my blog post on disguising data. As you can see in my post, you can also use these transformations to mask data.
  • Commitment Tiers – Previously known as Capacity Reservations, this is another way to reduce costs, as much as 65% compared to pay-as-you-go.
  • Storage Options – See the Storage Options section in Part 3.

In Part 3 of this series of posts, I cover the following topics: Agents and Forwarders, Sample Data, Storage Options, Repositories, Cross-workspace, and Other Resources.

Sentinel POC – Architecture and Recommendations for MSSPs – Part 1

TL;DR – Common topics that come up when partners, specifically MSSPs, are testing Microsoft Sentinel features to evaluate its SIEM and SOAR capabilities. Part 1

If you are the first in line to take advantage of the recently announced service Security Copilot, the best step you can take now is ensure you are using Defender and Sentinel. Part of my job is helping partners that offer managed security services and are evaluating migration from legacy SIEM solutions to Sentinel. Based on my experience, I’ve put together this guide to hopefully answer many of the questions I receive from partners as they work on Sentinel POCs.

This post is a part of series that covers various topics from the very basics, to ensure partners that may be familiar with other SIEMs, but that are not yet familiar with Azure can get all the information they need to be successful.

If the Contoso Hotels demo instance is not sufficient to evaluate specific Sentinel features, such as testing MSSP type configurations, then partners will need to build their own environments. The following sections will go over the options available, as well as recommendations on how to go about building these environments.

MSSP Architecture Goal

The diagram below shows an overview of the typical architecture an MSSP partner should build to evaluate Sentinel’s capabilities. At the core of Sentinel is a Log Analytics Workspace (LAW), where Sentinel is configured. Both Sentinel and the LAW are resources that exist within a resource group, which exists within a subscription. MSSPs will also need to deploy those resources within a subscription, which is associated with the MSSP tenant, to have access to MSSP customers’ resources using Azure Lighthouse.

Tenants and Subscriptions for the Sentinel POC in the context of an MSSP

Tenants – Partners will need a tenant that will work as the MSSP tenant and at least one tenant that will work as the customer’s tenant. Microsoft Sentinel and its associated Log Analytics Workspaces are subscription resources. However, all subscriptions must be associated with a tenant. So, that’s where it all starts.

Subscriptions – Partners will need a subscription within the MSSP tenant and at least one subscription within each of the customer tenants. A subscription is needed because the Log Analytics Workspace (LAW) where the data is ingested and Sentinel, which is a service deployed on a LAW, are both resources that exist within a subscription.

Considerations:

  • Which tenant will be the MSSP tenant? Partners performing a POC can choose to use their corporate tenant as their MSSP tenant. However, the ultimate goal should be to isolate the MSSP tenant, using the multiple identities model described on my previous post, MSSPs and Identity. If the requirement is to follow the same procedures that will be expected to be followed during go-live, then create a new tenant. If the requirement is just to test Sentinel’s features for a period of time, then partners can just use the single identity model, i.e., the corporate tenant.
  • Are there any options or credits to cover the costs of tenants/subscriptions? – Partners cannot use the CDX environments by themselves because those environments do not include a subscription and they have restrictions that prevent anyone from adding payment instruments, which is required to create a new subscription. However, partners can attach a Visual Studio subscription to one of those tenants. The Visual Studio subscription is offered as part of the Developer Program. This same program offers a Microsoft 365 developer sandbox, which can be the MSSP tenant as well. Therefore, partners can combine that Visual Studio subscription with the Microsoft 365 developer sandbox, and that will result in a tenant and a subscription with the costs covered by the developer program. This is very useful because partners will get an E5 license with that tenant, which means they will be able to test scenarios using some of the Defender 365 Security services.
  • Free Trial – As noted in the pricing guide, New workspaces can ingest up to 10GB/day of log data for the first 31-days at no cost. Both Log Analytics data ingestion and Microsoft Sentinel charges are waived during the 31-day trial period. This free trial is subject to a 20 workspace limit per Azure tenant.
  • Which region? – This may not be as important for a POC, but if the partner is trying to follow the same procedures that will be expected during go-live, then this information will be useful. There are various elements to consider when evaluating the region where the Log Analytics Workspace will be created, such as egress costs, feature availability, compliance requirements, etc. There is a decision tree available in the documentation that can guide partners when making these decisions.
  • An Isolated subscription – Microsoft recommends the Sentinel workspace be placed on a separate subscription or even better, a separate management group, to be able to isolate permissions of the security data and prevent permissions being inherited. More on permissions below.
Required Permissions

As I shared in a previous blog post, MSSPs and Identity: Q&A, Azure permissions can be at tenant level, i.e., Azure AD roles, or they can be at subscription/resource/management group level, i.e., Azure RBAC roles. The diagram below references the two types of permissions.

As resources that exist within a subscription, both Sentinel and Log Analytics Workspaces require Azure RBAC roles. To be able to create the Log Analytics Workspace, or any other resource within a subscription, users will need at least contributor role within that subscription, as referenced in the documentation. Additionally, some users will need to have the owner permission, so they can delegate the required access over the workspace to other users.  As I mentioned above, permissions can be inherited, so any users assigned permissions at management group level may inherit those permissions at subscription, resource group, and resource level.

Once the Log Analytics Workspace is created, as noted in the documentation, users will need the contributor role within the subscription to enable Sentinel. Once Sentinel is onboarded, partners need to assign permissions within Sentinel to their SOC teams, so they can manage Sentinel workspaces.  The permissions are shown below and also covered in detail in the documentation.

Azure Lighthouse

Partners can use Azure Lighthouse to configure delegated access at subscription or resource group level, so they can access their customers’ Sentinel workspaces. On one of my previous posts, I discussed in detail how to delegate access using Azure Lighthouse for a Sentinel POC. Furthermore, I go into detail about a more advanced scenario where partners can create a configuration that allows them to assign access to managed identities in the customer tenant. This will be required for partners that need to create playbooks (Azure Logic Apps) on the customer’s subscription, which may require them to assign permissions to the identities associated with those playbooks.

Partners can use the template option I describe in my blog post for a POC. However, they should plan to publish an Azure Lighthouse marketplace offer for their go-live, so their customers can easily delegate access to them using the public offer. For that reason, I recommend that prior to go-live partners create a private offer in the marketplace, which can be available only to specific tenants for initial testing purposes. Going through the process is highly recommended because it gets partners familiar with the process of publishing the offer.

The same process I described in this section can be used by partners to request delegation of access to manage any other security services that exist at subscription level. For example, Defender for Cloud (MDC) and its various Defender plans, including Defender for Servers, Defender for Containers, Defender for Storage, etc., as well as Defender for IoT. The only difference is the role required to manage those, i.e., Security Admin and/or Security Reader.

In Part 2 of this series of posts, I cover the following topics: B2B or GDAP, CSPs, Where is the data?, Migrations, Which connectors?

My adventures with Sentinel and the OpenAI Logic App Connector

TL;DR – Sentinel automation playbooks using the OpenAI Logic App connector.

A few of my partners have been brainstorming ways to integrate OpenAI with Microsoft Sentinel, so I set out to do my own research (read: playing). I read a few blogs where people were using the OpenAI connector to update comments and even add incident tasks, which was impressive and inspiring! However, I wanted to go a little further. I had two main goals during my initial testing:

  1. I wanted to separate the tasks. The original testing I saw being done with Sentinel was inspiring and impressive, but the steps that OpenAI recommended were all together in one task. I wanted to separate them into distinct tasks because that’s one of the great qualities about this tasks feature, being able to see the progress of those tasks as they are completed.
  2. I wanted to update additional information within the incident, not just update comments and add tasks. Specifically, I wanted to adjust the severity depending on the information that OpenAI was able to provide. And I wanted to add a tag that noted this incident had been updated by OpenAI.

By the way, I am using two connectors, The Microsoft Sentinel Logic App and the OpenAI Logic App connectors. Please note, when using the OpenAI Logic App connector, the key needs to be entered as “Bearer YOUR_API_KEY“, as noted in the documentation. Otherwise, you will get a 401 error.

A quick warning before you continue reading, this blog post is about testing what is possible, which may not be perfectly accurate or ideal for production scenarios at this time.

Separating the tasks

My initial goal was to separate the tasks. This is what I mean by separating the tasks. When I followed the steps from the initial blogs I read, I could see the tasks were being added into one task, as shown below.

So, this is how I separated the tasks. First, my prompt tells OpenAI specifically that I am looking for 3 steps and that I *only* want to see the first step, and I’ll let it know when I am ready for the next steps. I am only using the Incident Description in the prompt, but you can probably add additional information, such as the title, entities, tactics, techniques, etc.

So, once I get the output from that first step, I then feed it to “Add task to incident action“, and I name that step “Task no.1 from OpenAI“. Notice that I am passing it within a “For each” container, the reason for this is because I really just need the text within it, otherwise I’ll get some of the other information that comes with the output, and it just doesn’t look pretty. 🙂

And then I add similar actions for the next steps. However, this time the prompt says ‘Ready for the 2nd step…

And finally, the last step in my test.

Now, when I run my playbook, it ends up adding separate tasks that look like this.

Now instead of having all the steps in one task, I get separate tasks that an analyst can now check to complete, which would allow me to see the progress as the tasks are completed.

I still have some challenges because the behavior from the ChatGPT UI is not quite the same as when I use the API, but I was able to make it work using the prompts noted above. There’s probably more work to be done in that area.

Updating additional information

I covered the items on the left branch of my Logic App above. Now, let’s move to the right branch.

I am getting information from OpenAI on what the severity for my incident should be for this type of incident. Again, for my test this is based on Incident Description, but you can probably add additional information, such as the title, entities, tactics, techniques, etc.

And again, I am passing the out within a “For each” container, because I really just need the text within, and it wouldn’t work if I just use choices, because the format of the severity attribute would not be correct. Additionally, I am also adding a tag to highlight that the severity has been set according to the information received from OpenAI. Finally, I am also updating the status to ‘Active‘, this is really just to make my testing easier.

So, when I run the playbook, I can see in my activity log that the severity and status have been updated, and the tag was added, as shown below.

And I can see them updated as well.

Final thoughts

If you want this playbook to trigger automatically, don’t forget to assign your playbook’s managed identity the Microsoft Sentinel Responder Role. You can do this within Logic Apps, as shown below.

And if you need your SOC analysts to do this for customers, check out my previous blog post on this topic.

I am just getting started testing this integration, but I can already see the potential it has to help SOC analysts. This specific scenario may not be the right playbook for common incidents, but it may provide a head start with uncommon incidents. As usual, I hope this blog post is useful and I hope it sparks some ideas about how to use these features for your own requirements.

MSSPs and Identity: Q&A

TL;DR – Follow-up to the previous blog post to answer common questions

After I published the last blog post on MSSPs and Identity, I received various questions, and I thought it would be useful to answer the most common ones via this follow-up post. Let’s jump right in!

What is the difference between delegating access for Sentinel and/or Defender for Cloud (MDC) vs delegating access for Microsoft 365 Defender?

As I shared on previous posts, you can delegate access to Sentinel and to MDC using Azure Lighthouse. For the list of Azure subscription level roles, please reference the Azure built-in roles. But you cannot use Azure Lighthouse to delegate access for Microsoft 365 Defender. That’s because both Sentinel and MDC have permissions at Azure subscription level, whereas Microsoft 365 Defender has permissions at tenant level. In the diagram below, the Microsoft 365 Defender roles exist in the dark blue area, which is tenant level, while the Sentinel and MDC roles exist in the light blue area, which is subscription level.

For the list of tenant level roles, please reference the Azure AD built-in roles. As an MSSP, your customers can grant you access to their Microsoft 365 Defender tenants using either B2B or GDAP.

What is the difference between B2B and GDAP?

There are probably quite a few differences, but the one that MSSPs probably care the most about is that B2B collaboration users are represented in the customer’s directory, typically as guest users. Some partners have compliance requirements that do not allow that type of configuration. Luckily, in the case of GDAP, there is no guest user in the customer’s tenant. However, customers can still view sign-ins from partners by querying for ‘Cross tenant access type: Service provider‘, as shown below.

Also, GDAP is configured via Partner Center, so it’s exclusively for partners that are Cloud Solution Providers (CSPs). There is a great document that includes security best practices for CSPs, I highly encourage partners to review those. I especially encourage partners to take advantage of the free Azure AD P2 subscription.

Personally, I use B2B for all my testing because I don’t have access to Partner Center. If, like me, you are working on a POC, B2B is a good option to simulate the behavior. Furthermore, if you are working on a POC, I recommend you try a new feature called cross-tenant synchronization, which is in public preview currently. It allows me to automatically provision users to my customer tenants (as guests) without having to invite them. With the configuration I am using, I just add them to a group, i.e. ‘SOC team’, and then that triggers the provisioning to the target tenant (customer tenant). Again, this is good for POCs, I would not recommend this for production scenarios.

What happens when my SOC team is working on an incident in Sentinel and there’s a link to the Microsoft 365 Defender alerts? How does it know which customer tenant the incident is associated with?

If you hover over the link in Sentinel, you’ll notice that it includes a tid (tenant id) value in the URL.

So, when you click on the link, you are redirected to the correct incident for the correct customer, as shown below. This will work as long as your user has been granted the necessary access on that tenant via B2B or GDAP.

I noticed the MDC documentation references a Security Admin, is that the same as the Security Administrator for Microsoft 365 Defender?

No, the Security Admin that grants permissions to MDC (and Defender for IoT) is at subscription level, whereas the Security Administrator that grants permissions to Microsoft 365 Defender is at tenant level.

Does Azure Lighthouse allow a customer to delegate access to two different partners (or tenants)?

Yes! I get this question because some partners have different tenants for users that are managing customer resources for different reasons. For example, there may be an MSSP tenant that just exists to manage security for customers and there may be a different tenant that exists to manage non-security services. In that case, partners may need to configure access for one customer but delegate different levels of access to different tenants. And, yes, it works as expected. It will just show as two different offers, as shown below:

Do I need a separate subscription for Sentinel?

A separate subscription is recommended for the Microsoft Sentinel workspace, and the main reason is permissions. If you think about it, this subscription will include very privileged data, so you want to implement tight controls over which users can access and make changes to the resources in the security subscription.

Can a partner create a subscription for a customer?

As a CSP, partners can create a subscription for their customers. Keep in mind, this subscription will still need to be associated with the customer’s tenant. This is very important. The billing of the subscription can be via the partner, which is possible for CSPs. However, the tenant associated with that subscription still needs to be the customer’s tenant. This is important because you have certain features, like ingestion of Microsoft Defender 365 data, UEBA, etc. that will need to be configured for that customer tenant. As you know, the data is always ingested into the customer’s subscription.

A customer can have any number of subscriptions associated with their main tenant and not all of them need to be billed in the same manner. That means, you can have a customer with 25 subscriptions associated with their tenant and the customer can be billed directly for 24 of those subscriptions, and one can be billed via the partner, as a CSP.

Is Microsoft 365 Lighthouse an option for MSSPs to gain access to Microsoft 365 Defender?

Microsoft 365 Lighthouse is a solution specifically for managing small- and medium-sized business (SMB) customers. CSPs will need to configure GDAP prior to onboarding customers to Microsoft 365 Lighthouse. It allows CSPs to manage some features within Microsoft 365 Defender and take certain actions. Please check the list of requirements, including the limit on the size of the tenant, which at the time of writing this blog is 2500 licensed users.

That’s it for now!

I hope these answers are useful. Keep those questions coming! As always, if I don’t know the answer, I’ll go find out and then we’ll both learn. 🙂

MSSPs and Identity

TL;DR – Identity configuration recommendations for MSSPs.

I’ve had this conversation with most of my partners at one point or another, which is probably because most of my partners are MSSPs. I’ve discussed this also during my Sentinel Deep Dive sessions for MSSPs, including the latest. It just keeps coming up and so I figured it would be easier to just publish this blog post.

I’ll warn you, dear reader, this blog post is my opinion, based on my personal experience, and I am happy to share my reasons.

The Challenge

MSSPs or Managed Security Service Providers have the responsibility to manage security services for their customers. Whether it is to access customers’ Sentinel workspaces or MDC via Lighthouse, as I’ve described here and here, or managing customers’ Defender 365 tenants, via GDAP or B2B, the MSSP identities have to exist somewhere. The challenge is deciding if your MSSP identities will exist within your corporate tenant or if you will create a separate MSSP tenant to manage your customers.

The Options

The Microsoft Sentinel Technical Playbook for MSSPs includes a section on “Azure AD tenant topologies” where they go over the pros and cons of the Single Identity Model vs the Multiple Identities Model. By the way, I encourage all MSSPs to read the entire whitepaper, since it’s a great resource.

Single Identity Model

Single Identity Model is where the MSSP corporate identity is used to access customers’ security services.

I can see this model working for POCs, where you are just testing the configuration, but not to access real customers. Yes, it is supported, but I would not recommend this as a final configuration goal. The reason is attacks on your corporate identities will not only risk your corporate data, but also your customers’ data. And vice-versa, customer attacks may also spread to your corporate resources.

Multiple Identities Model

Multiple Identities Model is where a new/separate tenant is deployed to manage the identities that have access to customers’ security services.

This model reduces the blast radius associated with any credential, device, or hybrid infrastructure compromise due to the common risks associated with the corporate tenant where employee accounts are used for day-to-day activities, including Microsoft 365 services. Think Zero Trust, specifically the assume breach principle. As a reminder, identity isolation is also one of the published CSP security best practices.

This is the ideal model to protect both your corporate resources as well as your customers’ resources. And if you are supporting or planning to support government organizations or organizations that need to meet government compliance requirements, then this is the model you will need to follow. Keep reading for more information on this. And, yes, it requires more work, but it is possible to configure and to automate as much as possible, including the JML (Joiners-Movers-Leavers) process. For a full overview of JML, please see my posts starting with part 1 here.

In-between?

Potentially there is also a third option, you could have separate identities within the same corporate tenant. This is not an option discussed on the whitepaper, but it is still an option to be considered. This is similar to what is explained on the Microsoft documentation about Protecting Microsoft 365 from on-premises attacks. The scenario described in the linked documentation is specifically targeted to use cloud-only accounts for Azure AD and Microsoft 365 privileged roles, which is exactly what the MSSP SOC analysts will have assigned to them on the customers’ tenants.

I see this option as a bare minimum for an MSSP, maybe one that doesn’t have the resources to manage a separate tenant and that has no plans to support customers that have to meet government compliance requirements. Although, you will still need additional configuration and a process to manage those accounts as user entitlements.

Compliance Requirements

Many MSSPs have authorizations that require them to meet compliance requirements among them government compliance requirements, such as FedRAMP. For those organizations to earn, and continue to hold, those authorizations they need have separate identities within the enclave. That means, not your regular corporate identity.

Here is a quote from my colleague, Rick Kotlarz, to expand on this topic:

In respect to U.S. Government / FedRAMP Information Systems, networks that have varying levels of security classification/impact levels always require separate identities. Those identities must also then be managed by an identity and access management system which is categorized at the same security classification/impact level.

Complete isolation of identities is not always required. One scenario where this isn’t the case, is when one or more network enclaves of the same security classification/impact level are federated or have a trust. Another scenario is when two or more network enclaves of varying security classification/impact levels implement a data diode. These are sometimes referred to as Cross Domain Solutions, that provide a bridge with limited data capabilities between these two networks. Typically, data is only permitted to travel from a lower security classification/impact level upward and is not bidirectional.

Because both scenarios require multiple levels of security leadership to accept the underlying risk of trusting an external identity provider operating outside of their purview, existence of these two scenarios are few and far between.

Furthermore, while some systems operating within a FedRAMP authorized environment may be Internet connected, they often are only authorized to support inbound data pulled from the Internet via highly restricted sources (e.g., Windows Updates).

Impact level reference: https://www.fedramp.gov/understanding-baselines-and-impact-levels/

I’ve worked with large MSSPs that followed the same entitlements management process for their government and for their commercial customer access because of the risk isolation I mentioned above. However, there was one main difference is the automation of the JML process. For commercial, they could just trigger a workflow to create/modify/delete the account on the MSSP tenant. For the government instance, they used a queue-based system, where the source would create a message in a mid-point area, that would then be picked up by the gov side process later. Basically, it would be a pull from the gov side, as opposed to a push to the gov side.

How?

Once MSSPs (and their auditors) come to the conclusion that the best, and sometimes only, option is the multiple identities model, then the “How?” questions begin. I am discussing below the most common questions I receive. I am sharing what I normally share with my partners, but I would love to hear other ideas.

How do we make sure these separate tenant accounts are removed once when the employees are terminated?

This is by far the no.1 question I get, and I completely agree, it should be the no.1 concern. This is where I go back to the JML (Joiners-Movers-Leavers) process. These external tenant accounts need to be tracked throughout the employee lifecycle, just like any other entitlement.

This is where Entra Identity Governance solutions, such as Lifecycle Workflows, can make this an automated process. There are a few existing templates, such as “Offboard an employee” or “Pre-Offboarding of an employee“, which trigger based on the emploeeeLeaveDateTime attribute, which you can then configure with rules based on specific attributes, such as department (i.e. ‘SOC’), or jobTitle, or a combination of attributes. This workflow will then execute a set of tasks, such as removing the user from groups and even running a custom task extension, which is basically a Logic App. You can configure that Logic App to take the steps to disable or remove that user from groups or access packages, etc. on the MSSP tenant, or any other steps you need to take to clean up that account.

How do we onboard and audit users on the separate MSSP tenant?

You can take similar actions for provisioning, by using tools such as Lifecycle Workflows joiner templates, as well as Access Packages withing Entra IGA Entitlement Management. Access Packages are groups of resources that are packaged together and can be assigned to or requested by users. You can create these within the MSSP tenant.

This just makes it easier to assign only those permissions the analysts will need within the tenant. You can also include in this package the MSSP tenant group membership they will need to access those customers’ resources as configured using Azure Lighthouse. Access packages also allow you to configure an expiration of those permissions, which can be extended upon request.

You can even use PIM, Privileged Identity Management, for managing those privileged groups. Additionally, you can also include access reviews for either the group membership or for the access packages, so you can consistently ensure only the right people have the right access and only for the amount of time they need it. Yes, our goal is still Zero Trust, and specifically here the principle of least privilege.

One thing to keep in mind for provisioning of users into an MSSP tenant on Azure Gov, is the compliance requirements to ensure the enclave is still isolated. Please see my note above on Compliance Requirements.

How will device based conditional access policies be implemented on the MSSP tenant?

The ultimate goal would be to have PAWs, Privileged Access Workstations, and those can be physical or virtual. I’ve seen organizations use jump-boxes (some call them bastions) in the past for this purpose. I am not an expert on cloud PCs, but it may be another option to explore given the ability to configure Conditional Access policies on those. You could then use Conditional Access policies with Identity Protection to protect those users and sign-ins in the same way you do for your corporate resources.

You can also use those conditional access policies to ensure MSSP SOC analysts only authenticate using phishing resistant methods, which in some cases may be a compliance requirement.

Summary

Configuring, maintaining, and monitoring a separate tenant means additional work, but it is the right thing to do in order to protect your customers’ resources as well as your corporate resources. Even if you don’t have compliance requirements that force you to select a more secure configuration, I would still highly encourage you to consider it. I know you will not regret it!

Update: There is a follow-up post to answer some questions that came up after this blog was published. Please reference MSSPs and Identity: Q&A

Sentinel Repositories

TL;DR – A quick introduction to Sentinel Repositories.

There’s a Puerto Rican saying ‘Nadie aprende por cabeza ajena‘, which loosely translates to ‘Nobody learns from someone else’s head (read: brain)‘. I am writing this blog post because I really hope you give this feature a try, so you can see how easy and useful it can be.

I recently attended a call where quite a high number of attendees had not yet tested the Microsoft Sentinel Repositories feature. Anyone that has attended any of my Sentinel Deep Skilling sessions knows that I am a huge fan of this feature. In fact, I show it live at every session. You can catch one of those sessions here. If you don’t want to watch all two wonderful hours of Sentinel fun, and you just want to see the repositories feature, you can skip to 1:13:45.

Configuration

It’s a pretty straightforward concept. As an MSSP or as a team that has a centralized management for several Sentinel workspaces, you can distribute content from a centralized repository. Currently Repositories supports Azure DevOps or GitHub repositories.

All you need to do is create a connection on those workspaces to your repository from the workspaces that you want to connect. If you need a sample repository to connect, please use the Sample Content Repository provided.

You just need to be able to authenticate to that repository in order to create a connection. So, yes, it can be a private repository.

The feature currently supports the six artifacts listed below: Analytic rules, Automation rules, Hunting queries, Parsers, Playbooks, and Workbooks.

There are also customization options. For example, the default configuration will only push new or modified artifacts since the last commit, but the trigger can be modified. You can also modify the specific folder that is synchronized.

Recently, a new feature was added where you can now use configuration files to prioritize some content and maybe exclude other content. This can be very useful for MSSPs that want to configure certain content for all customers, but specific content to specific customers. If you want to read more about this topic, I highly recommend you review the Microsoft Sentinel Technical Playbook for MSSPs, which you can find here: https://aka.ms/mssentinelmssp.

How it works

In this example I have a few analytic rules that are already synchronized to my workspace. I can tell they were synchronized by the Repositories feature because the ‘Source name‘ is ‘Repositories‘.

I want to push a new analytic rule to all the workspaces connected to this repository, so I commit the new file to this repository.

And I can immediately see that a new action has been triggered, as shown below.

I can further click on that workflow run to see how it progresses.

When it’s finally completed, I see the complete job message below. If there are any errors, I can still go and expand any section to get the details from that run.

And when I check back in my workspace(s), I can see the new analytic rule was added as expected.

One last thing, if you are thinking ‘how can I export these artifacts?‘, here is a script created by one of the Sentinel PMs, which has been very useful for a few of the partners I am working with.

I encourage you to give this feature a try, especially if you are a partner that is already managing customers or looking to get started. Even customers that are centrally managing a variety of workspaces from various departments within an organization can find this tool to be highly beneficial. Have fun!